Solderdoodle Is An Open Source, USB Rechargable Soldering Iron

solderdoodle

Battery powered soldering irons are nothing new, but what about a soldering iron that can recharge via USB? [Solarcycle] realized that it might be handy to be able to recharge a portable soldering iron using such a ubiquitous connector and power source, so he developed the Solderdoodle.

The core component of the Solderdoodle is a Weller BP645 Soldering Iron. The heating element is removed from the Weller and placed into a custom case. The case is designed to be 3d printed. The STL files for the case are available if you want to make your own.

The Solderdoodle does away with large, disposable batteries and replaces them with a lithium ion battery pack. The battery contains no built-in protection circuitry in order to save space. Instead, this circuit is added later. [Solarcycle] appears to be using a circuit of his own design. The schematic and Gerber’s are available on his website.

The Instructable walks through all of the steps to build one of these yourself if you are so inclined. If you don’t have the spare time, you can fund the project’s Kickstarter and pre-order a production model. It’s always great to see a new commercial product with an open design.

[via Reddit]

Don’t Blink, Ken… Or The Weeping Barbie Will Get You

WeepingBarbies
That which holds the image of an Angel becomes itself an Angel. Have fun with that.

Barbie dolls have been around since 1959, but never before have they been this terrifying. [anthropolywog] decided to kick the creepy factor up a notch by modifying some poor, defenseless Barbie dolls into weeping angels.

If you aren’t familiar with the weeping angel concept, you probably don’t watch Dr. Who. The weeping angel episode, titled “Blink“, is now considered a classic Dr. Who episode. The basic premise is that some creepy, weeping stone statues can move only when no one is looking at them. Even closing your eyes for a moment to blink is enough to get them to move. It’s actually quite terrifying, but also awesome.

[anthropolywog] started by purchasing several ordinary Barbie dolls. She then cut off all of the arms at the elbow. This is because the Barbie arms do not normally bend at the elbow, and this was required to get that classic weeping angel pose. The hair was glued up into a bun, similar to the weeping angels from the show. The Barbies were then hot glued to wooden stands to make it easier to work on them.

Crinkle cotton fabric was then cut into a simple dress shape and draped over the dolls. The entire doll was then sprayed with a mixture of Elmer’s glue and water. This stiffens up the fabric and makes the whole thing look more statuesque.

The most complicated part was the wings. [anthropolywog] hand-made the wings from cardboard and craft feathers. This process took several hours of work in order to get something that would look right.

The dolls were primed for paint separately from the wings. The wings were then attached, and the whole doll was painted with “natural stone” textured spray paint. The final touch was to re-draw the faded eyes and mouths with a fine tipped permanent marker. You can see in the photo that the result turned out very well.

[via Reddit]

WiFinder Is A Python Driven Roommate Warning System

WiFinder

We’ve all been there. Your roommate is finally out of the house and you have some time alone. Wait a minute… your roommate never said when they would be back. It would be nice to be warned ahead of time. What should you do? [Mattia] racked his brain for a solution to this problem when he realized it was so simple. His roommates have been warning him all along. He just wasn’t listening.

Most Hackaday readers probably have a WiFi network in their homes. Most people nowadays have mobile phones that are configured to automatically connect to these networks when they are in range. This is usually smart because it can save you money by not using your expensive 4G data plan. [Mattia] realized that he can just watch the wireless network to see when his roommates’ phones suddenly appear. If their devices appear on the network, it’s likely that they have just arrived and are on their way to the front door.

Enter wifinder. Wifinder is a simple Python script that Mattia wrote to constantly scan the network and alert him to new devices. Once his roommates are gone, Mattia can start the script. It will then run NMap to get a list of all devices on the network. It periodically runs NMap after this, comparing the new host list to the old one. If any new devices show up, it alerts with an audible beep and a rather hilarious output string. This type of scanning is nothing new to those in the network security field, but the use case is rather novel.

Build A Bass Master 3000 Carnival Game

Bass Master 3000

We’ve all been there. You are having fun walking around the carnival when you suddenly find yourself walking past the carnival games. The people working the booths are taunting you, trying to get you to play their games. You know the truth, though. Those games are rigged. You don’t know how they do it. You just know that they do… somehow.

Now you can put your worries to rest and build your own carnival game! [John] built his own “Bass Master 3000” style carnival game and posted an Instructable so you can make one too.

The game is pretty straightforward. You have a giant fish-shaped target with a wide open mouth. You take hold of a small fishing reel with a rubber ball on the end. Your goal is to cast the ball out and hit the fish in its big mouth. If you hit the mouth, you get to hear a loud buzzer and see some flashing lights. The system also uses a webcam to take a candid photo of the winner. A computer screen shows all of the winners of the day.

The brain of the system is an Arduino Yún. The Yún is similar to an Uno but it also has some extra features. Some good examples are an Ethernet port, a wireless adapter, and an SD card slot. The mouth sensors are just two piezo elements. Each sensor is hooked up to the Arduino through a small trim pot. This allows you to dial in the sensitivity of each sensor. The lights and the buzzer are controlled via a relay, triggered by a 5V digital pin on the Arduino.

The Yún actually has a small on-board Linux computer that you can communicate with from inside the Arduino environment. This allows [John] to use the Yún to actually take photos directly from a web cam, store them on the local SD card, and display them on a local web server. The web server runs a simple script that displays a slide show of all of the photos stored on the card.

The final piece of the game is the physical target itself. The target is painted using acrylic paint onto a small tarp. The tarp is then attached to a square frame made from PVC pipe. The mouth of the fish is cut out of the tarp. A large piece of felt is then placed behind the hole with the piezo sensors attached. A short length of copper pipe helps to weigh down the bottom of the felt and keep it in place. The important thing is to make sure the felt isn’t touching the tarp. If it touches, it might be overly sensitive and trigger even when a player misses.

Now you know how to build your own Bass Master 3000 carnival game. Whether you rig the game or not is up to you. Also, be sure to check out a video of the system working below. Continue reading “Build A Bass Master 3000 Carnival Game”

Solder Stencil

How To Laser Cut Mylar Solder Stencils

When you think about the difficulties of working with surface mount components, the first thing that often comes to mind is trying to solder those tiny little parts. Instead of soldering those parts by hand, you can actually apply solder paste to the pads and place all of the components on at once. You can then heat up the entire board so all of the parts are soldered simultaneously. It sounds so much easier! The only problem is you then need a solder stencil. You somehow have to get a thin sheet of material that has a perfectly sized hole where all of your solder pads are. It’s not exactly trivial to cut them out by hand.

[Juan] recently learned a new trick to make cutting solder stencils a less painful process. He uses a laser cutter to cut Mylar sheets into stencils. [Juan] appears to be using EagleCAD and Express PCB. Both tools are available for free to hobbyists. The first step in the process is to export the top and bottom cream layers from your CAD software.

The next step is to shrink the size of the solder pads just a little bit. This is to compensate for the inevitable melting that will be caused by the heat from the laser. Without this step, the pads will likely end up a little bit too big. If your CAD software exports the files as gerbers, [Juan] explains how to re-size the pads using ViewMate. If they are exported as DXF files, he explains how to scale them using AutoCAD. The re-sized file is then exported as a PDF.

[Juan’s] trick is to actually cut two pieces of 7mil Mylar at the same time. The laser must be calibrated to cut all the way through the top sheet, but only part way into the bottom piece. The laser ends up slightly melting the edges of the little cut out squares. These then get stuck to the bottom Mylar sheet. When you are all done cutting, you can simply pull the sheets apart and end up with one perfect solder stencil and one scrap piece. [Juan] used a Full Spectrum 120W laser cutter at Dallas Makerspace. If you happen to have this same machine, he actually included all of the laser settings on his site.

DIY Hydroponic System Grows Herbs On The Wall

Wall-Mounted Hydroponic Garden

Everyone knows that you should eat healthy, but it’s not always easy. Fresh and healthy foods are often more expensive than processed foods. When money is tight, sometimes it’s best to just grow your own produce. What if you don’t have room for a garden, though?

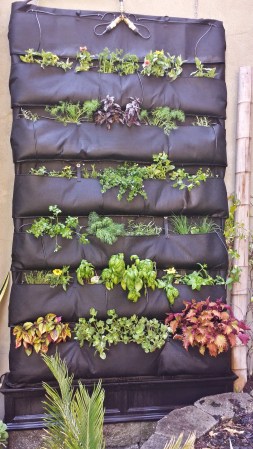
When [Matthew] returned home from the 2014 San Mateo Maker Faire, he found himself in a similar situation to many other faire attendees. He saw something awesome and was inspired to build it himself. In this case, it was a wall-mounted hydroponic garden. [Matthew] started out with some basic requirements for his project. He knew which wall he wanted to cover with plants, so that gave him the maximum possible dimensions. He also knew that they may have to remove the garden temporarily to perform maintenance on the wall in the future. And as for what to grow, [Matthew] loves lots of flavor in his foods. He chose to grow herbs and spices.

[Matthew] purchased most of the main components from Amazon and had them shipped to his doorstep. Everything else was found at the local hardware store. The base of the build is an off-the-shelf planter box. The drainage hole in the bottom was plugged up to prevent water from leaking out. A different hole was drilled in the side of the box to allow a garden hose to be mounted to the box. The hose is connected through a float valve, keeping the water level inside the box just right.

[Matthew] then built a frame out of dimensional lumber. The frame ended up being about 4.33 feet wide by 8 feet tall. The boards were fastened together with metal braces and mounting plates. A full sheet of plywood was then nailed to the front of the frame. Thick plastic sheet was then wrapped around the frame and stapled in place.

[Matthew] purchased giant planter pockets to actually hold the plants. He tried stapling them to the front of the frame, but discovered that staples were not strong enough to hold the weight of the plants, soil, and water. He instead used screws and washers.

Next, a submersible pump was mounted inside the bottom planter box. This pump is used to circulate the water and nutrients up to the plants above. Two hoses were connected to the pump and run up the sides of the upper frame. These hoses evenly distribute the water to the plants.

The final step was to mount the unit in place against the wall. [Matthew] didn’t want to screw into the wall and cause any damage. Instead, he placed a couple of bricks inside of the planter box and rested the bottom of the frame on top of those. The top of the frame is essentially hung from a railing up above with some thin steel wire.

The whole unit looks very slick and takes up little space. With some more ingenuity, one could likely build something similar with even more DIY components to save some more money.

Raspberry Pi Bluetooth Receiver For Your Car Stereo

RasPi Car Audio

The ability to play music in your car over a Bluetooth connection is very handy. You can typically just leave your phone’s Bluetooth module turned on and it will automatically pair to your car. Then all you have to do is load up a music player app and press play. You don’t have to worry about physically tethering your phone to the car every time you get in and out of the vehicle. Unfortunately Bluetooth is not a standard option in many cars, and it can be expensive to buy an aftermarket adapter.

[parkerlreed] built his own solution to this problem using a Raspberry Pi. He first installed arch Linux on his Pi. He also had to install pulseaudio and bluez, which is trivial if you use a package manager. He then modified some of the Linux configuration files to automatically bring the Pi’s Bluetooth adapter online once it is initialized by the kernel.

At the end of the boot sequence, the Pi is configured to automatically log in to a virtual console as [parkerlreed’s] user. The user’s bashrc file is then altered to start pulseaudio in daemon mode at the end of the login sequence. This allows the Pi to actually play the audio via the Pi’s sound card. The Pi’s stereo output jack is then plugged into the vehicle’s auxiliary input jack using a standard audio cable.

The Reddit post has all of the configuration details you would need to duplicate this setup. [parkerlreed] also includes some commands you will need to setup the initial pairing of the Raspberry Pi to your smart phone. Be sure to watch the video demonstration below. Continue reading “Raspberry Pi Bluetooth Receiver For Your Car Stereo”