From Nanoamps To Gigahertz: The World’s Most Extreme Op Amps

The operational amplifier, or op amp, is one of the most basic building blocks used in analog circuits. Ever since single-chip op amps were introduced in the 1960s, thousands of different types have been developed, some more successful than others. Ask an experienced analog designer to name a few op amps, and they’ll likely mention the LM324, the TL072, the NE5534, the LM358, and of course the granddaddy of all, the uA741.

If those part numbers don’t mean anything to you, all you need to know is that these are generic components that you can buy anywhere and that will do just fine in the most common applications. You can buy fancier op amps that improve on some spec or another, sometimes by orders of magnitude. But how far can you really push the concept of an operational amplifier? Today we’ll show you some op amps that go way beyond these typical “jellybean” components.

Before we start, let’s define what exactly we mean when we say “operational amplifier”. We’re looking for integrated op amps, meaning a single physical component, that have a differential high-impedance voltage input, a single-ended voltage output, DC coupling, and high gain meant to be used in a feedback configuration. We’re excluding anything made from discrete components, as well as less-general circuits like fixed-gain amplifiers and operational transconductance amplifiers (OTAs).

Continue reading “From Nanoamps To Gigahertz: The World’s Most Extreme Op Amps”

A Lego cup holder with a glass of water and electronics on a breadboard

LEGO Cup Holder Helps You To Stay Hydrated

Eat more fruit, exercise more, drink more fluids; early January is traditionally the time to implement New Year’s resolutions. Most of the common ones simply require willpower, but if it’s staying hydrated that you’re targeting, then some help is available. [Pepijn de Vos] designed a LEGO cup holder and an accompanying desktop app that tell you exactly how much water you’ve had so far, making it easier to get to those eight glasses a day.

The basic idea is simple: the cup holder contains a load cell that senses the weight of your drinking vessel. If the weight decreases, then a message is sent to your PC detailing the amount lost. If the weight increases, then the glass must have been refilled and the previous weight is disregarded. This way, the app simply needs to add up all the amounts reported, without having to compensate for the weight of the empty glass.

The tricky bit was integrating a load cell into the LEGO structure. It required some fiddling with Flex System hoses to ensure the platform’s weight rested only on the load cell, while still being stable enough to safely hold a full glass of water. The load cell is read out through an amplifier and A/D converter, while the USB communication is handled by a Teensy 3.

[Pepijn] modified an existing GNOME desktop widget to display a cup icon and the total volume consumed, which seems to work pretty smoothly judging from the video embedded below. All the code and even a complete set of LEGO build instructions are available on the project’s Github page. If simply monitoring your fluid intake isn’t enough of a nudge for you, then check out this device that floods your desk if you don’t drink enough.

Continue reading “LEGO Cup Holder Helps You To Stay Hydrated”

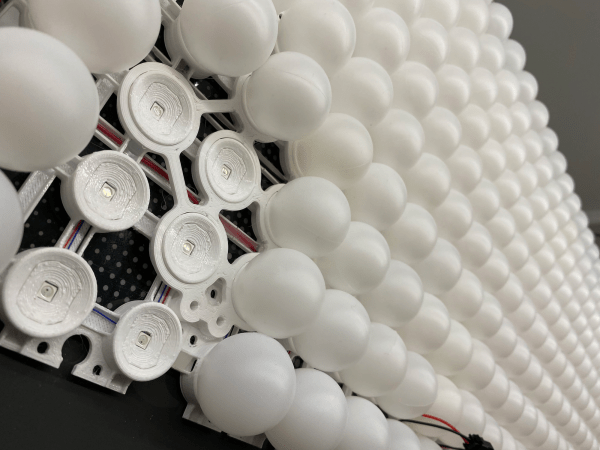
Detail of an LED display made using ping-pong balls

Modular Design Enables Huge Ping-Pong Ball LED Displays

Ping-pong balls have many uses: apart from playing table tennis, they have been used for countless art projects, science experiments, and even to raise ships from the bottom of the ocean. As it turns out, they also come in handy as diffusers for LED pixels, allowing the construction of large-size displays without requiring large individual LEDs.

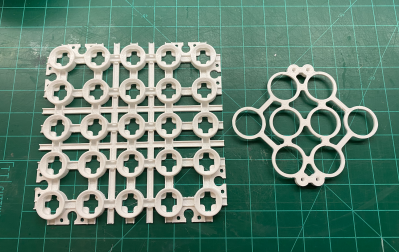
[david] designed an LED ping-pong ball display using 3D printed components, which allows for the construction of arbitrarily-large LED displays thanks to a strictly modular design. The basic unit is a small piece that holds a single LED module and has a cup-like structure for attaching a standard table tennis ball. Twenty-five of these basic units combine together into a panel that also contains wiring ducts. Finally, any number of these panels can be combined into a display, thanks to clips that give the structure rigidity in the out-of-plane direction.

A 3D-printed frame for making an LED display
A single panel holds 25 LEDs and comes with cable ducts. On the right is a clip for connecting multiple frames together.

Of course, simply mounting LED modules is not enough to create a display: the LEDs also need to be connected to power and data lines. [david] didn’t relish the thought of having to cut and strip 1,800 pieces of wire, and therefore devised a clever way of automating this process: he put a bunch of wires onto a piece of card stock and used a laser cutter to burn off the insulation at regular intervals. Then it was simply a matter of soldering these wires onto the LEDs and snipping off pieces along the data bus.

The finished panel is driven by a combination of a Teensy 3.2 to generate the data signals and a Raspberry Pi to process the images. You can see the rather impressive result in the video embedded below; if this inspires you to build your own, you’ll be happy to hear that the STL files and all code are available on [david]’s project page.

Massive LED displays are always fun to watch, and although this is not the first one to use ping-pong balls as diffusers, its modularity and open-source design makes this one perhaps the easiest to replicate. Assuming you have a good supplier of ping-pong balls, of course.

Continue reading “Modular Design Enables Huge Ping-Pong Ball LED Displays”

A NeoPixel Punk Console

NeoPixel Punk Console Drives WS2812s Using 555 Timers

NeoPixels, a type of LED strip with individually addressable pixels, are a firm favorite among creators of intricate light effects. They are popular for their versatility and the ease with which you can daisy-chain them. Although the protocol to drive these little LEDs can be rather tricky to implement due to tight signal timing constraints.

However, [Adrian Studer] proved that driving WS2812-based LED strips like the NeoPixel series doesn’t necessarily require hand-optimized assembly code. In fact, it doesn’t require any code at all. He built the NeoPixel Punk Console, a device that creates a light show without even using a microcontroller. Just a handful of 555 timers and some 74HC series logic work together to produce pulses with approximately correct timings.

Operating the device is as easy as tweaking a few potentiometers, just like its namesake the Atari Punk Console. It’s quite a random process though, and it might be impossible to re-create a pattern that you liked. Also, the LEDs mostly light up in primary colors at full power, though [Adrian] plans to make an improved version that drives the red, green, and blue subpixels separately. But the fact that all of this is implemented by just a bunch of 555 timers makes it a rather impressive hack by any standard.

We’ve seen more than a few ways of driving NeoPixels or similar WS2812-based LED strips, though all of them use a microprocessor of some sort; you can fire up a classic 6502, use SPI and DMA on a PIC32, or just plug in a single ARM Cortex M0+.

Continue reading “NeoPixel Punk Console Drives WS2812s Using 555 Timers”

A circuit sculpture based on an indicator tube

“Buggy” Circuit Sculpture Based On A Tuning Indicator Tube

If you’ve ever used an old tube radio, you might be familiar with that mysterious little green display that helps you to tune exactly to a station. That display is called a tuning indicator, or magic eye tube; in essence it’s a minimalistic cathode ray tube that can sweep its electron beam along only one axis. It thereby outputs a kind of bar graph that varies with the input voltage.

With few modern uses other than being pretty, it only makes sense that these tubes find their way into works of art: [Patrice] used one to make an insect-like piece of circuit sculpture. The tube he used is an EM34, which is one of the most common indicator tubes around and has a circular, iris-like display area. This becomes a large eye, peering forward from the bug’s body. The legs are made from 1.5 mm thick brass wire, while a DC/DC converter generates the 210 Volts DC needed to operate the tube.

An interesting “touch” is the addition of two antennae that are hooked up in such a way that the tube’s image changes when you push them; this interactivity makes the bug come alive a little bit. Speaking of touch, we think it would be prudent to put some insulation around the 210 V wires; even though the bug is battery-powered, touching the high voltage and ground wires simultaneously would deliver a nasty shock.

Nevertheless, the bare-wire retro design looks beautiful and would make a great ornament for any electronics-lover’s office. We’ve seen magic eye tubes being used for various purposes: you can turn them into a spectrum analyzer, measure capacitors with them, or simply use them as a bar-graph display. Continue reading ““Buggy” Circuit Sculpture Based On A Tuning Indicator Tube”

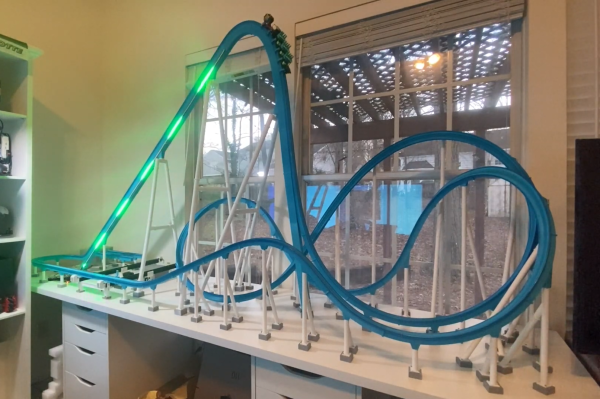
A model roller coaster

3D Printed Model Roller Coaster Accurately Simulates The Real Thing

While they don’t give the physical thrill of a real one, model roller coasters are always fun to watch. However, they actually make a poor analog of a full-sized ride, as gravitational force and aerodynamic drag don’t scale down in the same way, model roller coasters usually move way faster than the same design would in the real world. [Jon Mendenhall] fixed this deficiency by designing a model roller coaster that accurately simulates a full-sized ride.

The track and cart are all made of 3D printed pieces, which altogether took about 400 hours to print. The main trick to the system’s unique motion is that the cart is motorized: a brushless DC motor moves it along the track using a rack-and-pinion system. This means that technically this model isn’t a roller coaster, since the cart never makes a gravity-powered drop; it’s actually a small rack railway, powered by a lithium-ion battery carried on board the cart. An ESP32 drives the motor, receiving its commands through WiFi, while the complete setup is controlled by a Raspberry Pi that runs the cart through a predetermined sequence.

The design of the track was inspired by the Fury 325 roller coaster and simulated in NoLimits 2. [Jon] wrote his own software to generate all the pieces to be printed based on outputs from the simulator. This included all the track pieces as well as the large A-frames holding it up; some of these were too long to fit in [Jon]’s 3D printers and had to be built from smaller pieces. The physics simulation also provided the inputs to the controller in the form of a script that contains the proper speed and acceleration at each point along the track.

The end result looks rather slow compared to other model roller coasters, but actually feels realistic if you imagine yourself inside the cart. While it’s not the first 3D printed roller coaster we’ve seen, it’s probably the only one that accurately simulates the real thing. If you’re more interested in a roller coaster’s safety systems, we’ve featured them too.

Continue reading “3D Printed Model Roller Coaster Accurately Simulates The Real Thing”

The insides of a vacuum tube computer

1950s Vacuum Tube Computer Replica Communicates Through USB

When we talk about a “computer” today, we generally picture an electronic machine that can perform various kinds of mathematical operations, manage its program flow, move data from one place to another, and string all these functions together to perform some useful task. But once upon a time there were machines that could perform only a subset of these functions; these might be classified somewhere between computers and calculators.

One such machine was the Elektronensaldierer ES 24, built in 1955 by German computer pioneer Heinz Nixdorf. Its name translates as “electronic balancer”, with “balance” in the accounting sense meaning the difference of assets and liabilities. Designed to interface with a punch card machine from French manufacturer Bull, it contained several hundred vacuum tubes and could be used to add and subtract numbers stored on those punch cards.

[Henry Westphal] decided to make a modern copy of the ES 24 (translated), based on Nixdorf’s original schematics, for display in the HNF computer museum in Paderborn. The result is a huge display containing 204 tubes as well as a massive power supply. Like the 1955 original it can add incoming numbers and output the result as a twelve-digit decimal number. To make its inner workings visible, [Henry] also added a status light to each tube, showing whether it is storing a “0” or a “1”. This makes for a beautiful Blinkenlights display that shows the bits moving through the machine’s inner circuits.

Continue reading “1950s Vacuum Tube Computer Replica Communicates Through USB”