A small touchscreen displaying the Runbox GUI

Touchscreen-Powered USB Hub Selectively Powers Down Devices

One of the most useful features of the Universal Serial Bus is its hot-plugging capability. You simply plug in your device, use it, and unplug it when you’re done. But what if you’ve got a huge number of USB devices? You might not want to use all of them all of the time, but repeatedly unplugging and re-plugging them is inconvenient and wears out the connectors. [Matt G] fixed this problem by building the RUNBOX: a USB hub that can be controlled through a touchscreen.

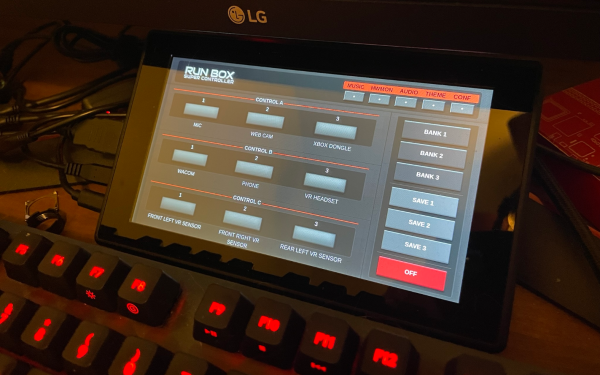
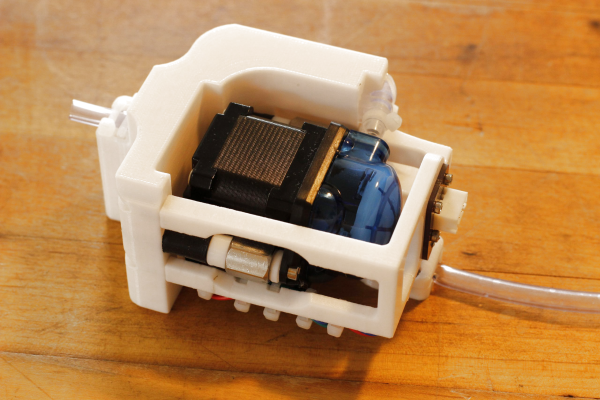
The USB hub part consists of a Yepkit YKUSH 3, which is a USB 3.1 hub that support software-controlled disconnecting of devices. [Matt] hooked up a Raspberry Pi to its ports so that it could switch devices on and off through a software command. To make it more user-friendly he added a touch screen controller and created an app using the Electron framework. This allowed him to enable or disable separate devices with a single touch: turn on the mic and webcam for video-conferencing, or fire up the VR headset and game controller for a gaming session.

A USB hub in a laser-cut wooden enclosure
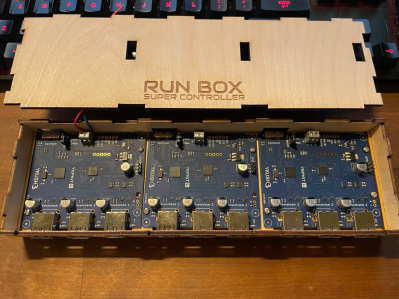
The modified USB hub is housed in a laser-cut enclosure with plenty of space to hook up a variety of USB devices. The touchscreen neatly fits just above [Matt]’s keyboard; this setup was inspired by head-down displays used in aircraft which similarly use a small additional screen for peripheral functions.

Although we’ve seen switchable USB hubs before, they usually require you to either press a manual switch or run dedicated software on your PC. We’ve also seen other sleek builds combining a Raspberry Pi with a USB hub.

A T700 laptop motherboard with its parts labelled

Replacement Motherboard Brings New Lease Of Life To Classic Thinkpads

“They don’t make them like they used to.” It might be a cliché, it might not even be entirely true, but there’s something special about owning a piece of hardware that was built to a much higher standard than most of its contemporaries, whether it’s that bulletproof Benz from 1992 or that odd fridge from 1987 that just seems to last forever. For laptop aficionados, the Thinkpad series from IBM and Lenovo is the ne plus ultra: beloved for their sturdy construction and rich feature set, they have been used anywhere from the United Nations to the International Space Station. The T60 and T61 (introduced in 2006) are especially famous, being the last generation sporting IBM logos and such classic features as 4:3 displays and infrared ports.

The thing is, even the best hardware eventually becomes obsolete when it can no longer run modern software: with a 2.0 GHz Core Duo and 3 GB of RAM you can still browse the web and do word processing today, but you can forget about 4K video or a 64-bit OS. Luckily, there’s hope for those who are just not ready to part with their trusty Thinkpads: [Xue Yao] has designed a replacement motherboard that fits the T60/T61 range, bringing them firmly into the present day. The T700 motherboard is currently in its prototype phase, with series production expected to start in early 2022, funded through a crowdfunding campaign.

Designing a motherboard for a modern CPU is no mean feat, and making it fit an existing laptop, with all the odd shapes and less-than-standard connections, is even more impressive. The T700 has an Intel Core i7 CPU with four cores running at 2.8 GHz, while two RAM slots allow for up to 64 GB of DDR4-3200 memory. There are modern USB-A and USB-C ports as well as well as a 6 Gbps SATA interface and two m.2 slots for your SSDs.

As for the display, the T700 motherboard will happily connect to the original screens built into the T60/T61, or to any of a range of aftermarket LED based replacements. A Thunderbolt connector is available, but only operates in USB-C mode due to firmware issues; according to the project page, full support for Thunderbolt 4 is expected once the open-source coreboot firmware has been ported to the T700 platform.

We love projects like this that extend the useful life of classic computers to keep them running way past their expected service life. But impressive though this is, it’s not the first time someone has made a replacement motherboard for the Thinkpad line; we covered a project from the nb51 forum back in 2018, which formed the basis for today’s project. We’ve seen lots of other useful Thinkpad hacks over the years, from replacing the display to revitalizing the batteries. Thanks to [René] for the tip.

The insides of an oscilloscope

Oscilloscope Probes Itself To Add Video

Modern oscilloscopes are often loaded with features, but every now and then you run into a feature that seems easy to implement yet isn’t available. [kgsws] wanted to use his Rigol DS1074 to show live measurements in his YouTube videos, but found out that this scope doesn’t support video output. Not to be deterred, [kgsws] decided to add this feature himself. In the video embedded below, he describes in detail the process of adding a USB Video Capture (UVC) interface to his oscilloscope.

The basic idea was to find the signals going into the scope’s display and read them out using a Cypress EZ-USB board. This is a development board that can be used to design USB devices, and supports the UVC mode. However, with no documentation of any of the Rigol’s internal circuitry [kgsws] had to probe the display connector to find out which pin carried which signal. And since he had no other scope available than this Rigol, he hooked up the various bits of the disassembled instrument so that it could (awkwardly) probe its own internal signals.

After mapping out its own display signals, it was time to hook them up to the EZ-USB board. [kgsws] achieved this by soldering about two dozen tiny wires to SMD pads on the motherboard. The EZ-USB board itself was placed in the back of the scope’s case, but had to be stripped of unneeded components in order to save space and power. A very clever trick was the addition of a reed switch, which allowed [kgsws] to set the EZ-USB board to programming mode without having to open the scope’s case, by simply holding a magnet near the switch.

After soldering a USB connector into a spare slot in the RF shield the project was complete. The Rigol can now be connected to a PC and will simply appear as a video capture device, ready to be streamed or captured for [kgsws]’s future project videos. We’ve seen other hacks on the Rigol DS1000Z series to capture a series of screenshots or to enable additional bandwidth and features, but adding a live video output was not one of the options so far. Continue reading “Oscilloscope Probes Itself To Add Video”

A Numitron clock showing "30 degrees C"

Simple But Stylish Numitron Clock Can Display Time, Date And Temperature

While it seems like Nixie tubes get all the attention when it comes to making retro-style displays, there are plenty of other display technologies that can make a good-looking retro design. Take the Numitron tube: introduced by RCA in the early 1970s, these display tubes might look superficially similar to Nixies but work in a completely different way. The Numitron uses incandescent elements that make up seven-segment displays.

The main advantage Numitrons have over Nixes is that they don’t require a high-voltage supply, which makes them much easier to hook up to modern low-voltage electronics. [mircemk] used this to his advantage when he built a simple clock using four numitrons that can display the time, the date, and the ambient temperature.

The brains of the device are formed by an Arduino Nano coupled with a DS3231 battery-backed real-time clock module. For now, the time has to be synchronized by connecting the Arduino to a PC and reprogramming it, but [mircemk] has plans to update the design with pushbuttons to allow the user to set the time manually.

Four shift registers are all that’s needed to interface the microcontroller to the display tubes, thanks to their low-voltage operation. They do need quite a lot of current, so [mircemk] used the high-power TPIC6C595 instead of a  regular 74HC595 chip. We wonder if the tubes’ high power consumption could be the reason why the temperature in his lab seems to hover around 30 °C.

A simple but stylish plastic enclosure completes the design. Since Numitron tubes are relatively low-cost and no other specialized components are needed, this could be one of the cheapest and easiest ways to make a retro display tube clock. Although we’ve seen a couple of Numitron clocks and even watches before, today’s build is a great example of how simple such a design can actually be. Continue reading “Simple But Stylish Numitron Clock Can Display Time, Date And Temperature”

The Silent Dripper Dispenses Water Without Making Any Sound

Engineering is all about making a design that conforms to a set of requirements. Usually those are boring things like cost, power consumption, volume, mass or compatibility with existing systems. But sometimes, you have to design something with restrictions you might have never considered. [Devon Bray] was tasked with designing a system that could dispense single drops of water, while making absolutely no noise. [Devon]’s blog describes in detail the process of making The Silent Dripper, which was needed for an art installation called The Tender Interval by [Sara Dittrich].

The design process started with picking a proper pump. Centrifugal pumps can be very quiet due to their smooth, continuous motion, but are not suitable for moving small quantities of liquid. Peristaltic pumps on the other hand can generate single drops of liquid very accurately, but their gripping-and-squeezing motion creates far more sound. [Devon] still went for the latter type, and eventually discovered that filling up the pumping mechanism with lithium grease made it quiet enough for his purpose.

The pump was then mounted on a 3D-printed bracket that also contained the water feeding tube and electrical connections to the outside world. The tubing was fastened with zip ties to stop it from moving when the pump was running, and the pump itself was isolated from the bracket with rubber dampening mounts.

Another trick to silence the pump was the motor driver circuit: standard PWM drivers often cause audible whine from the motor coils because of their abrupt switching, so [Devon] went for a Trinamic SilentStepStick that regulates the current much more smoothly. The end result is a water dripper that makes less noise than a piece of tissue paper being crumpled, as you can observe in the video (embedded below) which also demonstrates the complete art installation.

We really like the mechanical design of the Dripper; as far as we’re concerned it would merit a spot in a gallery on its own. It would not be the first water dripping art project either; we’ve already seen a sculpture that apparently suspends droplets in mid-air. Continue reading “The Silent Dripper Dispenses Water Without Making Any Sound”

A nixie tube next to a screenshot of a to-do list

Nixie Tube Indicator Tells You How Many Tasks You’ve Got Left To Do

For busy people, keeping track of all the tasks on your to-do list can be a daunting task in itself. Luckily there’s software to help you keep organized, but it’s always nice to have a physical artifact as well. Inspired by some beautiful nixie clock designs, [Bertrand Fan] decided to build a nixie indicator that tells him how many open items are on his to-do list, giving a shot of instant gratification as it counts down with each finished task.

The task-management part of this project is a on-line tool called Todoist. This program comes with a useful Web API that allows you to connect it your own software projects and exchange data. [Bert] wrote some code to extract the number of outstanding tasks from his to-do list and send it to an ESP8266 D1 Mini that drives the nixie tube. Mindful of the security implications of letting such a device connect directly to the internet, he set up a Mac Mini to act as a gateway, connecting to the ESP8266 through WiFi and to the Todoist servers through a VPN.

The little ESP board is sitting in a 3D-printed case, together with the nixie driver circuits and a socket to hold the tube. A ceramic tile glued to the front gives it a bit more of a sturdy, luxury feel to match the shiny glass and metal display device. The limitations of the nixie tube restrict the number of tasks indicated to nine, but we imagine this might actually be useful to help prevent [Bert] from overloading himself with too many tasks. After all, what’s the point of having this device if you can’t reach that satisfying “zero” at the end of the day?

Although nowadays nixie tubes are mostly associated with fancy clocks, we’ve seen them used in a variety of other uses, such as keeping track of 3D-printer filament, adding a display to a 1940s radio, or simply displaying nothing useful at all.

Continue reading “Nixie Tube Indicator Tells You How Many Tasks You’ve Got Left To Do”

Children playing a zombie shooting game on a big screen

Halloween Game Lets You Shoot Zombies With A Laser-Powered Crossbow

Suppose you were looking for all the essential elements to make a great Halloween-themed shooting game. Zombies? Check. Giant “lasers”? Check. Crossbows shooting forks? We’ve got you covered. Check out “Fork The Zombies“, which was set up by [piles.of.spam] to entertain the neighborhood kids this Halloween.

The game is played on a big screen, which shows a horde of angry zombies marching toward the player, who has to shoot as many as possible before they reach the front of the screen. The weapon provided is a crossbow; when the trigger is pulled, a fork is launched and hopefully skewers one of the ghouls. The game was written using an open-source engine called Urho3D, which takes care of all the hard-core 3D and physics work, allowing the user to focus on designing the gameplay and visuals.

A wooden crossbow game controller
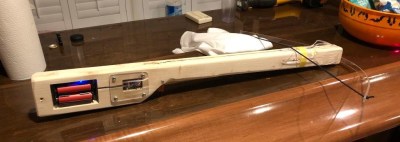
To give the game a bit more of a physical feel, [piles.of.spam] made an actual crossbow for the player to wield. Its handle was cut from a scrap piece of wood, using a band saw for the general shape and a CNC machine for the delicate cut-outs that hold a laser pointer, an ESP32 and a microswitch-based trigger. The laser shines onto the game screen, while the ESP32 sends out a data packet over WiFi when the trigger is pulled.

The location of the shot is tracked using a clever trick: a webcam is pointed at the screen, with a red color filter in front. This way, it only sees the red laser dot moving across the screen. The resulting image is processed using the Python OpenCV library, which provides functions to convert the relative motion of the pointer on the screen to an absolute position along the playing field.

A webcam on top of a Jetson Nano, with a red color filter in frontThe computing hardware consists of a pair of Jetson Nano boards, which sport quad-core ARM A57 CPUs as well as powerful graphics hardware to generate the game’s visuals. The end result is impressive, especially given the fact that all of this was designed and built in just three weeks. It was apparently a great hit with its intended audience, as visitors queued to try their hand at shooting the hungry zombies.

Laser pointers are an obvious tool for creating shooting games: we’ve seen ones with a single round target, a set of shapes set up around you, and even metal cans that fall over and stand up again. But if you need to protect yourself in case of an actual zombie apocalypse, a slingshot that shoots knives might be more useful.

Continue reading “Halloween Game Lets You Shoot Zombies With A Laser-Powered Crossbow”