Scrolling A Message On A Building In A Time Lapse Video

[Saulius Lukse] has a really interesting way of turning a couple of buildings into his own addressable display. The effect is not seen in real life, but is a clever video rendering with stock he pulled from time-lapse cameras. Now if you want to play Tetris using the windows of a building you add wireless lightbulbs to every window. But that’s a lot of work. You can fake playing Tetris (or scrolling messages in this case) if you just show a video of the buildings and swap in your own image manipulation.

4

[Saulius] starts with a time lapse sequence of a city scape. It needs to be one with a large building or two to provide a good scrolling surface. The building is extracted from the scene with the background transparent. The really time consuming part is creating a distinct image with one window lit for each window that is going to be used. This set of windows are the ‘pixels’ used to create the scrolling images. This is accomplished by masking out one image of the building with every office light turned off, then masking out each window individually with the office illuminated. This masking means everything going on around the building (traffic, weather, people) will be preserved, while the windows can be individually manipulated.

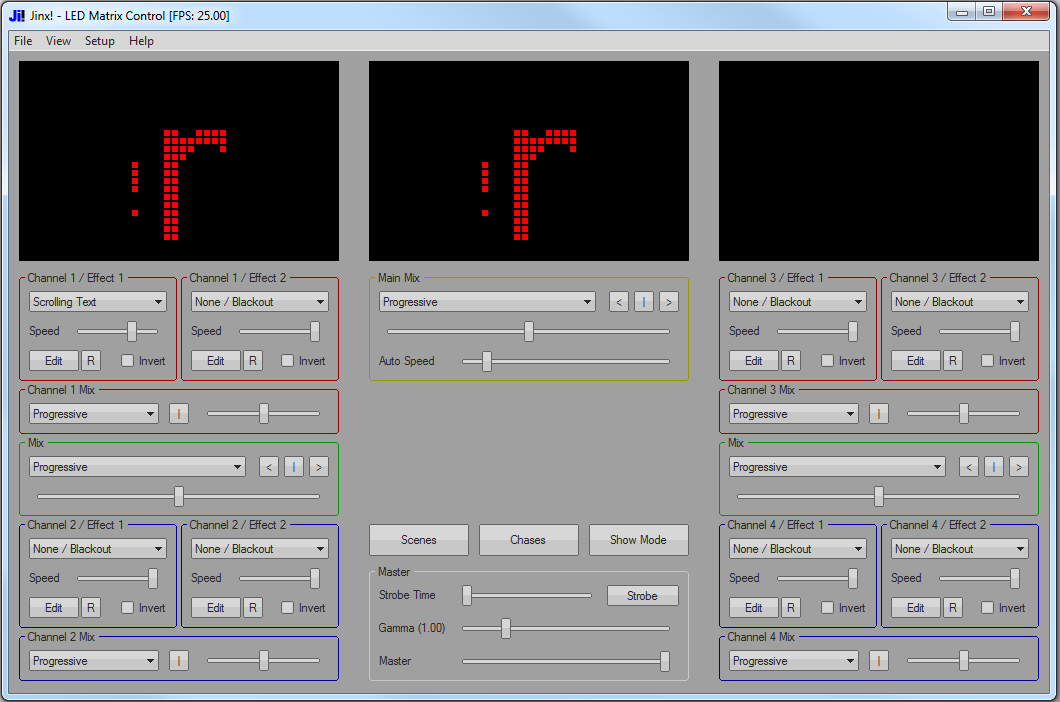
Next the program jinx is used to create the building animation. This program is designed to create scrolling messages on LED panels. [Saulius] provides a Python script that takes the images, the output of jinx, and combines them to create the final set of moving images.

The result is a city wishing you a “Happy New Year!”

Continue reading “Scrolling A Message On A Building In A Time Lapse Video”

How To Use Lidar With The Raspberry Pi

The ability to inexpensively but accurately measure distance between an autonomous vehicle or robot and nearby objects is a challenging problem for hackers. Knowing the distance is key to obstacle avoidance. Running into something with a small robot may be a trivial problem but could be deadly with a big one like an autonomous vehicle.

My interest in distance measurement for obstacle avoidance stems from my entry in the 2013 NASA Sample Return Robot (SRR) Competition. I used a web camera for vision processing and attempted various visual techniques for making measurements, without a lot of success. At the competition, two entrants used scanning lidars which piqued my interest in them.

Continue reading “How To Use Lidar With The Raspberry Pi”

Precision CNC Drawing With EtchABot

Turning the classic toy Etch-A-Sketch into a CNC drawing tablet intrigues a large number of hackers. This version by [GeekMom] certainly takes the award for precision and utility. Once you build something like this, you can hardly stop writing firmware for it; [GeekMom] produced an entire Arduino library of code to allow joystick doodling, drawing web images, and a self-erasing spirograph mode. The topper is the version that runs as a clock!

gallery

The major hassle with making a CNC version of this toy is the slop in the drawing mechanism. There is a large amount of backlash when you reverse the drawing direction. If that isn’t bad enough, the backlash is different in the vertical or horizontal directions. Part of [GeekMom’s] presentation is on how to measure and correct for this backlash.

The EtchABot uses three small stepper motors. Two drive the drawing controls and the third flips the device forward to erase the previous drawing. The motors are each controlled by a ULN2003 stepper motor drivers. An Arduino Uno provides the intelligence. Optional components are a DS3231 Real Time Clock and a dual axis X-Y joystick for the clock and doodling capability. Laser cut wood creates a base for holding the Etch-A-Sketch and the electronics.

The write up and details for this project are impressive. Be sure to check out the other entries in [GeekMom’s] blog. Watch the complete spirograph video after the break.

Continue reading “Precision CNC Drawing With EtchABot”

Recursive Soldering Iron Hacking

We’ve all done it. You’re walking out the door or maybe you’ve even gotten on the road when the question hits, “Did I leave the [coffee pot | stove | hair curler | soldering iron ] on?” [Daniel Johnson’s] problem was even worse. He couldn’t tell if his Hakko-936 soldering iron was off because the LED indicator wasn’t always on. Instead it flashed. He fixed that problem and along the way hacked his battery powered soldering iron since he was out of batteries. Now that’s perseverance.

Hacked Soldering Iron to Hack Soldering Iron
Soldering Iron Hack Recursion

The Hakko’s LED turned on whenever the power turned on to heat the tip. That was about every 5 seconds once the tip was hot. But just as a watched pot never boils, a watched LED never seems to flash. After determining the LED was driven by a comparator he decide to unsolder it as part of his hack. He wisely decided using the Hakko on itself was not a good idea so reached for the battery-powered portable iron, which was sadly battery-free. Undaunted, he wired the portable to a power supply and when 4.5 volts didn’t melt the solder cranked it up to 6 volts.

Back to the Hakko, he replaced the red LED with a RBG LED but used only the red and green leads. The green was tied to the 24v power supply through a hefty 47k ohm resistor, and the red was tied to the comparator. A little masking tape to hold things in place and provide insulation finished the job. Now when the Hakko is on the green LED is lit and the red LED shows the heating cycle. Quite clever.

Raspberry Pi Wind Measurement

A well organized approach to a project is a delight to see. [Pavel Gesyuk] takes just that approach with the experiments on his blog. Experiment 13 is a multi-part series using a Raspberry Pi as the heart of a weather station. [Pavel] is looking at wind speed and direction, and temperature measurement, plus solar power for the station. One of his videos, there are many, is after the break.

electrical_02_t
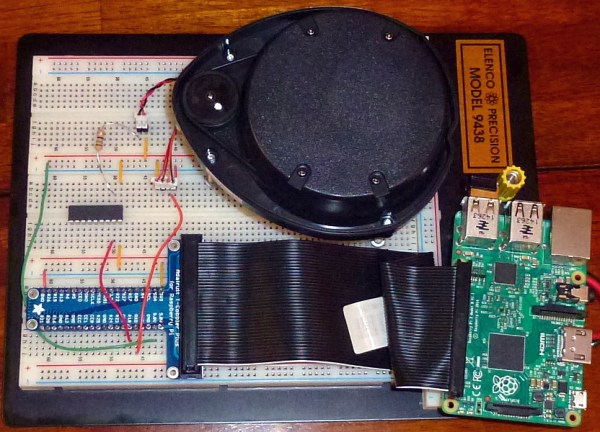
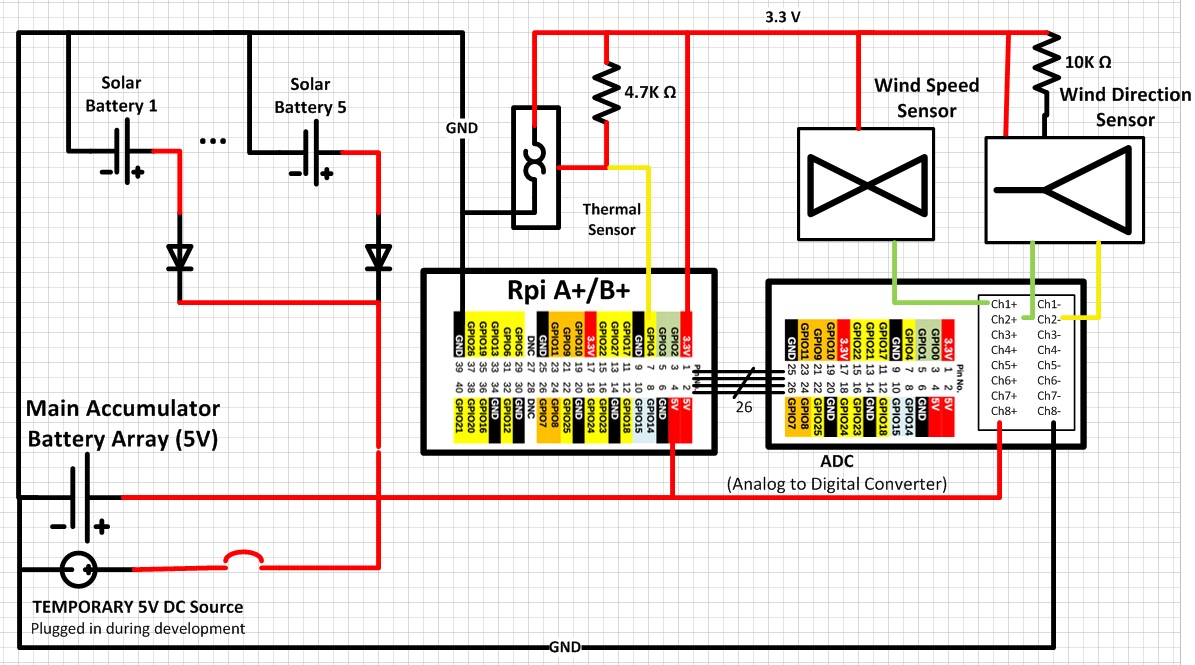
The anemometer and direction sensors are stock units wired to a Raspberry Pi A+ using an analog to digital daughter board. The data from the temperature sensor is acquired using I2C. During one part of the experiment he uses an EDIMAX WiFi adapter for collecting the data.

Python is [Pavel’s’ language of choice for development and freely shares his code for others to see. The code collects the data and displays it on a monitor connected to the Pi. The experiment also attempts to use solar power to charge batteries so the station is not dependent on mains power.

The mechanical assembly shows attention to detail commensurate with his project presentation and we respect how well organized the work is.

Continue reading “Raspberry Pi Wind Measurement”

Ham Radio Public Service Activities – Rewarding And Useful

“Hi! I’m Rud, Kilo Five Romeo Uniform Delta.” That’s me introducing myself at a ham meeting. Ham radio operators kid that we don’t have last names, we have call signs.

Becoming an Amateur Radio Operator (ARO), our more formal name, is not difficult and opens a world of interesting activities, including hacking. As with anything new, becoming actively involved with an existing club can be daunting. The other hams at a meeting are catching up with their buddies and often seem uninterested in the new guy standing nearby. Some groups will invite new members to stand and introduce themselves early in the meeting, which helps break the ice.

Regardless of how anyone else acts at the meeting there is one ham who is always looking for someone new – the ham who manages public service events, where amateur radio operators help establish communications for large public gatherings. These can be local bike rides, walks, or runs; I’ve even seen hams working an art show. In the nomenclature adopted since 9/11, these are “planned incidents” in contrast to “unplanned incidents” like hurricanes, tornadoes, forest fires, snow storms, and other natural or man made disasters. Working planned incidents is training for unplanned incidents when that need arises. The basic activities for AROs are the same.

Here in the Houston there are two very big events that enlist hundreds of hams. The big one in January is the Houston Marathon. The other large event is the Houston to Austin Multiple Sclerosis 150 (MS 150) mile bike ride in April. That event starts on Saturday morning, takes a break mid-way on Saturday evening, and finally wraps up late on Sunday evening. Starting in the fall there are warm-up events for the Marathon and in the late winter bike rides to prepare riders for the MS-150. There are also other marathons, Iron Man races, walks, runs, and races throughout the year. Wherever your are, there are probably events nearby and they can always make use of your radio capability.

landing-page-banners-51a

Continue reading “Ham Radio Public Service Activities – Rewarding And Useful”

PiNoculars – A Farseeing Pi Camera

The Raspberry Pi camera provides a 5 megapixel resolution with still images of up to 2592 x 1944 and multiple video modes including 2592 x 1944 at 15 frames per second. With it being mounted on a small board it is ideal for using in hacks. [Josh Williams] mounted the camera on the lens of binoculars to capture some startling images, including this squirrel.

The camera is installed on a custom, laser cut mount that fastens to one eyepiece of the binoculars. The Pi itself is mounted above the binoculars. An LCD touch screen from Adafruit allows [Josh] to select the image and adjust the focus. Snapping pictures is done using either the touch screen or switches that come with the screen.

The Instructable [Josh] wrote is extremely detailed and includes two different ways of mounting the Pi on the binoculars. The quick and dirty method just straps on with tape. The highly engineered method delves into Inkscape to design a plywood mount that is laser cut. For portable operation, [Josh] uses one of the ubiquitous battery packs meant for USB charging.

Basic setup of the Pi and camera are in a video after the break.

Continue reading “PiNoculars – A Farseeing Pi Camera”