Repairs You Can Print: Take A Deep Breath Thanks To A 3D Printed Fume Extractor

If you are a maker, chances are that you will be exposed to unhealthy fumes at some point during your ventures. Whether they involve soldering, treating wood, laser cutting, or 3D printing, it is in your best interest to do so in a well ventilated environment. What seems like sound advice in theory though is unfortunately not always a given in practice — in many cases, the workspace simply lacks the possibility, especially for hobbyists tinkering in their homes. In other cases, the air circulation is adequate, but the extraction itself could be more efficient by drawing out the fumes right where they occur. The latter was the case for [Zander] when he decided to build his own flexible hose fume extractor that he intends to use for anything from soldering to chemistry experiments.

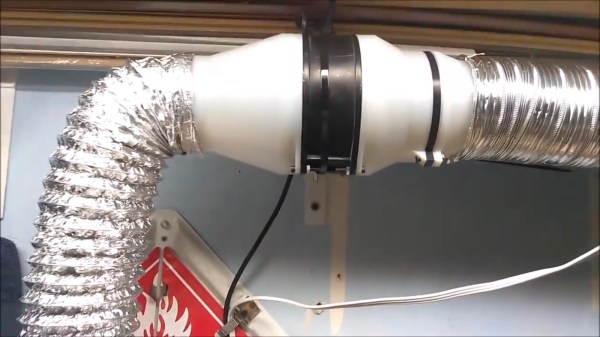
Built around not much more than an AC fan, flex duct, and activated carbon, [Zander] designed and 3D printed all other required parts that turns it into an extractor. Equipped with a pre-filter to hold back all bigger particles before they hit the fan, the air flow is guided either through the active carbon filter, or attached to another flex duct for further venting. You can see more details of his build and how it works in the video after the break.

Workspace safety is often still overlooked by hobbyists, but improved air circulation doesn’t even need to be that complex for starters. There’s also more to read about fumes and other hazardous particles in a maker environment, and how to handle them.

Continue reading “Repairs You Can Print: Take A Deep Breath Thanks To A 3D Printed Fume Extractor”

Seek And Exploit Security Vulnerabilities In An Infusion Pump

Infusion pumps and other medical devices are not your typical everyday, off-the-shelf embedded system. Best case scenario, you will rarely, if ever, come across one in your life. So for wide-spread exploitation, chances are that they simply seem too exotic for anyone to bother exploring their weaknesses. Yet their impact on a person’s well-being makes potential security holes tremendously more severe in case someone decides to bother one day after all.

[Scott Gayou] is one of those someones, and he didn’t shy away from spending hundreds of hours of his free time inspecting the Smiths Medical Medfusion 4000 infusion pump for any possible security vulnerabilities. Looking at different angles for his threat model, he started with the physical handling of the device’s user interface. This allowed him to enable the external communication protocols settings, which in turn opened to the device’s FTP and Telnet ports. Not to give too much away, but he manages to gain access to both the file system content and — as a result of that — to the system’s login credentials. This alone can be clearly considered a success, but for [Scott], it merely opened a door that eventually resulted in desoldering the memory chips to reverse engineer the bootloader and firmware, and ultimately executing his own code on the device.

Understanding the implications of his discoveries, [Scott] waited long enough to publish his research so the manufacturer could address and handle these security issues. So kudos to him for fighting the good fight. And just in case the thought of someone gaining control over a machine that is crucial to your vitality doesn’t scare you enough yet, go ahead and imagine that device was actually implanted in your body.

Reading Out An EPROM – With DIP Switches

We’re all too spoiled nowadays with our comfortable ways to erase and write data to persistent memory, whether it’s our microcontroller’s internal flash or some external EEPROM. Admittedly, those memory technologies aren’t exactly new, but they stem from a time when their predecessors had to bathe under ultraviolet light in order to make space for something new. [Taylor Schweizer] recently came across some of these quartz-window decorated chips, and was curious to find out what is stored in them. Inspired by the BIOS reverse engineering scene in Halt and Catch Fire, he ended up building his own simple reader to display the EPROM’s content.

The 2732 he uses is a standard EPROM with 32kbit memory. Two pins, Chip Enable and Output Enable, serve as main control interface, while 12 address pins select the data stored in the chip’s internal 4K x 8 arrangement, to output it on the 8 data output pins. You could of course hook up the EPROM to a microcontroller and send what you read via serial line, but [Taylor] opted for a more hands-on approach that lets him read out the data in a manual way. He simply uses a bank of DIP switches to set the address and control pins, and added a row of LEDs as display.

As you can see from the short demonstration in the video after the break, reading out the entire EPROM would be a rather tedious task this way. If you do have more serious intentions to read out the content, you could have a look at one of those microcontroller based solutions sending data via serial line after all.

Continue reading “Reading Out An EPROM – With DIP Switches”

Capture The Flag Challenge Is The Perfect Gift

Nothing says friendship like a reverse engineering challenge on unknown terrain as a birthday present. When [Rikaard] turned 25 earlier this year, his friend [Veydh] put together a Capture the Flag challenge on an ESP8266 for him. As a software guy with no electronics background, [Rikaard] had no idea what he was presented with, but was eager to find out and to document his journey.

Left without guidance or instructions, [Rikaard] went on to learn more about the ESP8266, with the goal to dump its flash content, hoping to find some clues in it. Discovering the board is running NodeMCU and contains some compiled Lua files, he stepped foot in yet another unknown territory that led him down the Lua bytecode rabbit hole. After a detour describing his adjustments for the ESP’s eLua implementation to the decompiler he uses, his quest to capture the flag began for real.

While this wasn’t [Rikaard]’s first reverse engineering challenge, it was his first in an completely unknown environment outside his comfort zone — the endurance he demonstrated is admirable. There is of course still a long way down the road before one opens up chips or counts transistors in a slightly more complex system.

Learn To Reverse Engineer X86_64 Binaries

Opening up things, see how they work, and make them do what you want are just the basic needs of the average hacker. In some cases, a screwdriver and multimeter will do the job, but in other cases a binary blob of random software is all we have to work with. Trying to understand an unknown binary executable is an exciting way to discover a system’s internal functionality.

While the basic principles of software reverse engineering are universal across most platforms, the details can naturally vary for different architectures. In the case of the x86 architecture, [Leonora Tindall] felt that most tutorials on the subject focus mostly on 32-bit and not so much on the 64-bit specifics. Determined to change that, she ended up with an extensive introduction tutorial for reverse engineering x86_64 binaries starting at the very basics, then gradually moving forward using crackme examples. Covering simple string analysis and digging through disassembled binaries to circumvent fictional security, the tutorial later introduces the Radare2 framework.

All example source code is provided in the accompanying GitHub repository, although it is advised to avoid looking at them to keep it more interesting and challenging. And in case you are looking for more challenges later on, or generally prefer a closer connection to the hardware, these MSP430 based capture the flag online challenges might be worth to look at next.

34C3: Microphone Bugs

Inspiration can come from many places. When [Veronica Valeros] and [Sebastian Garcia] from the MatesLab Hackerspace in Argentina learned that it took [Ai Weiwei] four years to discover his home had been bugged, they decided to have a closer look into some standard audio surveillance devices. Feeling there’s a shortage of research on the subject inside the community, they took matters in their own hands, and presented the outcome in their Spy vs. Spy: A modern study of microphone bugs operation and detection talk at 34C3. You can find the slides here, and their white paper here.

Focusing their research primarily on FM radio transmitter devices, [Veronica] and [Sebastian] start off with some historical examples, and the development of such devices — nowadays available off-the-shelf for little money. While these devices may be shrugged off as a relic of Soviet era spy fiction and tools of analog times, the easy availability and usage still keeps them relevant today. They conclude their research with a game of Hide and Seek as real life experiment, using regular store-bought transmitters.

An undertaking like this would not be complete without the RTL-SDR dongle, so [Sebastian] developed the Salamandra Spy Microphone Detection Tool as alternative for ready-made detection devices. Using the dongle’s power levels, Salamandra detects and locates the presence of potential transmitters, keeping track of all findings. If you’re interested in some of the earliest and most technologically fascinating covert listening devices, there is no better example than Theremin’s bug.

Continue reading “34C3: Microphone Bugs”

Coin Cell Powered Sea Turtle Research

Hacking and tinkering are always fun and games, but one just has to appreciate when all efforts are additionally aimed towards doing something good. [Nikos] sets an example by combining his interest in technology with his passion for wildlife conservation by creating a low cost and ultra-low power temperature logger — and he is using a coin cell for it.

As the founder of a sea turtle conservation project in Greece, [Nikos] enjoys building scientific instruments that help him and his team on their mission. With a goal to log the temperature every 10 minutes over a period of at least 180 days, he designed a PCB just big enough to hold a CR2032 coin cell. Fifty of them will eventually be sealed in waterproof enclosures, and buried in the sand for the whole research duration.

Limiting the design to its bare necessities, the rest of the PCB is housing a digital temperature sensor, an SPI EEPROM to hold all the recorded sensor values over those 180 days, and an ATmega328PB clocked by a 32.768kHz crystal. Wondering what to do with all the extra, unused pins of the ATmega, [Nikos] simply routed them to be accessible through pin headers, thus turning the data logger alternatively into a coin cell powered development board.

Assuming your logging interval requirements are significantly lower, you might be thrilled to hear that [Nikos] estimates a theoretical 7+ years an average coin cell could power the data logger in sleep mode, which makes him confident to reach the 180 days goal.