Reading Out An EPROM – With DIP Switches

We’re all too spoiled nowadays with our comfortable ways to erase and write data to persistent memory, whether it’s our microcontroller’s internal flash or some external EEPROM. Admittedly, those memory technologies aren’t exactly new, but they stem from a time when their predecessors had to bathe under ultraviolet light in order to make space for something new. [Taylor Schweizer] recently came across some of these quartz-window decorated chips, and was curious to find out what is stored in them. Inspired by the BIOS reverse engineering scene in Halt and Catch Fire, he ended up building his own simple reader to display the EPROM’s content.

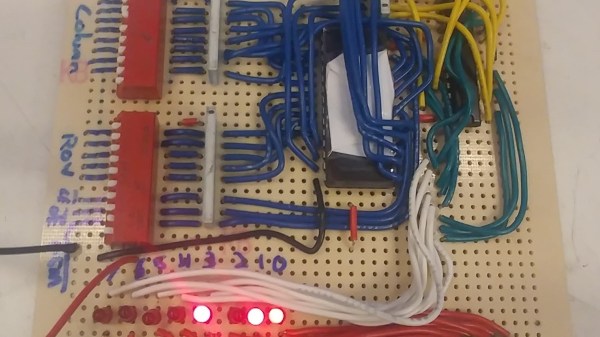
The 2732 he uses is a standard EPROM with 32kbit memory. Two pins, Chip Enable and Output Enable, serve as main control interface, while 12 address pins select the data stored in the chip’s internal 4K x 8 arrangement, to output it on the 8 data output pins. You could of course hook up the EPROM to a microcontroller and send what you read via serial line, but [Taylor] opted for a more hands-on approach that lets him read out the data in a manual way. He simply uses a bank of DIP switches to set the address and control pins, and added a row of LEDs as display.

As you can see from the short demonstration in the video after the break, reading out the entire EPROM would be a rather tedious task this way. If you do have more serious intentions to read out the content, you could have a look at one of those microcontroller based solutions sending data via serial line after all.

Continue reading “Reading Out An EPROM – With DIP Switches”

MicroPython Learns A New Trick – ISP For AVRs

One of the reasons why the Arduino became so popular was the ability to program it with ease. It meant the end of big parallel programmers that would cost an arm and a leg. The latest installment of CircuitPython from [Lady Ada] and the team over at Adafruit is a library for programming AVR microcontrollers without a dedicated PC.

For the uninitiated, in-system programming or ISP for AVR controllers employ the SPI bus to write the compiled binary to the flash memory of the controller. The discount on the number of pins used itself is a benefit though getting the timings right was a bit tricky in the good old days. Most dedicated ISPs handle this nicely, though they are normally slaves to a host PC where an ‘upload’ button initiates the process.

With CircuitPython (a derivative of MicroPython), programming microcontrollers does not require going through the code-compile-flash cycle. It can be run on a number of processors, however, AVRs are not among them so this neat little library offers the next best thing. Wire-up an Atmega328P or ATmega2560 to a board like the ESP8266 that does run CircuitPython, and you can write firmware on the fly.

There is a complete tutorial on the subject thanks to [Phillip Torrone] and [Lady Ada] which includes some demo files for testing out the functionality. This opens up a lot of possibilities where OTA firmware updates for an AVR co-processor. We expect to see some keychain AVR programmers in the near future taking a hint from the ESP8266 based Two-Factor Authentication featured previously.

Cardboard Wall Is Surprisingly Well Built

We all built cardboard forts when we were kids. [Paintingcook] has taken it into adulthood with a hand built cardboard wall. He and his wife leased a loft apartment. Lofts are great — one giant space to work with. Plans changed a bit when they found out they had a baby on the way. A single living, working, and sleeping space definitely wouldn’t be good for a newborn, so the couple set about separating a section of the room with a wall.

Sheetrock and steel or wood lumber would be the normal path here. They instead decided to recycle their cardboard moving boxes into a wall. The boxes were formed into box beams, which created the framework of the wall. The two pillars were boxed in and incorporated into the wall itself. The skin of the wall is a random patchwork of cardboard pieces. Most of the construction is completed with 3/8 ” screws and masking tape. Tape won’t last forever, but this is a temporary wall after all.

You might be wondering about fire hazards — sure, cardboard burns more readily than gypsum board, but the apartment is outfitted with sprinklers, which should help on this front. A few commenters on [Paintingcook’s] Reddit thread asked about formaldehyde and other gasses emitting from the cardboard. Turns out he’s an inorganic chemist by trade. He says any outgassing happens shortly after the cardboard is manufactured. It should be safe for the baby.

Cardboard is a great material to work in. You can build anything from robots to computers to guns with it. So get hop the couch, grab that Amazon box, and get hacking!

Big Trak Gets A New Brain

If you were a kid in the 1980s you might have been lucky enough to score a Big Trak — a robotic toy you could program using a membrane keyboard to do 16 different motions. [Howard] has one, but not wanting to live with a 16-step program, he gave it a brain transplant with an Arduino and brought it on [RetroManCave’s] video blog and you can see that below.

If you want to duplicate the feat and your mom already cleaned your room to make it a craft shop, you can score one on eBay or there’s even a new replica version available, although it isn’t inexpensive. The code you need is on GitHub.

Continue reading “Big Trak Gets A New Brain”

Over The Air Updates For Your Arduino

An Arduino and a data radio can make a great remote sensor node. Often in such situations, the hardware ends up installed somewhere hard to get to – be it in a light fitting, behind a wall, or secreted somewhere outdoors. Not places that you’d want to squeeze a cable repeatedly into while debugging.

[2BitOrNot2Bit] decided this simply wouldn’t do, and decided to program the Arduinos over the air instead.

Using the NRF24L01 chip with the Arduino is a popular choice to add wireless communications to a small project. By installing one of these radios on both the remote hardware and a local Arduino connected to the programming computer, it’s possible to remotely flash the Arduino without any physical contact whatsoever using Optiboot.

The writeup is comprehensive and covers both the required hardware setup for both ends of the operation as well as how to install the relevant bootloaders. If you’re already using the NRF24L01 in your projects, this could be the ideal solution to your programming woes. Perhaps you’re using a different platform though – like an Arduino on WiFi? Don’t worry – you can do OTA updates that way, too.

Know Your Video Waveform

When you acquired your first oscilloscope, what were the first waveforms you had a look at with it? The calibration output, and maybe your signal generator. Then if you are like me, you probably went hunting round your bench to find a more interesting waveform or two. In my case that led me to a TV tuner and IF strip, and my first glimpse of a video signal.

An analogue video signal may be something that is a little less ubiquitous in these days of LCD screens and HDMI connectors, but it remains a fascinating subject and one whose intricacies are still worthwhile knowing. Perhaps your desktop computer no longer drives a composite monitor, but a video signal is still a handy way to add a display to many low-powered microcontroller boards. When you see Arduinos and ESP8266s producing colour composite video on hardware never intended for the purpose you may begin to understand why an in-depth knowledge of a video waveform can be useful to have.

The purpose of a video signal is to both convey the picture information in the form of luminiance and chrominance (light & dark, and colour), and all the information required to keep the display in complete synchronisation with the source. It must do this with accurate and consistent timing, and because it is a technology with roots in the early 20th century all the information it contains must be retrievable with the consumer electronic components of that time.

We’ll now take a look at the waveform and in particular its timing in detail, and try to convey some of its ways. You will be aware that there are different TV systems such as PAL and NTSC which each have their own tightly-defined timings, however for most of this article we will be treating all systems as more-or-less identical because they work in a sufficiently similar manner.

Continue reading “Know Your Video Waveform”

Solenoids And Servos For Self Actuated Switches

The new hotness in home automation is WiFi controlled light switches. Sure, we’ve had computer-controlled home lighting for literally forty years with X10 modules, but now we have VC money pouring into hardware, and someone needs to make a buck. A few years ago, [Alex] installed WiFi switches in a few devices in his house and discovered the one downside to the Internet of Light Switches — his light switches didn’t have a satisfying manual override. Instead of cursing the darkness for want of an Internet-connected candle, [Alex] did the only sensible thing. He installed electromagnets, solenoids, and servos behind the light switches in his house.

The exact problem [Alex] is trying to solve here is stateful wall switches. With an Internet-connected lamp socket, the wall switch no longer functions. Being able to turn on a light when your phone is out of charge is something we all take for granted, and the solution is, of course, to have Internet-connected switches.

Being able to read the state of a switch and send some data off to a server is easy. For this, [Alex] used a WeMos D1 mini, a simple ESP8266-based board. The trick here, though, is stateful switches that can toggle themselves on and off. This is a mechanical build, and although self-actuated switches that can flip up and down by computer command exist, they’re horrifically expensive. Instead, [Alex] went the DIY route, first installing electromagnets behind the switches, then moving to solenoids, and finally designing a solution around four cheap hobby servos. The entire confabulation stuffed into a 2-wide electrical box consists of two switches, four hobby servos, the D1 mini, and an Adafruit servo driver board.

The software stack for this entire setup includes a NodeJS server connected to Orvibo Smart Sockets over UDP. Also on this server is a WebSocket server for browser-based clients that want to turn the lights on and off, a FauXMo server to turn the lights on and off via an Amazon Echo via WeMo emulation, and an HTTP server for other clients like [Alex]’ Pebble Watch.

This is, without question, the most baroque method of turning a lamp on and off that we’ve ever seen. Despite this astonishing complexity, [Alex] has something that is also intuitive to use and, to borrow an applhorism, ‘Just Works’. With a setup like this, anyone can flick a switch and turn a lamp on or off over the Internet, or vice-versa. This is the best Home Automation build we’ve ever seen.

You can check out [Alex]’ video demo of his build below, or his GitHub for the entire project here.

Continue reading “Solenoids And Servos For Self Actuated Switches”