HDMI Audio And Video For Neo Geo MVS

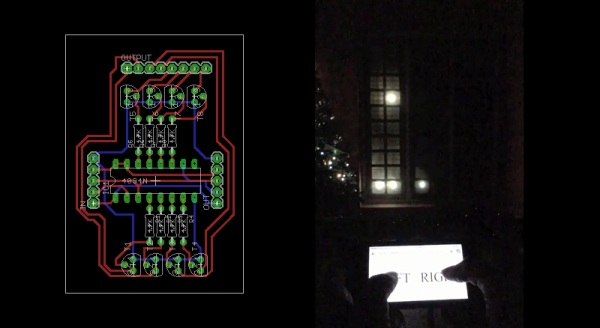
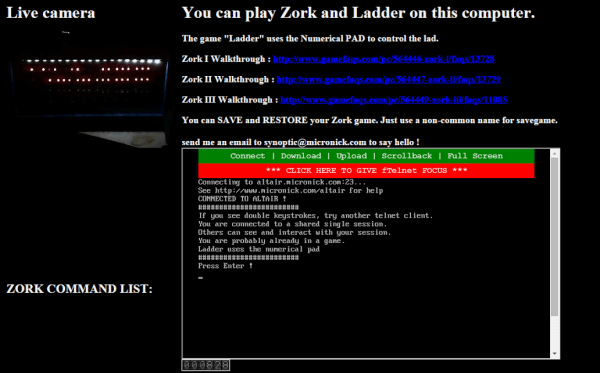
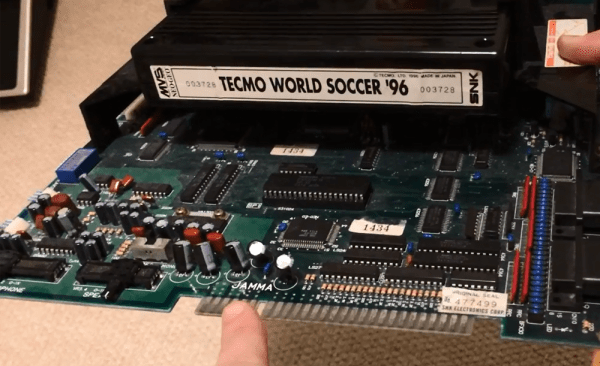
[Charlie] was killing some time hacking on some cheap FPGA dev boards he bought from eBay. Initially, he intended to use them to create HDMI ports for a different project before new inspiration hit him. Instead, he added an HDMI port to Neo Geo MVS games. The Neo Geo MVS was a 90’s arcade machine that played gems like the Metal Slug and Samurai Showdown series. [Charlie] has a special knack for mods, being featured on Hackaday before for implementing Zork on hardware and making a mini supergun PCB. What’s especially nice about his newest mod is that the HDMI outputs both audio and video.

[Charlie] obtained the best possible video and audio signal by tapping the digital inputs to the Neo Geo’s DACs (digital-to-analog converter). The FPGA was then used to convert the signals to HDMI, maintaining a digital signal path from video generation to display. While this sounds simple enough, there was a lot that had to be done. The JAMMA video standard’s lower resolution was incompatible with the various resolutions offered by the HDMI protocol. [Charlie] solved this problem by implementing scan doubling using the RAM on the Cyclone II dev board. He then had to downsample the audio to 32kHz (from 55.6kHz) in order to meet the HDMI specs. Getting the sound over HDMI required adding data islands to the signal, a feat [Charlie] admits was a frustrating one.

When he tested the HDMI with his monitor, it was out of spec but still worked. His TV, on the other hand, refused to play it at all. This was due to the Neo Geo outputting 59.1 fps – not the standard 60 fps. Using the FPGA, [Charlie] overclocked the NeoGeo by approximately 1% and used the 27Mhz pixel clock to change the FPGA output to a 720 x 480p signal.

For those that love the scan lines of yore, they can be enabled with the push of a button. [Charlie] notes that there are some slight differences in the shadow effects of some graphics, but he has done his best to minimize them. He also admits that the FPGA code contributes only 100 microseconds of delay compared to analog output, which is fast enough for even the most hardcore gamers.

Check out the video after the break to see how the Neo Geo looks in HDMI along with a side-by-side comparison to a CRT TV.

Continue reading “HDMI Audio And Video For Neo Geo MVS”

Use Ruby To Make Any Window A Blinken Window

[Akhil Stanislavose] wanted to spice up his window decorations for the holidays. Inspired by blinkenlights, he decided to make his front window interactive. The Blinken Window is a grid of 6 x 10 programmable LEDs running on a Raspberry Pi. Since a RasPi doesn’t have enough GPIO pins for 60 LEDs, [Akhil] built an expander board using 8 daisy chained standard CD4094 (74HC595 could also be used) shift registers to accommodate them.

[Akhil] designed a PCB to replace the expander board for future use. It is modular in nature so that many of them can be connected together to provide as many outputs as one needs, allowing any size window to become a Blinken Window. The PCBs are still being fabricated, but the Eagle files are available for download (zip file). Ruby was used to implement the API. You can find the project files on GitHub, which also features a simulator that you can run on your computer to see how an animation or game will end up looking on the window. In the demo video, [Akhil] demonstrates how you can use the Blinken Window to play a version of Pong using your smartphone as the controller. [Akhil] has also provided a few basic animation examples that can be expanded upon. We’d enjoy seeing an implementation of Tetris. There’s so many fun ways to turn regular windows into dynamic displays, we’re starting to look scornfully at our own lazy, air leaking windows.

See the Blinken Window in action after the break.

Continue reading “Use Ruby To Make Any Window A Blinken Window”

“Scotty” Is More Hungry 3D-printing Fax Machine Than Teleporter

Researchers at the Hasso Plattner Institute have created “Scotty,” a so-called teleportation system. While the name is a clear homage to the famous Star Trek character, this is not the Sci-Fi teleporting you may be expecting. The system is composed of two 3D printers (they used a pair of MakerBot Replicators). The “sender” printer has a camera and built-in milling machine. It uses deconstructive scanning – taking the picture of an object’s layer, then grinding that layer down to expose the next layer – and then sends the encrypted data to a “receiver” printer with a RasPi to decrypt the data so that it can immediately print the object. The ultimate idea behind this is that there is only one object at the end of the process.

It’s a disservice describing Scotty as a teleporter. By the researchers’ definition of a teleporter, the lowly fax machine is on par with Scotty – and it doesn’t destroy the original. The researchers claim that this destructive-reconstuctive method preserves the uniqueness of a given object, as long as any sentimentality. We can agree with the unique aspect: the less copies of something means it retains it intrinsic value in the marketplace. The sentimentality – not so much. We’ve all had a moment in our lives where a treasured item of ours, worthless to everyone else, was destroyed. Either we’d get a replacement or someone else would give us one to silence our wailing, but it wasn’t quite the same. If you could clone your dead pet, subconsciously you’d know it’s not going to be the same Fluffy. It’s that exact thing, atoms and all, that has the emotional attachment. Trying to push that psychological perspective onto Scotty’s purpose is irksome.

Continue reading ““Scotty” Is More Hungry 3D-printing Fax Machine Than Teleporter”

Husband Uses MRI Images To 3D Print Wife’s Skull And Tumor

[Michael Balzer] shows us that you are your own best advocate when it comes to medical care – having the ability to print models of your own tumors is a bonus. [Michael’s] wife, Pamela, had been recovering from a thyroidectomy when she started getting headaches. She sought a second opinion after the first radiologist dismissed the MRI scans of her head – and learned she had a 3 cm tumor, a meningioma, behind her left eye.  [Michael], host of All Things 3D, asked for the DICOM files (standard medical image format) from her MRI.  When Pamela went for a follow-up, it looked like the tumor had grown aggressively; this was a false alarm. When [Michael] compared the two sets of DICOM images in Photoshop, the second MRI did not truly show the tumor had grown. It had only looked that way because the radiologist had taken the scan at a different angle! Needless to say, the couple was not pleased with this misdiagnosis.

However, the meningioma was still causing serious problems for Pamela. She was at risk of losing her sight, so she started researching the surgery required to remove the tumor. The most common surgery is a craniotomy: the skull is sawed open and the brain physically lifted in order to access the tumor below it. Not surprisingly, this carries a high risk of permanent damage to any nerves leading to loss of smell, taste, or sight if the brain is moved the wrong way. Pamela decided to look for an alternative surgery that was less invasive. [Michael] created a 3D print of her skull and meningioma from her MRIs. He used InVesalius, free software designed to convert the 2D DICOM files into 3D images. He then uploaded the 3D rendered skull to Sketchfab, sharing it with potential neurologists. Once a neurologist was found that was willing to consider an alternative surgery, [Michael] printed the skull and sent it to the doctor. The print was integral in planning out the novel procedure, in which a micro drill was inserted through the left eyelid to access the tumor. In the end, 95% of the tumor was removed with minimal scarring, and her eyesight was spared.

If you want to print your own MRI or CT scans, whether for medical use or to make a cool mug with your own mug, there are quite a few programs out there that can help. Besides the aforementioned InVesalius, there is DeVIDE, Seg3D, ImageVis3D, and MeshLab or MeshMixer.

[lovablechevy] Transforms A Nomad Into The HandyGen

[lovablechevy], aka the Queen of Bondo, has added another member to her Mushroom family of custom portable consoles.  This time, it’s the HandyGen, an improved Sega Nomad.  As an owner of the latter, we can attest that the Nomad had limitations, including its unwieldy size and shape, and its godawful battery life. As part of a build-off contest over at the Bacman forums , [lovablechevy] took apart a half-working Nomad and trimmed its board to fit into a smaller case of her own design, while retaining features such as the A/V out, headphone jack, and Player 2 controller port.  She also bumped up the size of the screen, swapping in a new 4″ LCD and its corresponding controller board. The best improvement was increasing the battery life considerably; HandyGen uses 2 LiPo batteries lasting 7 hours instead of the Nomad needing 6AA’s that barely lasted two. HandyGen’s battery life is roughly double that of the GeneBoy, an earlier portable Genesis mod we’ve featured before.

[lovablechevy] always does a great job with her portables, from the Nintenduo to the HandyNES. Being avid PS fans, we also award her bonus points for testing out the HandyGen with Phantasy Star 4. Check out her video of the HandyGen after the break.

Continue reading “[lovablechevy] Transforms A Nomad Into The HandyGen”

Derby the Dog

Derby’s Got Legs, He Knows How To Use Them

There’s just something about the holidays and man’s best friend that brings out the best in people. [Tara Anderson], Director of CJP Product Management at 3D Systems, fostered a husky mix named Derby.  Derby was born with a congenital defect: his forelegs were underdeveloped with no paws.  This precluded the poor fellow from running around and doing all of the things dogs love to do.  [Tara] had fitted him with a wheel cart, but she still felt that Derby deserved more mobility and freedom.  Deciding that 3D-printed prosthetics was the answer, she turned to her colleagues and collaborated with Derrick Campana, a certified Animal Orthotist, to create a new set of forelegs for Derby.

The design is different from typical leg prosthetics; Tara felt that the typical “running man” design would not work for a dog, since they’d just sink right into the ground. Instead, the “loop” design was used, allowing for more playful canine antics. They were constructed using MultiJet Printing on the 3DS’ ProJet 5500X.  MultiJet Printing enabled the prosthetics to be printed with firm and soft parts, both needed for comfort and durability.

Continue reading “Derby’s Got Legs, He Knows How To Use Them”

Altair Online

Online Altair 8800 Clone Lets You Play Zork

[Citponys] wanted to share their Altair 8800 clone with the world, and what better way to do so than by hooking it up to the Internet? This hack was pulled off by using a Linux computer which receives a Telnet connection and redirects it to a serial port. This serial port is connected to the Altair clone. In order to connect the serial port to the Internet using TCP, the ser2sock program was used. People can interact with the Altair on the webpage, where there is also a live camera feed showing the Altair’s Blinkenlights.

This is an ongoing project for [Citponys]. Zork 1-3 and Ladder are now available for play. You can interact with other people in the current session; play nice, or it’ll end up a Mad Libs version of ‘Twitch Plays Pokemon’.  Most recently, [Citponys] updated the webpage with a HTML5-embedded terminal emulator. If you want to quit the current session displayed, enter “quit” and you will be redirected to the main menu where you can choose another game. [Citponys] has links to game walkthroughs on the top of the page. We have a soft spot for classic computers and games, especially the Altair. Take a trip down memory lane and play some Zork at the fork where the past meets the present!

[via Reddit]