Experimenting With Vibratory Wind Generators

We’ve all got a pretty good mental image of the traditional wind-powered generator: essentially a big propeller on a stick. Some might also be familiar with vertical wind turbines, which can operate no matter which way the wind is blowing. In either case, they use some form of rotating structure to harness the wind’s energy.

But as demonstrated by [Robert Murray-Smith], it’s possible to generate electrical power from wind without any moving parts. With simple components, he shows how you can build a device capable of harnessing the wind with nothing more than vibrations. Alright, so we suppose that means the parts are technically moving, but you get the idea.

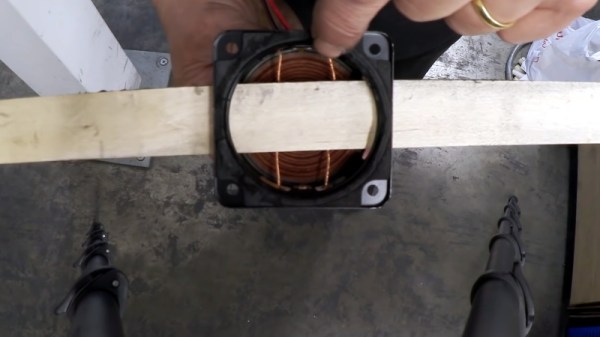
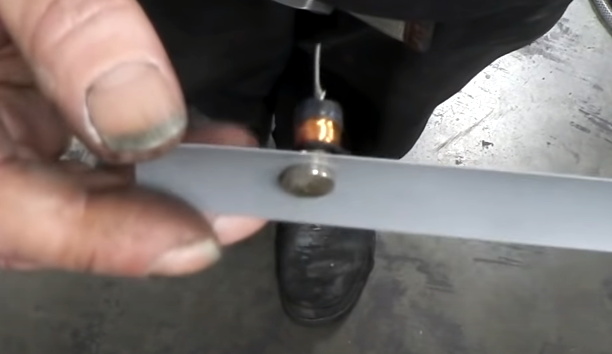
In the video after the break, [Robert] shows two different devices that operate under the same basic principle. For the first, he cuts the cone out of a standard speaker and glues a flat stick to the voice coil. As the stick moves back and forth in the wind, the coil inside of the magnet’s field and produces a measurable voltage. This proves the idea has merit and can be thrown together easily, but isn’t terribly elegant.

For the revised version, he glues a coil to a small piece of neoprene rubber, which in turn is glued to a slat taken from a Venetian blind. On the opposite side of the coil, he glues a magnet. When the blind slat starts vibrating in the wind, the oscillation of the magnet relative to the coil is enough to produce a current. It’s tiny, of course. But if you had hundreds or even thousands of these electric “blades of grass”, you could potentially build up quite a bit of energy.

If this all sounds a bit too theoretical for your tastes, you can always 3D print yourself a more traditional wind turbine. We’ve even seen them in vertical form, if you want to get fancy.

Continue reading “Experimenting With Vibratory Wind Generators”

The Segway Is Dead, Long Live The Segway

Before it was officially unveiled in December 2001, the hype surrounding the Segway Human Transporter was incredible. But it wasn’t because people were excited to get their hands on the product, they just wanted to know what the thing was. Cryptic claims from inventor Dean Kamen that “Ginger” would revolutionize transportation and urban planning lead to wild speculation. When somebody says their new creation will make existing automobiles look like horse-drawn carriages in comparison, it’s hard not to get excited.

Dean Kamen unveils the Segway

There were some pretty outlandish theories. Some believed that Kamen, a brilliant engineer and inventor by all accounts, had stumbled upon some kind of anti-gravity technology. The kids thought they would be zipping around on their own Back to the Future hover boards by Christmas, while Mom and Dad were wondering what the down payment on a floating minivan might be. Others thought the big secret was the discovery of teleportation, and that we were only a few years out from being able to “beam” ourselves around like Captain Kirk.

Even in hindsight, you really can’t blame them. Kamen had the sort of swagger and media presence that we today associate with Elon Musk. There was a general feeling that this charismatic maverick was about to do what the “Big Guys” couldn’t. Or even more tantalizing, what they wouldn’t do. After all, a technology which made the automobile obsolete would change the world. The very idea threatened a number of very big players, not least of which the incredibly powerful petroleum industry.

Of course, we all know what Dean Kamen actually showed off to the world that fateful day nearly 20 years ago. The two-wheeled scooter was admittedly an impressive piece of hardware, but it was hardly a threat to Detroit automakers. Even the horses were largely unconcerned, as you could buy an actual pony for less than what the Segway cost.

Now, with the announcement that Segway will stop production on their eponymous personal transporter in July, we can confidently say that history will look back on it as one of the most over-hyped pieces of technology ever created. But that’s not to say Kamen’s unique vehicle didn’t have an impact. Continue reading “The Segway Is Dead, Long Live The Segway”

Mini “Gaming PC” Nails The Look, Streams The Games

To have a proper gaming “rig”, you need more than a powerful GPU and heaps of RAM. You’ve also got to install a clear side-panel so lesser mortals can ogle your wiring, and plenty of multicolored LEDs to make sure it’s never actually dark when you’re up playing at 2 AM. Or at least, that’s what the Internet has led us to believe.

The latest project from [Michael Pick] certainly isn’t doing anything to dispel that stereotype. In fact, it’s absolutely reveling in it. The goal was to recreate the look of a high-end custom gaming PC on a much smaller scale, with a Raspberry Pi standing in for the “motherboard”. Assuming you’re OK with streaming them from a more powerful machine on the network, this diminutive system is even capable of playing modern titles.

But really, the case is the star of the show here. Starting with a 3D printed frame, [Michael] really went all in on the details. We especially liked the little touches such as the fiber optics used to bring the Pi’s status and power LEDs out to the top of the case, and the tiny and totally unnecessary power button. There’s even a fake graphics card inside, with its own functional fan.

Even if you’re not interested in constructing custom enclosures for your Raspberry Pi, there are plenty of tips and tricks in the video after the break that are more than worthy of filing away for future use. For example, [Michael] shows how he fixed the fairly significant warping on his 3D printed case with a liberal application of Bondo and a straight-edge to compare it to.

This isn’t the first time we’ve seen a Raspberry Pi masquerade as a high-end computer, but it’s surely the most effort we’ve ever seen put into the gag.

Continue reading “Mini “Gaming PC” Nails The Look, Streams The Games”

Build A Lathe Like It’s 1777

We’ve seen quite a few scratch built lathes here at Hackaday, but none quite like the handcrafted pole lathe put together by [Jon Townsend] and his band of Merry Men as part of their effort to build a period-accurate 18th century log cabin homestead. With the exception of a few metal spikes here and there, everything is made out of lumber harvested from the forest around them.

The lathe is designed to be a permanent structure on the homestead, with two poles driven into the ground to serve as legs. Two rails, made of a split log, are then mounted between them. The movable components of the lathe, known as “puppets” in the parlance of the day, are cut so they fit tightly between the rails but can still be moved back and forth depending on the size of the work piece. With two metal spikes serving as a spindle, the log to be turned down is inserted between the puppets, and wedges are used to lock everything in place.

So that’s the easy part. But how do you spin it? The operator uses a foot pedal attached to a piece of rope that’s been wound around the log and attached to a slender pole cantilevered out over the lathe. By adjusting the length and angle of this pole, the user can set the amount of force it takes to depress the pedal. When the pedal is pushed down the log will spin one way, and when the pole pulls the pedal back up, it will spin the other.

Since the tools only cut in one direction, the user has to keep letting the pressure off when the log spins back around. The fact that the work piece isn’t continuously rotating in the same direction makes this very slow going, but of course, everything was just a bit slower back in the 18th century.

So now that we’ve seen lathes made from wood, intricately cut slabs of stone, and a grab bag of junkyard parts, there’s only one question left. Why do you still not have one?

Continue reading “Build A Lathe Like It’s 1777”

What’s The Deal With Snap Packages?

Who would have thought that software packaging software would cause such a hubbub? But such is the case with snap. Developed by Canonical as a faster and easier way to get the latest versions of software installed on Ubuntu systems, the software has ended up starting a fiery debate in the larger Linux community. For the more casual user, snap is just a way to get the software they want as quickly as possible. But for users concerned with the ideology of free and open source software, it’s seen a dangerous step towards the types of proprietary “walled gardens” that may have drove them to Linux in the first place.

Perhaps the most vocal opponent of snap, and certainly the one that’s got the most media attention, is Linux Mint. In a June 1st post on the distribution’s official blog, Mint founder Clement Lefebvre made it very clear that the Ubuntu spin-off does not approve of the new package format and wouldn’t include it on base installs. Further, he announced that Mint 20 would actively block users from installing the snap framework through the package manager. It can still be installed manually, but this move is seen as a way to prevent it from being added to the system without the user’s explicit consent.

The short version of Clement’s complaint is that the snap packager installs from a proprietary Canonical-specific source. If you want to distribute snaps, you have to set up an account with Canonical and host it there. While the underlying software is still open source, the snap packager breaks with long tradition of having the distribution of the software also being open and free. This undoubtedly makes the install simple for naive users, and easier to maintain for Canonical maintainers, but it also takes away freedom of choice and diversity of package sources.

Continue reading “What’s The Deal With Snap Packages?”

An Open Source Tool To Document Your Wiring

Most of us are familiar with the tools available to create circuit diagrams, as generally that’s the first step towards producing a custom PCB. But that about the cables and wiring harnesses that don’t live on your board? How do you easily document the rat’s nest perfectly logical wiring of your latest and greatest creation?

That’s precisely the question that led [Daniel Rojas] to create WireViz. This open source Python tool takes human readable input files and turns them into attractive and functional visualizations of where all the wires in your project are going. It can even be used to generate a Bill of Materials that documents the lengths of wire required and types of connectors needed to hook everything up.

If you’re still using pre-made cables to connect all of your components together, than you might not immediately see the benefit of a tool like this. But as we’ve talked about in the past, the creation of custom wiring harnesses is something that serious hardware hackers should become familiar with. Yes it takes more effort, but the end result is worth it. With a tool like WireViz, the creation of a bespoke harness for your next project just got a little bit easier.

[Daniel] has done a fantastic job documenting this project, providing not only a tutorial on how to feed and care for your WireViz, but a gallery of examples that shows off the kind of complex wiring the tool can help make sense of. But there’s plenty more to be done, and he’s happy to get feedback or code contributions from anyone who wants to get involved.

Popping The Hood On The Flux Beamo Laser Cutter

While the K40 has brought affordable laser cutting to the masses, there’s no question that it took a lot of sacrifices to hit that sub-$400 price point. There’s a reason that we’ve seen so many upgrades and improvements made to the base model machine, but for the price it’s hard to complain. That being said, for users who don’t mind spending a bit more money for a more complete out-of-the-box experience, there are other options out there.

One of them is the beamo, from FLUX. [Frank Zhao] recently picked up one of these $1,900 USD laser cutters because he wasn’t thrilled with the compromises made on the K40. Specifically, he really liked the idea of the internal water cooling system. Oddly enough, something about using a garden hose and buckets of water to cool the laser seemed off-putting. Luckily for us, he’s got a technical eye and the free time necessary to do a teardown and objective analysis of his new toy.

The short version of the story is that [Frank] is not only happy with the results he’s getting, but finds the machine to be well designed and built. So if you’re looking for a rant, sorry. But what you will find is a methodical look at each subsystem of the beamo, complete with annotated pictures and the kind of technical details that Hackaday readers crave.

We especially like his attempts to identify parts which might be difficult to source in the future; it looks like the CO2 laser tube might be proprietary, but everything else looks fairly jellybean. That includes the Raspberry Pi 3B that’s running the show, and the off-the-shelf touch screen HDMI display used for the interface. [Frank] did note that FLUX was unwilling to give him the credentials to log into the Pi and poke around, but with direct access to the SD card, it’s not like that will stop anyone who wants to get in.

In a way, laser cutters are in a similar situation today to that desktop 3D printers were in a few years ago. The cheap ones cut so many corners that upgrades and fixes are almost a necessity, and building your own machine is often less expensive than buying a commercial offering with similar specs. While the beamo is still a bit too expensive for the average hobbyist, it’s good to see machines of this caliber are at least coming down out of the 5 figure range.