Ultra-Thin Rubber Parts Made With A 3D Printed Plug

We generally think of 3D printed components as being hard bits of plastic, because for the most part, that’s what we’ve got loaded up in our desktop machines. But outside of the normal PLA, PETG, and ABS, you can also print with various flexible filaments such as TPU. This can be handy for producing custom seals, or rugged enclosures.

But what if you want to make very thin rubberized parts? In that case, the 0.4 mm nozzle on most desktop machines will be your limiting factor. But not so with the method [Daniel Bauen] demonstrates in his latest Engineerable video. The trick here is that the printer isn’t producing the final product — it’s making a water-soluble plug that has been slightly undersized for the application at hand.

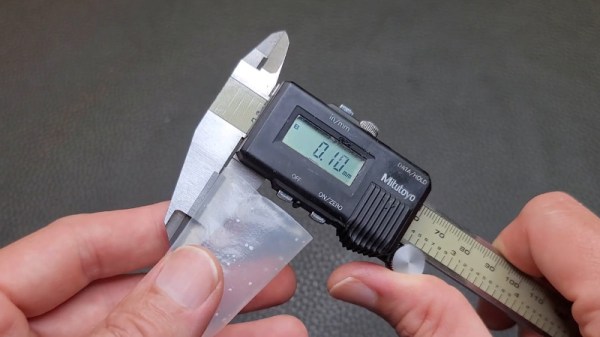
Once the plug has been printed, [Daniel] sprays it with several coats of Plasti Dip. This builds up a rubberized coating on the printed part, and once it’s reached the desired thickness, the whole thing gets tossed into an ultrasonic cleaner to break up the filament. What you’re left with is a silicone-like part that has the same shape as your original print, but is far thinner than anything you could have extruded normally.

So what is [Daniel] looking to accomplish with this technique? We’ll admit the shape of the object is rather suggestive, but in that case, the dimensions just leave us with more questions than answers. Perhaps we’ll learn more in the next video, which we’re told will see the plugs get dipped into latex.

If subtractive manufacturing is more your speed, you can always freeze a sheet of rubber and use a CNC to cut custom parts out of it.

Continue reading “Ultra-Thin Rubber Parts Made With A 3D Printed Plug”

Scroll Through ESPHome With IPod-style Click Wheel

While you’d be hard pressed to find a Hackaday writer that feels any nostalgia for the DRM nonsense the iPod helped to introduce, we’ve got to admit that we miss that click wheel. Spinning your way through long lists was a breeze, and the tactile response made it easy to stop exactly where you wanted. These days, we’re stuck fumbling our way through touch screen interfaces that make simple tasks like seeking to a particular spot in a song or video all but impossible to do with any kind of accuracy.

If you too yearn to once again feel that subtle thumping under your thumb, then check out this project from [landonr]. Technically the handheld gadget is intended to be used as a wireless remote for a home automation system powered by ESPHome, but that’s only one possible application for this particular combination of off-the-shelf components.

If you must, there’s a version with buttons.

Building your own version of the handheld device is a simple as mounting a LILYGO ESP32 T-Display TTGO, an ANO Rotary Navigation Encoder from Adafruit, and a battery pack to a scrap of perfboard. We’d probably look into 3D printing a case to make it a bit less…pokey, but that’s up to you. The result actually bears quite a resemblance to Apple’s iconic media player, but without that pesky walled garden to hold you back.

As mentioned previously, [landonr] wrote the firmware with the intention of controlling a home automation system. So there’s a lot of stuff in there about turning on lights and such. But there are also functions for media playback that look very promising. Whatever software you end up running on it, one thing is for sure: running through the menus is going to feel like a dream.

We’ve covered several other home automation remotes over the years. This handsome wooden model kept things simple with just a few physical buttons, while this somewhat more whimsical approach repurposed Nintendo’s Zapper light gun.

Continue reading “Scroll Through ESPHome With IPod-style Click Wheel”

DIY Fume Extractor With ATtiny13 Speed Control

Let’s be honest, commercially-available soldering fume extractors are cheap enough that you probably don’t need to build one yourself. But it still makes for a good starter project, especially if you go out of your way to really flex your maker muscles like [Arnov Sharma] did with this tidy build.

All the hallmarks of modern hardware making are on display here — you’ve got the 3D printed enclosure, a motor salvaged from a cheap toy quadcopter, and a custom PCB which uses the ATtiny13 and an AO4406 MOSFET to implement a PWM speed control.

The first press of the button starts the motor off at max speed, but keep pushing it, and the motor’s speed will ramp down until it turns off entirely. There’s even a TP4056 charge controller to top off the internal 18650 cell when the fume extractor is connected to a USB power source.

Is it over-engineered? Perhaps. But projects like these are a great opportunity to practice your skills, whether it’s PCB design or creating bespoke 3D printed enclosures. In the era of cheap 32-bit microcontrollers, it’s also refreshing to see hackers still dragging the ATtiny from time to time.

Continue reading “DIY Fume Extractor With ATtiny13 Speed Control”

This Week’s Hack Chat Sets The Stage For Supercon

While the 2020 and 2021 Remoticons were a blast, we all know that virtual events are no substitute for in-person conferences. Which is why we’re so excited to once again invite the Hackaday community to converge on Pasadena in November for a weekend of talks, workshops, and hardware hacking for our sixth Supercon.

To help get the community prepared for the triumphant return of what we very humbly believe to be the greatest hardware hacking conference the world has ever seen, we invited Majenta Strongheart to this week’s Hack Chat to answer the community’s questions about this hotly anticipated event. There’s an incredible number of moving pieces involved in an event like Supercon, and as Head of Design and Partnerships at our parent company SupplyFrame, she’s integral to putting them all together right up until the doors open on November 4th.

The Chat kicked off with a general confirmation that yes, we did receive your talk and/or workshop proposal. It seems several people didn’t receive the intended confirmation message when they sent their information on, but Majenta assured everyone that all of the completed forms were received correctly and are currently under review. If you put in a proposal, you should be notified in the next few weeks about whether or not it was accepted.

With that out of the way, the next big question was the one that so many of you have been wondering: what does the Hackaday Supercon look like in the era of COVID? The truth is, things are still evolving and it’s hard to be sure of anything with two more months to go. But Majenta did confirm that the decision has been made to limit ticket sales compared to previous years so that attendees have a bit more breathing room — literally and figuratively. In addition many of the planned events will be held outdoors, and the talks will be streamed live for anyone who’d rather not sit in the audience.

Majenta also took this opportunity to let everyone know that the volunteer application form for Supercon will be available very soon, and that as usual, those who are willing to help out will get a free ticket in exchange. Speaking of which, if you’d rather pay the gold price, General Admission tickets for the 2022 Supercon are currently on sale.

As you might imagine, Majenta has been exceptionally busy as of late, so we appreciate her taking the time to sit down with us and Chat. If you couldn’t make this live discussion about Supercon, don’t worry. You can send questions, ideas, or comments, to superconference@hackaday.io and we’ll see what we can do.


The Hack Chat is a weekly online chat session hosted by leading experts from all corners of the hardware hacking universe. It’s a great way for hackers connect in a fun and informal way, but if you can’t make it live, these overview posts as well as the transcripts posted to Hackaday.io make sure you don’t miss out.

Small Engine Failure Leads To Impromptu Teardown

When the 6.5 HP (212 cc) Harbor Freight Predator engine in his kid’s go-kart gave up the ghost after some particularly hard driving, [HowToLou] figured it would be a good time to poke around inside the low-cost powerplant for our viewing pleasure. As a bonus, he even got it up and running again.

The shattered rod, and its replacement.

For an engine that has a retail price of just $160 USD, we’ve got to admit, the inside of the Predator doesn’t look too shabby. Admittedly, [HowToLou] determined that the cause of the failure was a blown connecting rod, but he also mentions that somebody had previously removed the engine’s governor, allowing it to rev up far beyond the nominal maximum of 3,600 RPM. No word on who snuck in there and yanked the governor out, but we’re betting it wasn’t the 7-year old driver…

Replacing the connecting rod meant taking most of the engine apart, but for our education, [HowToLou]  decided to take it a bit further and remove everything from the engine. After stripping it down to the block, he re-installs each piece while explaining its function. If you’ve ever wanted to see what makes one of these little engines tick, or perhaps you’ve got a Predator 212 cc in need of a repair or rebuild, the presentation is a fantastic resource.

Incidentally, this isn’t the first time we’ve seen the go-kart in question — back in June, we covered the unique electric reverse that [HowToLou] came up with for it.

LoRa Air Quality Monitor Raises The Bar On DIY IoT

We’ve seen an incredible number of homebrew environmental monitors here at Hackaday, and on the whole, they tend to follow a pretty predicable pattern. An ESP8266 gets paired with a common temperature and humidity sensor, perhaps a custom PCB gets invited to the party, and the end result are some values getting pushed out via MQTT. It’s a great weekend project to get your feet wet, but not exactly groundbreaking in 2022.

Which is why we find the AERQ project from [Mircea-Iuliu Micle] so refreshing. Not only does this gadget pick up temperature and humidity as you’d expect, but its Bosch BME688 sensor can also sniff out volatile organic compounds (VOCs) and gases such as carbon monoxide and hydrogen. The datasheet actually claims this is the “first gas sensor with Artificial Intelligence (AI)”, and while we’re not sure what exactly that means in this context, it’s a claim that apparently warrants a price tag of $15+ USD a pop in single quantities.

There’s an AI hiding in there someplace.

But the fancy sensor isn’t the only thing that sets AERQ apart from the competition. Instead of a member of the ubiquitous ESP family, it’s using the Wio-E5, a relatively exotic STM32 package that integrates a long-range LoRa radio. [Mircea-Iuliu] has paired that with a Linx USP-410 chip antenna or, depending on which version of the four-layer PCB you want to use, a u.Fl connector for an external antenna. The whole thing is powered by a simple USB connection, and its Mbed OS firmware is setup to dump all of its collected data onto The Things Network.

All told, it’s a very professional build that certainly wouldn’t look out of place if it was nestled into some off-the-shelf air quality monitor. While the high-end detection capabilities might be a bit overkill for home use, [Mircea-Iuliu Micle] points out that AERQ might provide useful insight for those running indoor events as COVID-19 transitions into its endemic stage.

Custom Printed Knobs In Just A Few Lines Of Code

While not everyone is necessarily onboard for the CAD-via-code principle behind OpenSCAD, there’s no denying the software lends itself particularly well to parametric designs. Using a few choice variables, it’s possible to make a model in OpenSCAD that can be easily tweaked by other users — even if they have zero prior experience with CAD.

Take for example this parametric-knob-maker written by [aminGhafoory]. The code clocks in at less than 100 lines, but if you’re looking to spin up your own version, all you really need to pay attention to are the clearly labeled variables up at the top. Just plug in your desired diameter and height, fiddle around a bit with the values that get fed into the grip generating function, and hit F7 to export it to an STL ready for printing.

Now admittedly, all the knobs generated with this code will look more or less the same. But that’s the beauty of open source, should you want to print out some wild looking knobs, you can at least use this code as a basis to build on. With the core functionality in place, you just need to concern yourself with writing a new function to generate a grip texture more to your liking.

Of course, if you want to make your OpenSCAD designs even easier for others to modify, you’ll want to look into its impressive customizer capability which replaces manually edited variables with friendly sliders and text input boxes. Projects like the Ultimate Box Maker we looked at back in 2018 are an excellent example of how powerful OpenSCAD can be if you give your design the proper forethought.