Programmable Resistance Box

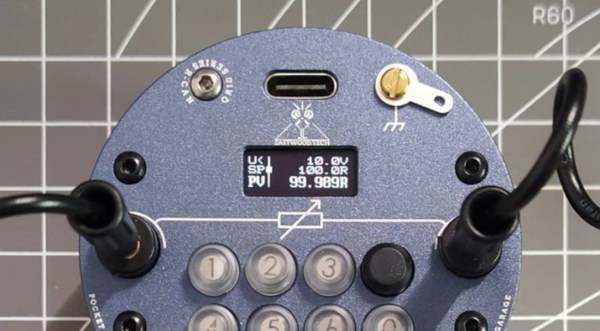
For prototype electronics projects, most of us have a pile of resistors of various values stored somewhere on our tool bench. There are different methods of organizing them for easy access and identification, but for true efficiency a resistance substitution box can be used on the breadboard to quickly change resistance values at a single point in a circuit. Until now it seemed this would be the pinnacle of quickly selecting differently-sized resistors, but thanks to this programmable resistor bank there’s an even better option available now.

Unlike a traditional substitution box or decade box, which uses switches or dials to select different valued resistors across a set of terminals, this one is programmable and uses a series of sealed relays instead. That’s not where the features stop, though. It also comes equipped with internal calibration circuitry which take into account the resistance of the relay contacts and internal wiring to provide a very precise resistance value across its terminals. It’s also able to be calibrated manually to account for temperature or other factors.

For an often-overlooked piece of test equipment, this one surely fits the bill of something we didn’t know we needed until now. Even though digital resistor substitution boxes are things we have featured in the past, the connectivity and calibration capabilities of this one make it intriguing.

Down The Intel Microcode Rabbit Hole

The aptly-named [chip-red-pill] team is offering you a chance to go down the Intel rabbit hole. If you learned how to build CPUs back in the 1970s, you would learn that your instruction decoder would, for example, note a register to register move and then light up one register to write to a common bus and another register to read from the common bus. These days, it isn’t that simple. In addition to compiling to an underlying instruction set, processors rarely encode instructions in hardware anymore. Instead, each instruction has microcode that causes the right things to happen at the right time. But Intel encrypts their microcode. Of course, what can be encrypted can also be decrypted.

Using vulnerabilities, you can activate an undocumented debugging mode called red unlock. This allows a microcode dump and the decryption keys are inside. The team did a paper for OffensiveCon22 on this technique and you can see a video about it, below.

Continue reading “Down The Intel Microcode Rabbit Hole”

IOT Garage Door Opener Makes For Excellent Beginner IOT Project

If you live in a home with a garage door opener, you may have experienced one or more inevitable moments. You pull up to your home, you press the button on the garage door opener, and… nothing. Or you can’t find the garage door opener. Or you have to mash the button repeatedly to get a response. Or… you get the idea. Thanks to [Core Electronics] however, you now have the basis for using a much better device to control your own garage door: Your phone. You can see the tutorial on the web or in video format below the break.

[Michael] at [Core electronics] was tired of dealing with the inconsistencies and inconveniences of a poorly built remote for his garage door opener. When he inspected the controller board on the garage door opener itself, he found that it was already configured to allow three buttons to be connected: Up, Down, and Stop. Continue reading “IOT Garage Door Opener Makes For Excellent Beginner IOT Project”

Quirky Complicated Clock Piques Constructor’s Curiosity

The Clock that served as inspiration for the garberPark Clock

Have you ever observed the project of another hacker and thought to yourself “I have got to have one of those!”? If so, you’re in good company with hacker [garberPark], the maker of the unusual chain clock seen in the video below the break.

While on a stroll past the Chicago Avenue Fire Arts Center in Minneapolis, MN, [garberPark] was transfixed by the clock seen to the right here. In the clock, two motors each drive a chain that has numbers attached to it, and the number at the top displays the current time. It wasn’t long before [garberPark] observed his own lack of such a clock. So they did what any hacker will do: they made their own version!

Using an ESP8266, and Arduino, and some other basic electronics, they put together a horizontal interpretation of the clock they saw. Rather than being continuous rotation, limit switches keep things in line while the ESP8266’s NTP keep things in time. Salvaged scanner stepper motors provide locomotion, and what appear to be bicycle cranks and chains work in harmony with cutoff license plates to display the current time- but only if there’s somebody around to observe it; A very nice touch and great attention to detail!

If you enjoyed this, you’ll love the Sprocket and Chain clock we featured a few months back.

Continue reading “Quirky Complicated Clock Piques Constructor’s Curiosity”

Washington, DC Finally Gets Its Own PCB Metro Map

There was a time, not so long ago, when folks who wanted to make their own custom PCBs would have found themselves in the market for a bucket of acid and a second-hand laser printer. These days, all you have to do is click a few buttons in your EDA program of choice and send the files off for fabrication. It’s easy, cheap, and nobody ends up with chemical burns.

This has obviously had a transformative effect on the electronics hobby — when you can place traces on a PCB like an artist using a brush, it’s only a matter of time before you get projects like [Logan Arkema]’s DCTransistor. This open source board uses carefully arranged RGB LEDs to recreate the Washington Metropolitan Area Transit Authority (WMATA) metro map, and thanks to an ESP8266 connected to their API, can display the positions of trains in real-time.

If you’re getting a sense of déjà vu here, it’s not just in your head. We’ve seen similar maps created for other major metropolitan areas, and [Logan] certainly isn’t trying to take credit for the idea. In fact, he was a bit surprised to find that nobody had ever made one for the DC area — so he decided to take on the challenge himself. He reasoned it would be a good way to hone his PCB design skills and become more comfortable with embedded development. We’d say the end result proves his theory correct, and makes one more city that can boast about its IoT cartography.

Looking to hang a DCTransistor on your own wall? [Logan] says he’ll be dropping the board design files and schematics into the project’s GitHub repository soon, and he also plans on selling pre-made boards in the near future.

We covered this London “tube” map back in 2020, and were impressed by the attention to detail that went into similar displays for Tokyo, Singapore, and the San Francisco Bay Area a year later. Perhaps it’s time to map out your own hometown in LEDs?

Dead Solar Panels Are The Hottest New Recyclables

When it comes to renewable energy, there are many great sources. Whether it’s solar, wind, or something else, though, we need a lot of it. Factories around the globe are rising to the challenge to provide what we need.

We can build plenty of new solar panels, of course, but we need to think about what happens when they reach end of life. As it turns out, with so much solar now out in the field, a major new recycling industry may be just around the corner.

Continue reading “Dead Solar Panels Are The Hottest New Recyclables”

Putting A Cheap Laser Rangefinder Through Its Paces

Sometimes a gizmo seems too cheap to be true. You know there’s just no way it’ll work as advertised — but sometimes it’s fun to find out. Thankfully, if that gadget happens to be a MILESEEY PF210 Hunting Laser Rangefinder, [Phil] has got you covered. He recently got his hands on one (for less than 100 euros, which is wild for a laser rangefinder) and decided to see just how useful it actually was.

The instrument in question measures distances via the time-of-flight method; it bounces a laser pulse off of some distant (or not-so-distant) object and measures how long the pulse takes to return. Using the speed of light, it can calculate the distance the pulse has traveled).

As it turns out, it worked surprisingly well. [Phil] decided to focus his analysis on accuracy and precision, arguably the most important features you’d look for while purchasing such an instrument. We won’t get into the statistical nitty-gritty here, but suffice it to say that [Phil] did his homework. To evaluate the instrument’s precision, he took ten measurements against each of ten different targets of various ranges between 2.9 m and 800 m. He found that it was incredibly precise (almost perfectly repeatable) at low distances, and still pretty darn good way out at 800 m (±1 m repeatability).

To test the accuracy, he took a series of measurements and compared them against their known values (pretty straightforward, right?). He found that the instrument was accurate to within a maximum of 3% (but was usually even better than that).

While this may not be groundbreaking science, it’s really nice to be reminded that sometimes a cheap instrument will do the job, and we love that there are dedicated folks like [Phil] out there who are willing to put the time in to prove it.