Operate Your Own Nuclear Reactor, Virtually

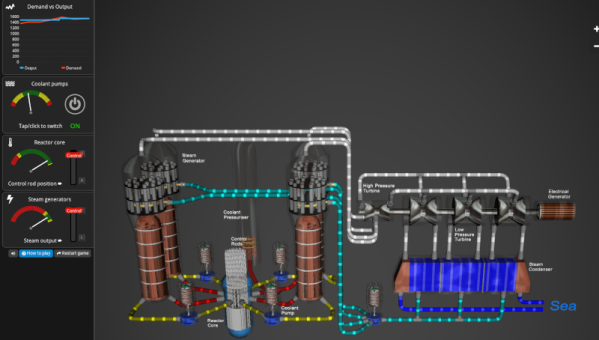
If you’ve ever wanted to operate your own nuclear reactor, you probably aren’t going to get one in your backyard shop. However, thanks to the University of Manchester, you can get a simulated one in your browser. The pressurized water reactor looks realistic and gives you controls that — we are fairly sure — are greatly simplified compared to the real thing.

We suggest you start with the tour before you start unless, you know, you’ve operated a reactor before. You have to balance the control rods, the coolant pumping, and the steam output to produce as much power as possible without melting the core.

If the reactor were real, the pressure vessel would weigh as much as two 747 jets! Despite the high-tech, the business end is a conventional steam generator. The only difference is that the steam is made by the heat of the nuclear reaction instead of by burning coal or gas.

To operate the reactor, you’ll turn on the coolant pumps and wait for the high-pressure liquid to reach 290 C. In real life, this takes about 8 hours, but lucky for us, the simulation is sped up. Once you reach the right temperature, you can lift the control rods to start generating heat. This will let you adjust the steam output to try to match the demand at any given time. But if you go out of bounds, the reactor will helpfully shut down. Of course, that doesn’t help your score.

We don’t know how realistic it is, but we do know Homer Simpson probably has fewer shutdowns than we do. There are different types of reactors, of course. Operating them may be difficult, but creating fuel for them is no simple task, either. Just maybe put out your candles before you start playing.

Directional Antenna Stands Tall

When you think of directional ham radio antennas, you probably think of a Yagi, cubical quad, or a log-periodic antenna. These antennas usually are in a horizontal configuration up on a high tower. However, it is possible to build beams with a vertical orientation and, for some lower frequencies, it is far more practical than mounting the elements on a boom. [DXCommander] shows us his 40 meter two-element vertical antenna build in the video below.

A typical Yagi is just a dipole with some slightly longer or shorter elements to direct or reflect the signal. A normal vertical, however, is nothing more than half of a dipole that uses the ground as the other half. So it is possible to create reflectors and directors with a vertical-driven element.

Continue reading “Directional Antenna Stands Tall”

Inside A Rubidium Frequency Standard

We think of crystals as the gold standard of frequency generation. However, if you want real precision, you need something either better than a crystal or something that will correct for tiny errors — often called disciplining the oscillator. [W3AXL] picked up a rubidium reference oscillator on eBay at a low cost, and he shows us how it works in the video you can see below. He started with a GPS-disciplined oscillator he had built earlier and planned to convert it to discipline from the rubidium clock.

The connector looks like a D-shell connector superficially, but it has a coax connector in addition to the usual pins. The device did work on initial powerup, and using a lissajous pattern to compare the existing oscillator with the new device worked well.

Continue reading “Inside A Rubidium Frequency Standard”

Better 3D Printing Overhangs? Dive! Dive!

If you want better 3D-printed overhangs, you need better cooling, right? What would be better for cooling than printing submerged in water? It turns out [CPSdrone] tried it, and, at least for overhangs, it seems to work pretty well. Check it out in the video below.

Of course, there are some downsides. First, the parts of the 3D printer don’t want to work in water. The guys used deionized water to minimize water conductivity and also sealed open connections. Some components were replaced with equivalents that were less likely to corrode. However, the bearings in the stepper are still going to corrode at some point.

There’s no free lunch, though. Cooling is good for some parts of 3D printing. But for the hot parts, it could cool down too much. They encased the hot end in a large silicon block to help prevent this. They also potted the controller board, which works but makes future maintenance and upgrades painful. Initial tests looked promising.

Continue reading “Better 3D Printing Overhangs? Dive! Dive!”

Stereoscopic Macro Lens Shows Two Is Better Than One

You’d be forgiven if you thought [Nicholas Sherlock’s] new lens design was a macro lens that was 3D printed. In fact, it is, but it is also a macro lens that takes 3D images using two different cameras. If you have a pair of Sony E/FEs, you can 3D print your own copy today. If you don’t, you might have to adjust the design or wait for future releases. In any event, you are sure to enjoy the example photos, and there’s a video review of the device you can watch below.

The design merges two 4x microscope lenses to provide a 2X stereo image with a 5mm baseline. As you might expect, the secret is a prism in the assembly that allows one camera to shoot directly at the subject and the other to shoot with a 5mm offset. This is trickier than you might think because the cameras shift the image some, also.

Continue reading “Stereoscopic Macro Lens Shows Two Is Better Than One”

Another OmniBot 2000 Upgrade

There were many toy robots back in the 80s that were — frankly — underwhelming by today’s standards. Back then, any old thing that rolled around with some blinking lights would impress, but the bar is higher today. Then again, some of the basic components won’t really change. You still need wheels, motors, batteries, and all that. But the computers we can bring to bear today are much better. Maybe that’s why so many people, including [mcvella], decide to give these venerable toys like the OmniBot 2000 a facelift or, maybe a better analogy, a brain transplant.

In this particular case, the brain in question is a Raspberry Pi. The robot will also sport new sensors, motor controllers, and a webcam. There is also a new battery pack in play. The project doesn’t cover working with the single powered gripper arm. The left arm isn’t motorized. There is also a cassette tape deck you could probably make do something interesting. Of course, with a Raspberry Pi, you get wireless control, and the project uses Viam to define and control the robot’s motion.

There is some retro cool factor to using a robot like Ominbot. However, we might be more tempted to just build our own. With a 3D printer, a laser cutter, and a few motors, you could make something that would be about equivalent or better with little effort.

We have seen OmniBot conversions before, particularly over on Hackaday.io. Maybe someone will convert one over to steam power.

Scope GUI Made Easier

Last time, I assembled a Python object representing a Rigol oscilloscope. Manipulating the object communicates with the scope over the network. But my original goal was to build a little GUI window to sit next to the scope’s web interface. Had I stuck with C++ or even C, I would probably have just defaulted to Qt or maybe FLTK. I’ve used WxWidgets, too, and other than how many “extra” things you want, these are all easy enough to use. However, I had written the code in Python, so I had to make a choice.

Granted, many of these toolkits have Python bindings — PyQt, PySide, and wxPython come to mind. However, the defacto GUI framework for Python is Tkinter, a wrapper around Tk that is relatively simple to use. So, I elected to go with that. I did consider PySimpleGUI, which is, as the name implies, simple. It is attractive because it wraps tkinter, Qt, WxPython, or Remi (another toolkit), so you don’t have to pick one immediately. However, I decided to stay conservative and stuck with Tkinter. PySimpleGUI does have a very sophisticated GUI designer, though.

About Tkinter

The Tkinter toolkit lets you create widgets (like buttons, for example) and give them a parent, such as a window or a frame. There is a top-level window that you’ll probably start with. Once you create a widget, you make it appear in the parent widget using one of three layout methods:

  1. Absolute or relative coordinates in the container
  2. “Pack” to the top, bottom, left, or right of the container
  3. Row and column coordinates, treating the container like a grid

The main window is available from the Tk() method:

import tkinter as tk
root=tk.Tk()
root.title('Example Program')
button=tk.Button(root, text="Goodbye!", command=root.destroy)
button.pack(side='left')
root.mainloop()

That’s about the simplest example. Make a button and close the program when you push it. The mainloop call handles the event loop common in GUI programs.

Continue reading “Scope GUI Made Easier”