Tim’s Draw Bot Gets Around With A Pen

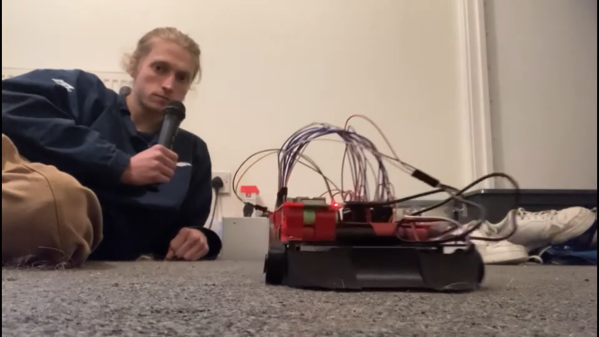
If you grew up playing with LOGO on an old 8-bit computer, you’re probably familiar with the concept of a drawbot. It’s a simple robot that drags a pen around to draw on paper. [Tim] decided to build one that uses a simple skid-steer design to get around the page. 

An Arduino Nano is the brains of the operation, paired with a CNC Shield that allows it to drive a pair of stepper motors. The stepper motors drive the wheels via cogged belts, with the 3D-printed rims fitted with square rubber drive belts used as tires for additional grip. A third jockey wheel is used for balance, in addition to the two main driven wheels. A servo is used to raise and lower the pen as needed. All the hardware is mounted on to a simple tray chassis, which was 3D printed along with most of the other basic componentry.

The robot does a good job of plotting out a drawing on a small scale, with [Tim] using it to outline his name on paper. We’ve featured some other great drawbots before, too, including this nifty spray-can version. Video after the break.

Continue reading “Tim’s Draw Bot Gets Around With A Pen”

A Tiny Board For Driving LEDs In…Whatever

Whether you’re into chiptune or just playing Tetris on original hardware, you might like rocking a heavily-customized Game Boy. Lovely flashing LEDs can only improve the aesthetic, so if that’s what you’re after, you might consider the ARCCore board from [NatalieTheNerd].

The board is a compact and easy way to drive some addressable LEDs, with a form factor designed to take up a small amount of space when stuffed into a Game Boy or other game console. It rocks an RP2040 microcontroller set up to drive a strip of WS2812B LEDs. Three buttons are used to configure the color and brightness settings. The board is designed to run on 3.3 to 5 V, thanks to an onboard buck converter. It’s capable of delivering enough juice to run up to 10 RGB LEDs, though you could potentially use more if you ran them from external power.

You can use just about any microcontroller on the market today to run addressable LEDs if you so desire. If you want a compact drop-in solution that takes up less space, though, you might find the ARCCore useful. If you’ve got your own nifty kit for running addressable LEDs, don’t hesitate to share it with the broader hacker massive — hit the tipsline!

A Paper Printer For QR Code Menus

Do you miss the days of thumbing through a sticky, laminated booklet to order your food? Sick of restaurants and their frustrating electronic menus? Fear not, for [Guy Dupont] and his QR code menu printer are here to save the day.

Yes, that’s right — it’s a lunchbox-sized printer designed to spit out a paper version of a digital menu. Using a Tiny Code Reader from Useful Sensors, the device can scan a QR code at a restaurant to access its menu. A Seeed Studio XIAO ESP32 takes the link, and then passes it to a remote computer which accesses the menu online and screenshots it. The image is processed with TesseractOCR to extract food items and prices, and the data is then collated into a simple text-only format using ChatGPT. The simplified menu is finally sent to a thermal printer to be spat out on receipt paper for your casual perusal.

[Guy] was inspired to build the project after hating the experience of using QR code menus in restaurants and bars around town. It’s his latest project that solves an everyday problem, it makes a great sequel to his smart jeans that tell you when your fly is down.

Continue reading “A Paper Printer For QR Code Menus”

Booting The Raspberry Pi 5 With An NVMe SSD

The Raspberry Pi has come a long way since its humble origins, adding faster processors and better interfaces with each new generation. Now, the Raspberry Pi 5 has a lovely new PCIe port right on board, and [Jeff Geerling] has gone right ahead and slammed in an NVMe SSD as a boot drive.

[Jeff] explains that to use an NVMe to boot, you first have to modify /boot/config.txt to enable PCIe and modify the Raspberry Pi’s boot order. Once the bootloader is appropriately configured, you can boot straight off an SSD with Raspberry Pi OS installed. To get the operating system on to an NVMe drive, he recommends cloning an existing boot volume from a microSD install.

One of the primary reasons you might want to do this is speed. NVMe drives are generally a significant cut above even the best microSD cards, both in speed and reliability. [Jeff] also notes that you can use an NVMe SSD through a PCIe switch on the Pi 5 if you so desire, but you can’t currently boot with this configuration.

It’s a great feature to have on the Pi 5, and it follows on from the earlier implementation on the Raspberry Pi Compute Module 4. Video after the break.

Continue reading “Booting The Raspberry Pi 5 With An NVMe SSD”

A Nicer Controller For Cheap Power Supply Modules

These days, you can get all kinds of cheap power supply modules off a variety of online vendors. A lot of examples from brands like Juntek and Drok often have pretty poor interfaces though, with a couple of tactile buttons and a simple 7-segment display. [rin67630] decided to whip up a better controller with a much more informative display.

The controller is designed to work with programmable buck converter modules like the DPS3806, Buck3603, and BST900. It’s based on a TTGO ESP32 with an integrated color TFT LCD. It displays voltage at the input and output, the same for current, along with current setpoints. It also allows for control of a fan and charge cycles if so desired, and it has the ability to fetch time from an NTP server for proper scheduling.  There’s also a web interface complete with graphs for really diving down into the nitty-gritty. Future plans include adding an MPPT solar charging capability.

If you’ve ever wanted a cheap power supply module with really low-level control and rich data display, this could be just what you need. Meanwhile, you’ve got your own neat power supply in the works, don’t hesitate to drop us a line. 

Level Your Trailer Or RV With This Nifty Helper Device

Getting your RV or trailer parked nice and level is key to getting a good night’s sleep. Traditional methods involve bubble levels and trial and error, but [MJCulross] wanted something better. Enter the Teensy RV Leveling Helper.

The device uses an accelerometer to detect the pitch and roll angles of the RV. It then displays these on a small screen, and performs calculations on how much the RV must be raised at each corner to bring it level. The RV’s width and wheelbase can be entered via a simple touchscreen interface to ensure the calculations are correct. There’s also a trailer mode which calculates three-point leveling figures for the wheels and the hitch, as opposed to the four-wheeled RV mode.

The result is that the correct leveling blocks can be selected first time when parking up the RV or trailer. It’s a lot less tedious than the usual method of parking, leveling, checking, and then leveling again.

We don’t see a lot of camper hacks around here, but we’ve noticed a new trend towards lightweight cycle campers in recent years. If you’ve found your own nifty hacks for your home on the open road, don’t hesitate to let us know!

Reverse-Engineered GBA Board Could Come In Handy

Retro gear is beloved, both for what it can do, and what it reminds us of. Nostalgia is a powerful thing, after all. But then, so is corrosion — and the latter has a habit of killing hardware and driving up prices for remaining units. Thankfully, hard workers like [NatalieTheNerd] are out there, creating reproduction PCBs to keep old hardware alive. Her Game Boy Advance (GBA) reproduction PCB is a great tool for the restoration and modding communities.

The board was reverse engineered, with [Natalie] sharing various scans and schematics of the GBA’s motherboard on the Modded Game Boy Club website. The project recreates the AGB-CPU-03 version of the GBA, and is designed to be produced on a 1 mm board with an ENIG process. You can combine the PCB with some salvaged parts and a new shell and build yourself a remarkably fresh GBA, if you so desire.

Beyond it’s intended use, [Natalie] points out the board outlines could be used as a basis for RetroPie or ESP32 projects that fit into a standard Game Boy Advance form factor. We love that idea. We’ve seen [Natalie’s] work before too, in the form of this neat little macropad. Nifty as always!