Many an automotive enthusiast finds themselves at a track day eventually. Typically, this involves competing against the clock to better one’s laptimes in short sessions throughout the day. Such events are fun, but it often creates a perishing thirst for a greater level of competition.
Regularity and endurance events are often the next step up for a lot of people. These events involve long runs at race pace that stress a car to (or beyond!) the breaking point. Careful preparation is required if one is to see out the race to the chequered flag. Let’s break down what you’ll need to consider.
Time-of-flight sensors used to be expensive obscurities, capable of measuring the travel time of photons themselves and often used for tracking purposes. However, the technology is cheaper now, such that [jean.perardel] has used TOF sensors to build a useful and affordable gesture-tracking system.
The system relies on four VL53L1X time of flight sensors, which have a 16×16 scanning array and communicate over the I2C bus. Controlling the show is an Arduino MKR1010, though the project should be achievable with a range of other microcontrollers, too.
The device is built into a cute hedgehog-like form factor, with an LCD screen acting as the face. It displays facial expressions which show how the system is interpreting and responding to gestures. It gives the project lots of personality, which makes using the system more fun. Gestures from the system can be used to send keystrokes over USB, control relays or servos, or even fire IR signals to control TVs and other hardware.
It actually seems like a useful gesture control interface, one that could become a useful part of a workstation setup. We’ve seen gesture controls put to other uses too, like controlling robot arms. Video after the break.
Those of us who enjoy seeing mechanical carnage have been blessed by the rise of video sharing services and high speed cameras. Oftentimes, these slow motion videos are heavy on destruction and light on science. However, this video from [Smarter Every Day] is worth watching, purely for the fluid mechanics at play when a supersonic baseball hits a 1-gallon jar of mayo.
The experiment uses the baseball cannon that [Destin] of [Smarter Every Day] built last year. Ostensibly, the broader aim of the video is to characterize the baseball cannon’s performance. Shots are fired with varying pressures applied to the air tank and vacuum levels applied to the barrel, and the data charted.
However, the real glory starts 18:25 into the video, where a baseball is fired into the gigantic jar of mayo. The jar is vaporized in an instant from the sheer power of the collision, with the mayo becoming a potent-smelling aerosol in a flash.
Amazingly, the slow-motion camera reveals all manner of interesting phenomena. There’s a flash of flame as the ball hits the jar, suggesting compression ignition happened at impact with the jar’s label. A shadow from the shockwave ahead of the ball can be seen in the video, and particles in the cloud of mayo can be seen changing direction as the trailing shock catches up.
The slow-motion footage deserves to be shown in flow-visualization classes, not only because it’s awesome, but because it’s a great demonstration of supersonic flow phenomena. Video after the break.
Riding a bicycle is a wonderful and healthy way to get around. However, just like with any other vehicle on the road, it can be useful to have a camera to record what goes on in traffic. [Richard Audette] built just such a rig.
The original setup relies on a Raspberry Pi 3, which takes a photo every 10 seconds using the attached Pi Camera. It then processes these photos using OpenALPR, which is a piece of software for reading licence plates. Licence plates detected while cycling can be stored on the Raspberry Pi for later, something which could be useful in the event of an accident.
However, [Richard] has developed the concept further since then. The revised dashcam adds blind spot detection for added safety, and uses a Luxonis OAK-D camera which provides stereo depth data and has AI acceleration onboard. It’s paired with a laptop carried in a backpack instead of a Raspberry Pi, and can stream video to a smartphone sitting on the handlebars as a sort of rear-view mirror.
Anyone who has commuted on a bicycle will instantly see the value in work like [Richard]’s. Just avoiding one accident from a car coming from behind would be of huge value, and we’re almost surprised we don’t see more bicycle rear view kits in the wild.
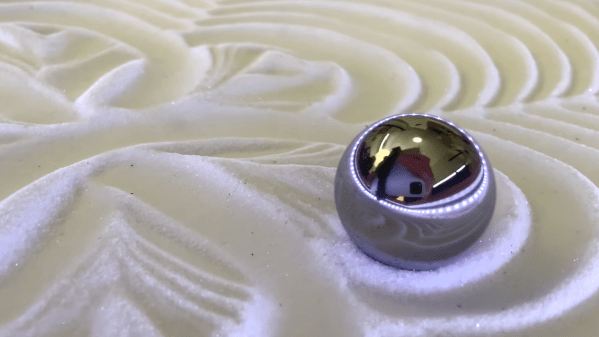
Many of us have marveled at art installations that feature marbles quietly and ceaselessly tracing out beautiful patterns in sand. [DIY Machines] is here to show us that it’s entirely possible to build one yourself at home!
The basic mechanism is simple enough. The table uses a Cartesian motion platform to move a magnet underneath a table. On top of the table, a metal sphere attached to the magnet moves through craft sand to draw attractive patterns. An Arduino and Raspberry Pi work together to command the stepper motors to create various patterns in the sand.
Low-cost pine is used to build most of the table, with oak used for the attractive bare wooden top. RGB LEDs surround the sand surface in order to light the scene, with options for mad disco lighting or simple white light for a subtler look. Other nice touches include sitting the craft sand atop a layer of faux leather, so the ball moving through the sand doesn’t make annoying crunching sounds as the ball moves.
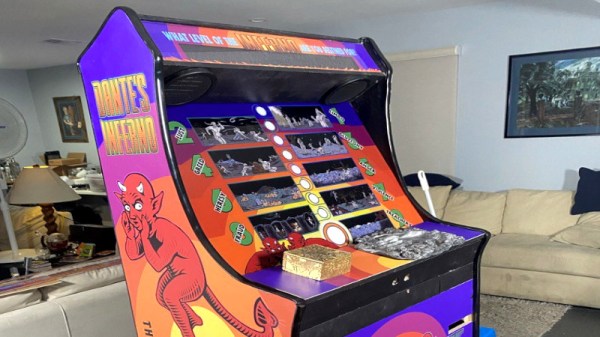
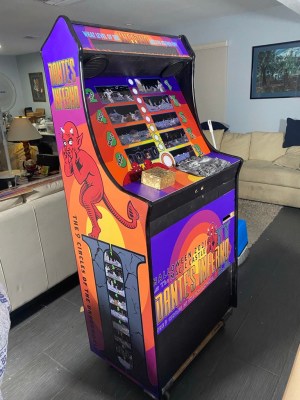
Many of us are vaguely familiar with the levels of hell described in Dante’s epic poem from the 14th century, even if we’ve never visited ourselves. It’s natural to wonder in which circle of hell one might end up, but that’s a question that [scubabear’s] arcade build seeks to answer.
The artwork is vibrant and enticing.
The stand-up cabinet was built for The Magic Castle, Hollywood’s exclusive private club for the magic set. The design is loosely inspired by old-fashioned love testers, the sort of which you might have seen in that Simpsons episode. The club has traditionally issued members with unique RFID tags in keychains, which can be used to trigger special objects in the facility. In this case, when a member scans their keychain and places their hand on a handprint, the machine starts up.
The hand is detected by an Adafruit touch sensor board, and the machine begins determining the fate of the member while playing a short musical interlude. Once calculated by the Raspberry Pi within, the user’s name is read out based on the RFID data, and their destiny is read aloud. They’re then given a receipt stating their destination in hell, along with a quote from Dante’s Inferno.
It’s a fun game and one that we’d love to try out if we find ourselves visiting The Magic Castle one spooky day. It’s made all the better by the sheer quality of the cabinet and the associated illustrations from [Jeremy Owen.]
For those keen to do something similar, [scubabear] hasn’t skimped on the details of the construction nor the electronics that make it all work. We’ve seen other great builds too, from the carefully crafted to the glowiest you’ve ever seen. Video after the break.
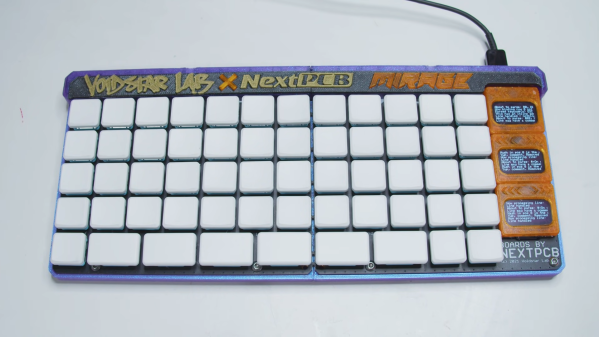
There are a huge number of available keyboards out in the world these days, catering to all of the plainest and the most advanced desires. However, if you want something that’s just right, sometimes it pays to build your own. [Zach] did just that.
One of the key features of [Zach]’s build is that it diverges away from the Cherry MX switch form factor. The design uses low-profile switches instead, which help with keeping the keyboard low enough to avoid it causing wrist problems. The keyboard also uses IO expanders to hook up all the key switches, helping to reduce the incidence of ghost keys. The board can also be split in half, allowing it to be repurposed as a smaller macropad when desired.
It’s all wrapped up in a cool 3D printed case, and there are even three OLED displays on the right-hand side. They’re soldered to the PCB on special cutouts that allow the displays to flex and trigger tactile switches, acting as giant pressable buttons.
[Zach] does a great job explaining all the nifty engineering decisions he made to cram maximum functionality into the design. We’ve seen some other great DIY ergonomic designs too. Video after the break.