A Rough And Ready Pan & Tilt Mirror

There’s nothing quite like waking up on a warm and sunny morning, with the sun filtering in through the windows over a magnificent beach view. Of course, in real life, not every bedroom has access to beautiful natural vistas and abundant natural light. [Rue Mohr] decided to try and solve this issue with technology.

The initial write-up may be brief, but the pictures of the resulting project show a proper hacker’s build. A stand for an old office chair appears to serve as the base, and the mirror is mounted on a frame that allows for both pan and tilt to be adjusted. There’s a large gear to enable pan rotation, which meshes with a nifty old-school cage gear built out of what we suspect is plastic and welding rod. An AVR microcontroller is charged with running the show, with it interpolating a series of waypoints to set the mirror’s position throughout the day.

[Rue] reports that the project is nearing completion, and is soon to be fully automated. With the dark bedroom that spawned the project no longer a concern, the mirror will instead be pressed into service to provide sun to a row of bean plants.

If you’re looking for a pan-tilt mechanism, but something a little smaller, this 3D-printed mechanism might be just what you’re after.

Dry Your Boots With The Internet Of Things

If you live somewhere cold, where the rain, snow and slush don’t abate for weeks at a time, you’ve probably dealt with wet boots. On top of the obvious discomfort, this can lead to problems with mold and cause blisters during extended wear. For this reason, boot dryers exist. [mark] had a MaxxDry model that had a timer, but it wasn’t quite working the way he desired. Naturally, it was begging to be hooked up to the Internet of Things.

The brains of the dryer is an ESP32, a solid choice for such a project. With WiFi on board, connecting the device to the internet is a snap. Relays are used to control the fan and heater inside the boot dryer, while MQTT helps make the device controllable remotely. It can be manually switched on and off, or controlled to always switch on at a certain time of the day.

It’s a simple project that shows how easily a device can be Internet controlled with modern hardware. For the price of a cheap devboard and a couple of relays, [mark] now has a more functional dryer, and toasty feet to boot.

We don’t see a lot of boot hacks here, but this magnet-equipped footwear is quite impressive.

The Benefits Of Restoring A C64 With A Modern FPGA Board

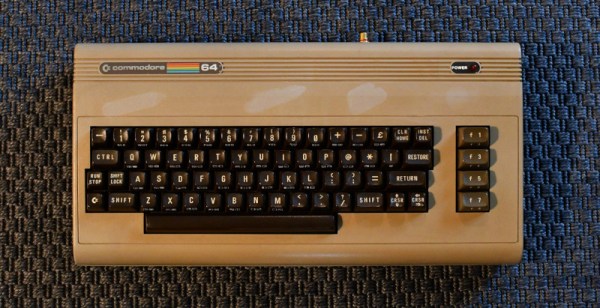
The Commodore 64 was the highest selling computer of all time, and will likely forever remain that way due to the fragmentation of models in the market ever since. Due to this, it’s hardly surprising that it still has a strong following many years after its heyday. This means that the avid restorer has a wide range of parts and support available at the click of a button. [DusteD] is just one such person who had a busted-up C64 laying around, and decided to make it a project.

[DusteD] wanted to reuse the original case, and decided it should remain a Commodore 64 after an initial attempt at a mini-ITX swap went awry. Desiring a reliable machine, an Ultimate64 FPGA board was selected to replace the original faulty motherboard. This has the benefit of being hardware compatible with the classic C64, while allowing [DusteD] to tinker and program to his heart’s content, without having to worry about blowing up valuable original parts. It also provides several interesting modern features, like HDMI output, USB, and even Ethernet connectivity. This allows one to experiment with the platform without the hassles of all the inherent limitations of 1980s technology.

As a fan of the classic SID sound chip, [DusteD] was also highly interested in the audio output of the Ultimate64. Recordings were made of the emulated output from the FPGA, as well as the sound output from a real SID installed in the board, both through the mixed output and directly from the chip via a SIDTAP. Those interested can download the 800MB of recordings and compare the output; there’s a summary of the differences noted listed on the site as well.

[DusteD] makes a great argument for the benefits of building up a C64 rig in this way. It’s a great way to get started for those eager to explore the world of Commodore’s 8-bit hardware without the hassles and expenses of buying all the real gear. As it stands, the C64 aftermarket is so advanced now, that you can build an entirely new machine from scratch if you so desire. Go forth and enjoy!

VR On The 6502

The MOS Technology 6502 was one of the more popular processors of the 1980s. It ran the Commodore 64, the NES in a modified form, and a whole bunch of other hardware, too. By modern standards, it’s barely fit to run a calculator, but no matter – [Nick Bild] built a VR game that runs on the retro CPU anyway!

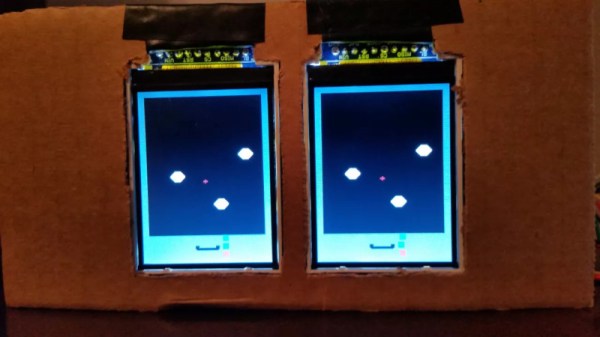
[Nick]’s project is built on his 6502 computer, the Vectron 64. Being a breadboard build, it’s easy to modify things and add additional hardware, and that’s precisely what he did. The VR system uses two 320 x 240 LCD screens, one for each eye. These are controlled over SPI, but the humble 6502 simply doesn’t have the speed to clock out enough bits fast enough for a video game. Instead, additional hardware is added to generate pulses to run the screens. There’s a bunch of other neat hacks as well that help make the game playable, like overclocking the CPU to 1.75 MHz and drawing common elements to both screens at the same time.

To test out the VR system, [Nick] coded a basic Asteroids VR game. It’s not really practical to demonstrate the game without the hardware, but we’d love to try it out. There’s something compelling about a low-resolution VR game with 8-bit graphics, and we hope to see the concept further developed in future.

More grunt would make this project even more capable, and for that, a 6502 running at 20MHz could come in handy. Video after the break.

[Thanks to Fred Gimble for the tip!]

Continue reading “VR On The 6502” →

Banana Bomb Is Likely To Get You In Trouble

If there’s one thing Hollywood loves, it’s a ticking clock to create drama. Nuclear weapons, terrorist bombs, and all manner of other devices have been seen featuring foreboding numbers counting down on a series of 7-segment displays. In this vein, [deshipu] developed a rather ridiculous take on the classic trope.

The project is built around a ticking four-digit display. The blue LEDs give it a modern touch, and it’s attached on top of an Arduino Pro Mini 3.3V. This enables the whole module to be powered by a coin cell, for an incredibly compact and tidy timer that is barely bigger than the display itself. There’s also a buzzer attached, which chirps each second, somewhat heightening the stress level in the immediate vicinity.

With a functioning timer, [deshipu] then went for comedy points, by hooking it up to a trio of bananas. This is widely considered more courteous than attaching it to a detonator circuit and actual dynamite, and is key to staying off government watchlists.

It’s a piece that would be amusing at a Halloween party or similar, and is easily completed by any beginner learning Arduino. It goes without saying that, while this is amusing, it’s a build that should very much not be bandied about in public or used for a prank. In this day and age, even touting a custom clock can draw unwelcome attention, so it’s important to be careful.  Video after the break.

Continue reading “Banana Bomb Is Likely To Get You In Trouble” →

The Quest For Perfect Croissants Via A DIY Dough Sheeter

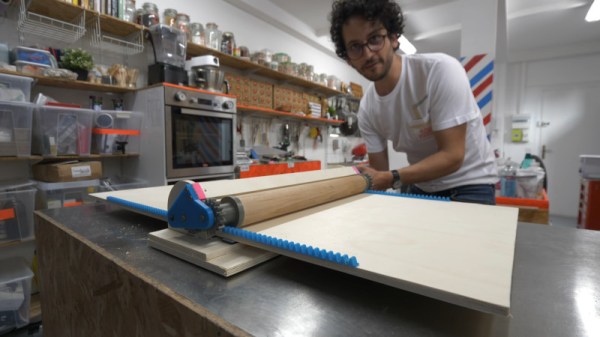
Baking is a wonderful pastime, as much an art as a science. [Alex] pursues the craft with plenty of vigor, and had built his very own dough sheeter to assist in his work. Unfortunately, the design had several flaws, and came out of a recent move rather the worse for wear. Growing tired of having to deal with dough of inconsistent thickness, he went back to the drawing board to whip up a new version (Youtube link, embedded below).

The new model improves significantly over the predecessor, by directly addressing the engineering pitfalls of the first design.

The core of the machine is a moving platform combined with a rolling pin, that can be set to a desired height to roll the dough into a set thickness. This is key to baking top-notch croissants, which [Alex] takes very seriously. His initial model used a table leg for a rolling pin, fitted with a threaded rod down the centre. This had significant issues with both runout, and uneven diameter across its length. Additionally, its frame had not held up after a recent move, and [Alex] was keen to start again.

The new model starts with attention paid to the basic engineering issues. The table leg is replaced with a professional-grade rolling pin, fitted with 3D-printed gears that accurately align the axis of rotation to the centre of the pin. A rack and pinion drive is also added to move the dough platform. Finally, a locking pin system is used to set the desired height of the dough.

It’s a useful project for the keen baker, and one that leans heavily on additive manufacturing methods. Producing such a tool in the years before 3D printers would have required significant effort to produce the required gears and mating components, so it’s impressive to see how easily something like this can come together these days. A hacker mindset can always be handy for baking – don’t forget, you can improve your bread crusts with steam! Video after the break.

Continue reading “The Quest For Perfect Croissants Via A DIY Dough Sheeter” →

This Tiny TFT Pendant Is Digital Jewelry

Hackers have a multitude of skills, many are well-versed in the ways of all things that blink and flash. These abilities have often be applied to the field of jewelry and human adornment, and many LEDs have been employed in this work. [Deshipu] has been attempting something a touch different however, by constructing a tiny TFT pendant.

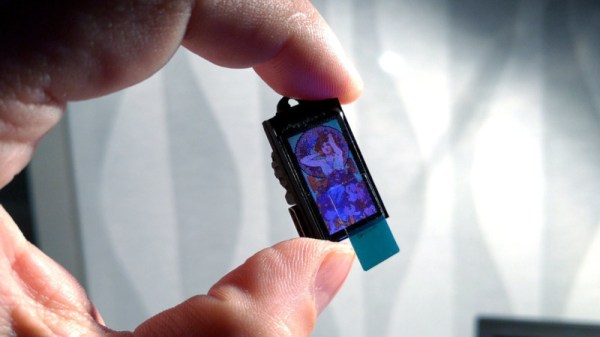
The basic idea is not dissimilar from those USB photo keychains of recent history. A SAMD21 Cortex M0+ serves as the brains of the operation, with the tiny microcontroller being soldered to a custom PCB that makes up the body of the pendant. A ST7735S TFT LCD screen is then attached to act as the display. Charging and delivery of images is done over USB, which can be handled natively by the SAMD21.

Currently, the pendant is capable of displaying 16-color BMPs, with the intention to create a converter for animated GIFs in the pipeline. Potential upgrades also involve creating a larger battery pack to sit behind the wearer’s neck, as currently the device has just 8 mAh to work with.

It’s a nicely designed piece, with the pendant appearing barely bigger than the screen itself. It’s not the first time we’ve seen a hacker take on a pendant, and we’re sure it won’t be the last. If you’ve got the goods, be sure to hit up the tip line.