Routing IP Over Instant Messages Is Possible Yet Impractical

Telegram is an instant messaging app, well known for its focus on security and encryption. It’s used by government officials, journalists, and the paranoid, and can also handle VoIP calls, in addition to its text messaging capability. [PiMaker] wondered if all this encryption could be put to good use, and decided to try and route IP over Telegram, as you do.

The project is called Teletun, and it works! It uses telgram-cli, a command line interface for the instant messaging network. The actual IP routing is handled with a Python script, and [PiMaker] recommends that in use, the user should “pray to the gods for mercy”. Reports are that bandwidth is limited, but latency can go as low as 100ms, which suggests Telegram is indeed a fairly instant messenger.

Tunneling over instant messaging services is good practice for any aspiring hacker, but likely to be unwieldy for any practical purpose. If you can think of one, other than irritating the intelligence agents tapping your communications, throw it down in the comments below. Otherwise, consider other oddball ways to (ab)use Telegram.
Depotting An Ancient Car Computer

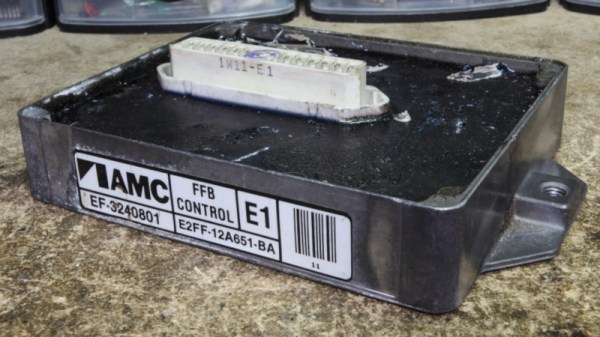
Carburettors were king for decades, until the onward march of technology brought electronic fuel injection to the fore. During their final years, a handful of automakers experimented with computer control of the humble carb, trying to squeeze out every last bit of efficiency and reduce pollution as much as possible. [NeXT] happened to own a vehicle fitted with AMC’s Computerized Engine Control system, and decided to see what made it tick.

This was easier said than done due to choices made by Ford, who manufactured the engine computer for AMC. Unlike modern ECUs which usually feature a metal case fitted with rubber gaskets, the CEC computer was potted in epoxy. [NeXT] was able to de-pot the circuit board by placing it in a stock pot of boiling water, and then slowly peeling the epoxy away.

With the potting removed, it was possible to begin reverse engineering the board. The main microcontroller is an Intel 8049, of the MCS-48 family. The board uses through-hole technology, and only features a handful of other small ICs.

It’s always interesting to look back at forgotten technologies and see how things were done in decades past. [NeXT] hopes to keep working on the project, intending to dump the ROM from the CEC module and build a replacement computer with an Arduino. It’s possible to build your own ECU from scratch, so we’re looking forward to seeing [NeXT]’s AMC Eagle running on modern silicon real soon.

A Modular Logic Analyzer For FPGAs

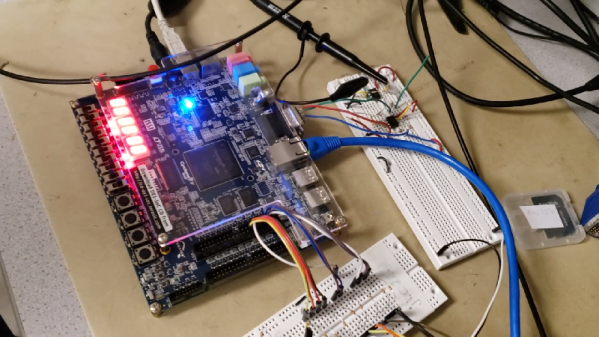
When working on a project, it’s incredibly helpful to be able to visualize the various signals in play. This is important when attempting to determine if what is supposed to be happening is actually happening. However, logic analyzers can be expensive, so a group from [Bruce Land]’s ECE5760 class developed their own hardware solution instead.

The primary idea behind the project is modularity. The basic building blocks of the logic analyser are coded in Verilog. They’re designed so that the number of channels and added functions can be mixed and match to suit the given purpose and the capabilities of the target FPGA platform. The team’s logic analyzer is also capable of decoding SPI and I2C in hardware, and has a graphical user interface running on an attached laptop for visualizing signals.

It’s a tidy build, and an excellent project to learn the fundamentals of both FPGA programming and the various communications protocols involved. [Bruce Land]’s classes are a hotbed of FPGA projects, from pokerbots to NES chiptune emulators. Video after the break.

Continue reading “A Modular Logic Analyzer For FPGAs” →

Radio Controlled Wheelbarrows Tear Up The Track

The wheelbarrow is a trusty companion to the gardening set, helping move heavy loads to and fro. [James Bruton] has an active imagination however, deciding to build a motorized racing barrow, and challenging his friends to do the same (Youtube link, embedded below).

[James] went with a straightforward design, fitting two wheels to the rear, and powering them with brushless inrunner motors. The original front wheel was then fitted with a caster mechanism to allow the barrow to be skid steered. A pair of lithium polymer batteries provide the juice, with [James] using VESC skateboard ESCs to run the motors. The whole contraption is radio controlled, with an Arduino handling the mixing for steering duties.

The motorized barrow performed well against its competition, a propeller-powered barrow from [Tom Stanton] and a leaf-blower propelled barrow from [Ivan Miranda]. Inclement weather did cause some issues, but the trio were kind enough to treat us to a destruction derby with their racing machines.

You may be familiar with [James]’ earlier work on the openDog project. Video after the break.

Continue reading “Radio Controlled Wheelbarrows Tear Up The Track” →

Humanizing Industrial Robots By Sticking A Jibo On Top

A great many robots exist in our modern world, and the vast majority of them are highly specialized machines. They do a job, and they do it well, but they don’t have much of a personality. [Guilherme Martins] was working on a fun project to build a robot arm that could create chocolate artworks, but it needed something to humanize it a bit more. Thankfully, Jibo was there to lend a hand.

For the uninitiated, Jibo was a companion robot produced by a startup company that later folded. Relying on the cloud meant that when the money ran out and the servers switched off, Jibo was essentially dead. [Guilherme] managed to salvage one of these units, however, and gave it a new life.

With the dead company unable to provide an SDK, the entire brains of the robot were replaced with a LattePanda, which is a Windows 10 single-board computer with an integrated Arduino microcontroller. This was combined with a series of Phidgets motor drivers to control all of Jibo’s joints, and with some Unity software to provide the charming expressions on the original screen.

With the Jibo body mounted upon the robot arm, a simple chocolate-decorating robot now has a personality. The robot can wave to humans, and emote as it goes about its day. It’s an interesting feature to add to a project, and one that certainly makes it more fun. We’ve seen projects tackle similar subject matter before, attempting to build friendly robot pets as companions. Video after the break.

Continue reading “Humanizing Industrial Robots By Sticking A Jibo On Top” →

Build A Sheet Metal Brake With No Welding Required

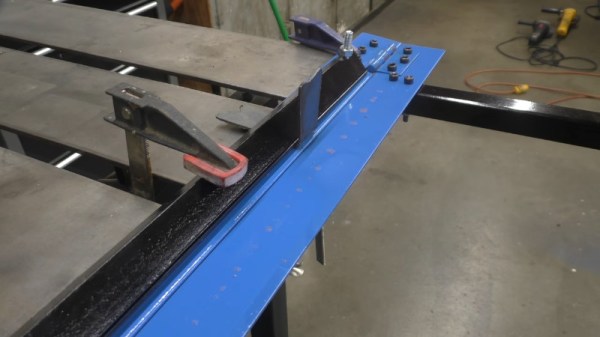
Sometimes, there’s a job to be done and the required tools don’t fall easily to hand. [Bob] found himself in just such a position, needing to get some window flashing made up despite lacking a sheet metal brake. After waiting far too long for someone else to do the job, [Bob] elected to simply make the tools and do it himself instead (Youtube link, embedded below).

The project came about simply because [Bob] needed to bend 42″ sections of flashing, and couldn’t find a decent deal on a sheet metal brake above 36″ wide. The build starts with some angle iron and simple hinges, bolted together to form a basic brake design. With some rectangular hollow section bolted on for handles, the brake is then clamped to the bench and is ready for action.

It’s a build that any experienced hacker could whip up in an afternoon and be pumping out basic sheet metal parts by sundown, and requires no welding to boot. To learn more about bending sheet metal, check out our primer on the subject. Video after the break.

Continue reading “Build A Sheet Metal Brake With No Welding Required” →

CNCing An X-Acto Knife Holder

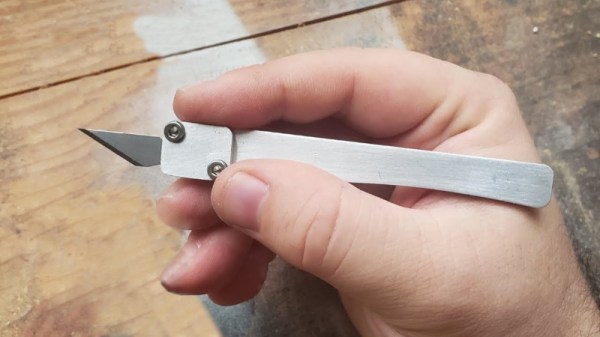
X-acto knives are popular as the scalpel of the craft world. Obviously, holders for the blades are available off-the-shelf, but you needn’t settle for store bought. [Ariel Yahni] set about making an X-acto handle of their own, and it shows just how quick and easy making your own tools can be.

The blades are first measured to determine the appropriate dimensions for the holder. With this done, the basic shape of the handle is drawn up in CAD software using simple primitive shapes and lines. Then it’s just a simple matter of jigging up a piece of aluminium stock in the CNC machine, and letting it do its thing.

The final result needs minimal finishing – primarily just an inspection of the parts, minor deburring and the drilling and tapping of the mount holes. With a couple of socket head cap screws and an X-acto blade installed, it’s ready for work.

We see a lot of interesting tool builds around these parts. You might consider making your own ultrasonic cutter if you’re regularly finishing 3D printed parts. Video after the break. Continue reading “CNCing An X-Acto Knife Holder” →