A High-Speed Slide Scanner Build

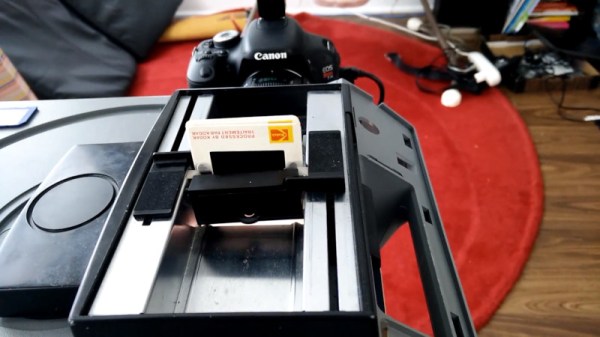
Photographic slides were popular in the middle part of the 20th century, but are long forgotten now. If you’ve found a handful in a dusty attic, you might consider sending them away to be digitized professionally, or using a flatbed scanner at home. [Bryan Howard] found himself with over 200,000 slides, however, so that just wouldn’t do. Instead, he endeavored to build an automated scanner of his own. 

Like many similar projects, [Bryan] started with an existing slide projector as a base. This means that all the difficult work of slide transport is already taken care of. The projector has then been upgraded with an LED light source and other tweaks befitting its new role. An Arduino Pro Micro runs the show, firing off the camera to image each slide before loading the next one into place. The DSLR responsible for imaging is then hooked up to a PC so the incoming images can be checked while the machine is in operation.

Preliminary tests are promising, with the scanner successfully capturing several slides in a row. [Bryan] estimates that, with a capture time of between 1 and 2 seconds per slide, it should take somewhere between 2-5 days to image the entire collection.

We wish [Bryan] the best of luck with the project, and look forward to seeing the final results. We’ve seen similar work before, too. Video after the break.


Continue reading “A High-Speed Slide Scanner Build” →

Build Your Own Freezer With Thermoelectric Coolers

Freezers are highly useful devices. You can preserve food, stop a dead animal from stinking out your apartment, and keep your vodka at the optimal drinking temperature. Of course, most of us bought ours from the local whitegoods store, but [Tech Ingredients] set out to build his own (YouTube, embedded below).

Unlike your freezer at home, this build doesn’t use the typical heat pump and refrigeration cycle with a compressor and expansion valve and so on. Instead, this freezer uses thermoelectric devices to pump heat, in combination with a glycol cooling circuit and fan-cooled radiators.

It’s not the most efficient or practical way to build a freezer, but it is functional and the device demonstrably works, making ice cubes over the course of a few hours. Performance can be further improved by moving the radiator assembly outdoors to make the most of the low ambient temperatures.

[Tech Ingredients] has further plans to experiment with a dessicant-based refrigeration system, and reports that initial results are promising. We’re eager to see how that goes; we’re fans of any rig that can cool a beer down in no time flat. Video after the break.

Continue reading “Build Your Own Freezer With Thermoelectric Coolers” →

Making A Flying Wing With Expanding Foam

Many radio control aircraft modelers will be familiar with the process of cutting wings out of foam with the hot wire method. The tools are simple enough to build at home, and it’s an easy way of producing a lightweight set of wings without too much hassle. [IkyAlvin] walks a different path, however (YouTube link, embedded below).

Expanding foam is the key here – that wonderful sticky material in a can that never quite goes where you want it to. MDF and foam is used to create a mold to produce the wing forms. It’s then a simple matter of loading floor underlay into the mold to act as the outer skin, and then filling the mold with expanding foam and waiting for it to cure.

The final parts are assembled into a flying wing, and the first test flight is remarkably successful. Using foam overlay as a skin also has the added benefit of providing a sleek silver finish to the aircraft. It goes to show that there’s always room to explore alternative techniques outside of the mainstream. If you’d like to get more familiar with the classic hot wire technique, though, we can help there too. Video after the break.

Continue reading “Making A Flying Wing With Expanding Foam” →

Vintage Slide Viewers Make Beautiful Retro Emulators

35mm still photography is still hanging on out in the wild, with its hardcore fans ensuring it never quite dies out despite the onward march of digital imaging. Slides are an even more obsolete technology, forgotten long ago when the quality of color negative films improved. The related paraphernalia from the era of the photographic slide continues to clutter up attics and garages the world over. [Martin Burlus] was in possession of some retro slide viewers, and found they made an excellent basis for a RetroPie build.

The build relies on stock standard fundamentals – a Pi Zero runs the show, combined with a USB hub and a power supply. [Martin] then chose to build this all inside the case of the slide viewer, combined with a 2.8″ PiTFT display. This neatly slots directly on to the Pi Zero’s 40-pin header, and comes complete with a touch screen. It’s the perfect size to slide into most slide viewers, though some models required removal of the tact buttons.

The slide viewers make for a charming enclosure, and the classic 1970s optics make for pleasant viewing. Throwing a modern display behind a vintage lens is a great way to give a project a more classic look and feel. One thing’s for sure – we’ll be keeping an eye out for a slide viewer of our own next time we’re passing through the local junk shops.

Concrete Table Even Includes A USB Hub

When designing furniture, material choice has a huge effect on the character and style of the finished product. Wood is a classic option, while more modern designs may use metal, plastic or even cardboard. Less popular, but no less worthy, is concrete. It’s heavy, cheap, and you can easily cast it into a wide variety of forms. [KagedCreations] thought this would be ideal, and whipped up this nifty piece of furniture with an integrated USB hub.

A pair of melamine shelves were scrapped to build the form, in which the concrete table is cast. Melamine is a popular choice, as it’s cheap, readily available, and releases easily from the finished concrete. Along with the USB hub, a wooden board is cast into the base of the concrete table top. This serves as an easy attachment point for the pre-made hairpin-style legs, which can be installed with wood screws.

The final result is a tidy side table that has plenty of heft to keep it stable and secure. It’s not the first concrete USB hub we’ve seen, but it’s likely the heaviest thus far. We’d love to see a version with an integrated charging pad, too – if you build one, be sure to let us know. Video after the break.

Continue reading “Concrete Table Even Includes A USB Hub” →

Cement Shelves Double As USB Hub

Some of us are able to get by in life with somewhere between 0 and 1 USB ports. We typically refer to these people as “Mac users”. For the rest of us, too much is never enough, and we find ourselves seeking out expansion cards and hubs and all manner of perverse adapters and dongles. [JackmanWorks] was a man who found himself in need of more connectivity, so he built this beautiful shelf with an integrated 12-port hub.

Material choice is key here, with this build looking resplendent in mahogany and cement. As the core of the build, the USB hub is first disassembled and sealed up to prevent damage from the cement. Hot glue is used to protect the PCB, while electrical tape helps cover the individual ports. The cement is then poured into a form which creates the overarching structure for the shelf, with the USB hub being cast in place. With the cement cured, mahogany boards are then cut and waxed, before installation into the structure. These form the individual shelves which hold phones, hard drives and other USB accessories.

The shelf was designed so that the entire structure is supported through the bottom shelf, which then sits on top of the desktop computer case. It’s an attractive piece, and the weight of the cement construction makes it pleasantly stable in use. It’s rare, but we do occasionally see shelf hacks around these parts. Video after the break.

Continue reading “Cement Shelves Double As USB Hub” →

Making A Dash Button Update Your To-do List

Amazon’s Dash Buttons are useful little devices, that let you automatically order a wide variety of common household goods at the press of a button. They’re cheap and wireless and readily available, and that makes them ripe for hacking. In just this vein, [Inbar] and [Ezra] found a way to make the Dash buttons update their to-do list.

[Inbar] uses Any.do to manage his to-do list. There’s no public API, but the service can be configured to respond to Alexa commands. Naturally, this meant that if a Dash Button could be configured to trigger a voice command, Alexa would then make the necessary additions to the list.

This was achieved with lashings of Python, a Raspberry Pi, and Apple’s text-to-speech engine. The Raspberry Pi is set up as a wireless hotspot, to which the Dash Buttons are connected. When the button is pressed, a DHCP request goes out as the button tries to phone home. By scraping the MAC address from this request, the Raspberry Pi can identify which button has been pressed, and then plays a recorded voice sample of Apple’s Samantha voice. This voice was specifically chosen to be the one most reliably understood by Alexa, which is responsible for parsing the voice command and updating the list on Any.do.

It’s a cheeky hack that doesn’t bother itself with the nitty-gritty of interfacing with various services and tools. Instead, it laces up a bunch of easy-to-use software and hardware, and gets the job done just as well.

As we’ve seen, Amazon’s Dash Button has been thoroughly pwned. Video after the break. Continue reading “Making A Dash Button Update Your To-do List” →