Silent Stepper Drive Makes A Nicer Watch Winder

Mechanical watches are great in that they never need batteries, but they are simultaneously less than great in that they will lose time if not worn or otherwise regularly agitated. The ridiculous solution to this is the watch winder, which automatically rotates your mechanical watches for you, while you’re not wearing them. This is probably the item you’ll miss the least once the apocalypse hits. [Kristopher] wanted a nice quiet watch winder for his bedside table, but existing solutions were either too loud or too expensive. As is often the case, hacking ensued.

[Kristopher] had decided that starting from scratch was too much hassle. The cheaper watch winders on the market had acceptable quality enclosures, but were simply too loud. [Kristopher] sourced a $40 unit from Amazon, and proceeded to gut the drivetrain. This was replaced with a Sparkfun stepper motor and a Trinamic SilentStepStick – an advanced stepper motor driver that uses several techniques to reduce noise during operation.

An Arduino Nano was substituted as the brains of the operation, communicating with the stepper driver and allowing the winder to be configured for different wind rates. [Kristopher] reports that the device operates near-silently, and the total cost came in well below that of a high-end luxury winder.

Mechanical watches don’t always get a lot of attention these days, but we’ve seen one built from the ground up before. As always, with tips – send ’em if you got ’em.

Original Xbox Gets Hardware Transplant, And Is Very Fast

The original Xbox launched way back in 2001, to much fanfare. This was Microsoft’s big first entry into the console market, with a machine packing a Pentium III CPU, and commodity PC hardware, contributing significantly to its bulk. Modding was a major part of the early Xbox scene, and as the original hardware has grown too feeble to keep up with modern tasks, enterprising makers have instead turned to packing the black box with modern hardware. The team at [Linus Tech Tips] decided that other builds out there weren’t serious enough, and decided to take things up a notch.

The build starts with a passively cooled compact power supply, a Core i5 8400 6-core CPU, and a GeForce RTX2070 to handle graphical tasks. Parts were carefully selected for a combination of performance, packaging, and with an eye to the thermal limits inherent in stuffing high-powered modern hardware into a tight Xbox shell.

All manner of oddball techniques are used to make the build happen. The GPU is connected through a PCI Express cable, which we were surprised to learn was a thing, given the nature of high-speed signals and long transmission lines. The Xbox shell had its original metal insert and plastic standoffs removed, with an aluminium inner shell being CNC cut and bent up on a pan brake to act as a new internal chassis. There’s yet more carnage to come, as the GPU has its extraneous DVI port hacked off with a grinding wheel.

In the end, after much cutting and cajoling, the parts come together and fit inside the case, making the sleeper build a reality. It’s fun to watch the team fiddle with config files and struggle to load and play local multiplayer games, as they realise that there are just some things that consoles do better.

Regardless, it’s an impressive casemod that goes to show what you can pull off with some off-the-shelf parts, a well-stocked workshop, and some ingenuity. If you’re looking for more case mod inspiration, try out this all-in-one printer build. Video after the break.

[Thanks to Keith O for the tip!]

Continue reading “Original Xbox Gets Hardware Transplant, And Is Very Fast” →

The Vectrex Projector We’ve Been Waiting For

Unlike most old consoles, the Vectrex is unique for having a vector-based display. This gives it a very different look to most of its contemporaries, and necessitated a built-in display, as regular televisions aren’t built to take vector signals. Not one to be limited to the stock screen size, [Arcade Jason] decided the Vectrex needed a projection upgrade, and built exactly that.

The build relies on a lens that [Jason] salvaged from an old rear-projection TV. These units used CRTs with big lenses which projected the image onto a screen. That’s precisely what is happening here, with a vector display replacing the CRT used in the original TV. The vector display itself used here is a tube from a small black and white TV set, which [Jason] modified to use a Vectrex yoke, making it capable of vector operation.

Through some modification and careful assembly, [Jason] was rewarded with a wall-sized display for his Vectrex console. This is demonstrated with some beautiful glowing vector demos, accompanied with appropriate bleep-bloop music, as was the style at the time. The Cantina band is a particular highlight.

We’ve seen [Jason]’s vector hacks before, too – like this Asteroids machine modified to display in color. Video after the break.

Continue reading “The Vectrex Projector We’ve Been Waiting For” →

Build A Seismometer Out Of Plumbing Parts

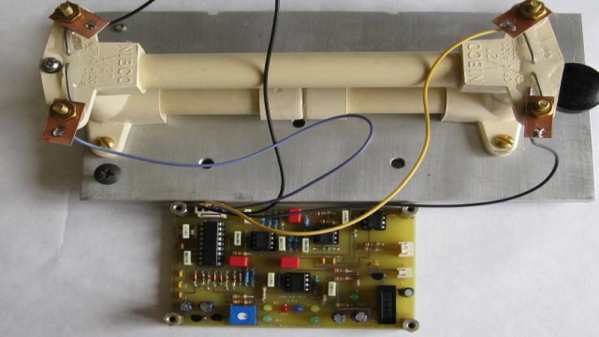
For those outside the rocking and rolling of California’s tectonic plate, earthquakes probably don’t come up on a daily basis as a topic of conversation. Regardless, the instrument to measure them is called a seismometer, and it’s entirely possible to build one yourself. [Bob LeDoux] has shared his article on how to build a Fluid Mass Electrolytic Seismometer, and it’s an impressive piece of work.

This is an instrument which works very differently from the typical needle-and-graph type seen in the movies. Fluid is held in a sealed chamber, with a restricted orifice in the center of a tube. The fluid level is monitored at each side of the orifice. When motion occurs, fluid levels change at either side which allows seismic activity to be measured.

Hooked up to some basic analog electronics, in this form, the device only shows instantaneous activity. However, it would be trivial for the skilled maker to hook this up to a datalogging setup to enable measurements to be plotted and stored. The entire project can be built with simple hand tools and a basic PCB, making it highly accessible.

It’s not the first time we’ve seen a seismometer, either – the Raspberry Shake project is a distributed network of sensors running on the Raspberry Pi.

Open Sourced Carbon Fiber Rod Ends

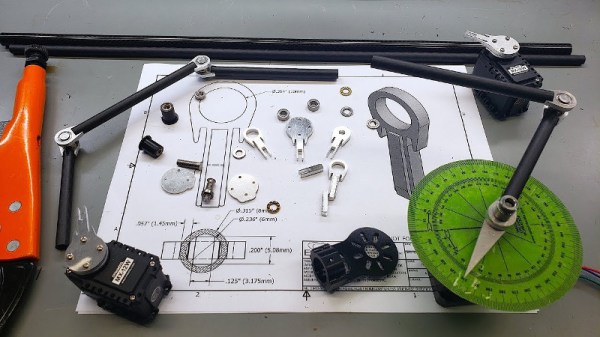
Modellers and makers who have been around the block for a few decades generally have their preferred materials. Balsa wood, sheet metal, brass tube… these were all staples of the hobbyist workshop. Composites are very much the new kid on the block and are starting to gain more of a foothold in the hobby marketplace. [Anthony] has been experimenting in this area, and has created some useful attachments for carbon fiber tubing.

The fittings are designed to be lasercut from aluminium or 3D printed. The rod ends are a simple two-piece design that slots together, before insertion into the carbon fiber rod. [Anthony] shows off a series of rods being used as linkages with a stepper motor, before performing pull-out tests on the links. Installed with cyanoacrylate glue, the link holds up to a pull load in excess of 180 lbs. The strength is impressive, and [Anthony] also talks about how to install the appropriate bearings to use the links for motion projects.

Overall, these links will likely prove useful to anyone using carbon fiber rods in a build, and helpfully, the required files are all available on GitHub. The source material is now cheap and readily available online, and is strong and resilient when used properly. We’ve seen carbon fiber popping up in a lot more projects recently, too. Video after the break.

Continue reading “Open Sourced Carbon Fiber Rod Ends” →

Front Door Camera Sends Automatic Alerts By Text

In these turbulent times, journalists fearmonger and honest citizens fear for the safety of their homes and themselves. Adding some security features can allay these fears, and with the advent of cheap technology, front door cameras have become popular. There’s a wide array of options on the market, but short of watching hours of logged video, they’re not always super useful. Adding some smarts can really help – as [Peter Quinn] has done.

For this project, [Peter] decided on a JeVois smart camera. More than just a USB webcam, it also packs a quad-core processor running machine vision algorithms. This allows object recognition and other tasks to be run on the camera itself. In this setup, [Peter] configured the JeVois camera to detect people. When a human is detected upon the doorstep, the camera sends a message to the connected Raspberry Pi over serial. The Raspberry Pi then captures a JPEG still from the camera over the USB connection, and, using Twilio, sends a notification to [Peter]’s phone.

It’s a well-integrated system that automatically photographs visitors to [Peter]’s home, requiring little to no interaction from the user. We’ve seen other integrated machine vision platforms, too – such as the OpenMV, which got its start as a Hackaday Prize entry, way back in 2017.

CNC Mill Repairs IPhone 7

Modern smartphones are highly integrated devices, bringing immense computing power into the palm of one’s hand. This portable computing power and connectivity has both changed society in innumerable ways, and also tends to lead to said powerful computers ending up dropped on the ground or into toilets. Repairs are often limited to screen replacement or exchanging broken modules, but it’s possible to go much further.

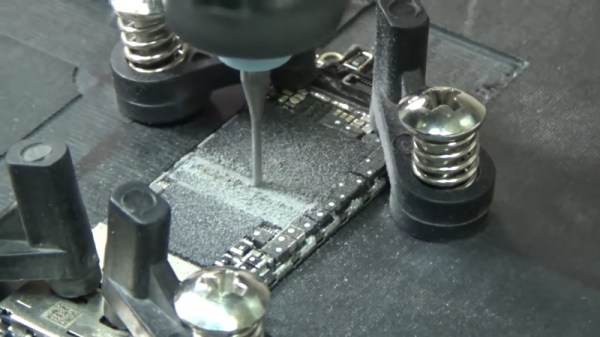
The phone is an iPhone 7, which a service center reported had issues with the CPU, and the only fix was a full mainboard replacement. [The Kardi Lab] weren’t fussed, however, and got to work. The mainboard is installed in a CNC fixture, and the A10 CPU is delicately milled away, layer by layer. A scalpel and hot air gun are then used for some further cleanup of the solder pads. Some conductivity testing to various pads is then carried out, for reasons that aren’t entirely clear.

At this point, a spare A10 CPU is sourced, and a stencil is used to apply solder paste or balls – it is not immediately obvious which. The new chip is then reflowed on to the mainboard, and the phone reassembled. The device is then powered on and shown to be functional.

It’s an impressive repair, and shows that modern electronics isn’t so impossible to fix – as long as you have the right tools to hand. The smart thing is, by using the CNC machine with a pre-baked program, it greatly reduces the labor required in the removal stage, making the repair much more cost-effective. The team are particularly helpful, linking to the tools used to pull off the repair in the video description. We’ve seen similar hacks, too – such as upgrading an iPhone’s memory.  Video after the break.

[Thanks to Nikolai for the tip!]

Continue reading “CNC Mill Repairs IPhone 7” →