Repairing A “for Parts” Canon 7D Mark II DSLR

The exciting part of buying a ‘broken, for parts’ off a site like EBay is that you rarely know exactly just how ‘broken’ it truly is. Even if the seller insists that it’s thoroughly buggered, you just might be able to eke out a fix with some out-of-the-box thinking and plucky ingenuity. Such was the case for [Dieter Vansteenwegen] who gambled on a cheap Canon 7D Mark II DSLR body that was sold for a mere €180 on account of broken condition.
After confirming that the DSLR’s condition was basically as described by the seller, with nothing on the LCD or HDMI output and the auto-focus not working while partially pressing the trigger button, but still taking a picture when fully pressed. Sometimes it would also show a standard maintenance message on the LCD, so clearly it ought to be working. Maybe the camera’s processor was just being chronically unhappy about something, in which case an easy fix might be possible.

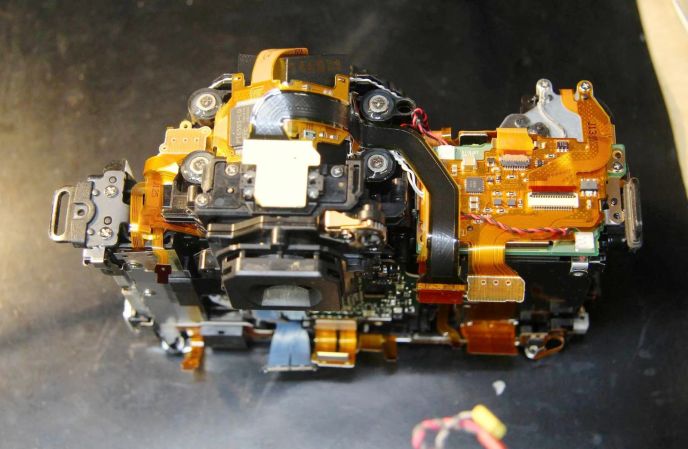
As anyone who has ever taken a digital camera apart knows, you do not simply pop them open for a quick look. Somewhere in the nightmarish contraption of flatflex cables, PCBs and endless sub-assemblies there might be a fault, but where to start? Fortunately with some support from the custom Canon firmware community Magic Lantern and the website Photo Parts UA for reference images he was able to start tracing a number of pertinent signals.

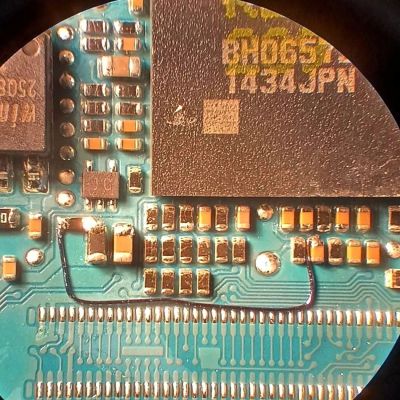
With the auto-focus hint as guide, this was traced back to the MPU, which turned out to have a floating signal on the auto-focus pin that got interpreted as ‘active’. Likely the internal pull-up got damaged due to the use of an external trigger module as there’s no real protection on these lines. One bodge wire later to create an external 3.3 V pull-up the DSLR happily sprung back to life.

In terms of parts this definitely was a cheap repair, but it comes with the prerequisite of having the skills and equipment to perform said repair. Still, massive props and congratulations to [Dieter] for saving this DSLR from being merely a device to be picked over for parts.
Duplicating Parts Using Silicone Molds

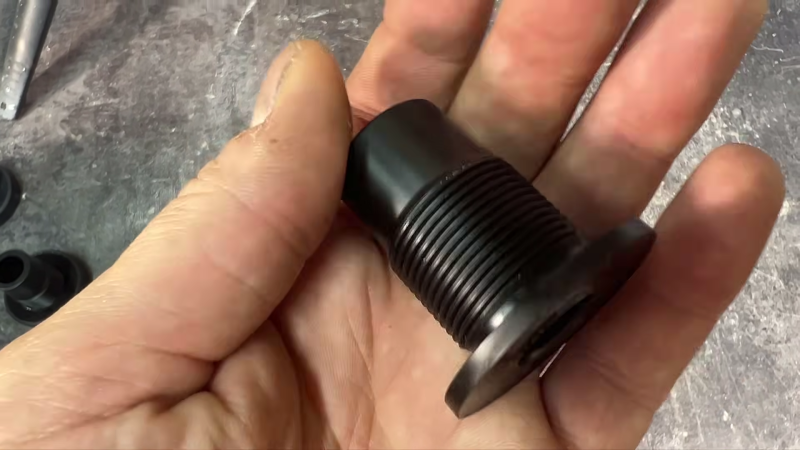
[Do As I Do] had a simple task to complete. A couple of small parts needed to be duplicated in some quantity, with good dimensional accuracy and surface finish. There are a number of ways you might go about this, particularly if you have the original tooling or a machine shop on hand. In this case, however, the plan was to duplicate the parts with silicone molds.

The first step, naturally, was to produce the silicone molds. Doing this involved some craft supplies, with glossy paper and hot glue used to create a vessel for casting silicone around the original parts. The silicone itself was mixed carefully and poured into the vessels, and soon enough [Do As I Do] had a pair of negative molds that could be used to produce duplicates of the original. The original parts were removed, and the silicone molds were filled with resin over and over again to make as many duplicates as were needed.

This was a simple enough project with straightforward geometry that suited the process. More challenging parts would require more care in mold prep and more advanced techniques. Depending on material choice for the duplicate parts and other factors like intended final application, extra steps like degassing may be necessary, too. Still, for a quick guide on duplicating a simple plastic part, it’s hard to beat.

We’ve featured other silicone mold jobs before, like these impressive recreated tail light lenses. Video after the break.

Continue reading “Duplicating Parts Using Silicone Molds”

Delta Pen Plotter Draws In Multiple Colors

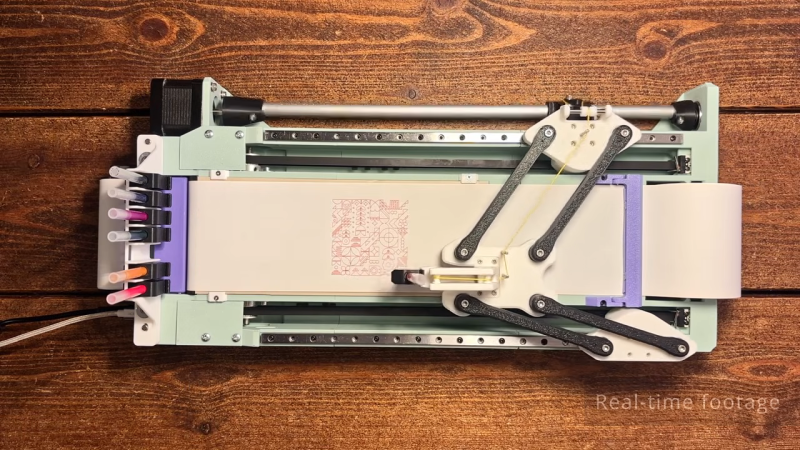
If you’re building your first plotter, or you just like thinking in right angles, you’d probably consider a Cartesian design for your build. [András Vujovits] went another route with his project, building an impressive delta pen plotter with a useful tool changer, to boot.

The build relies on a unique motion system, wherein two NEMA 17 stepper motors drive either side of the linkage to control the position of the end effector—in this case, a pen carriage. By controlling the position of each side of the mechanism, it’s possible to move the pen through XY space. Running the show is an Arduino Nano, fitted with a GRBL shield and appropriate stepper motor drivers.

The magnetic tool changer is particularly nifty, too. It allows the plotter to grab a different ink at will to add more color to the drawing. It’s well-designed, with the plotter able to change inks without losing accuracy or otherwise fumbling the switchover. The plotter uses Muji ball point pens, which are available in a range of colors and draw with slick, clean lines. It’s also quite a fast plotter, thanks in part to [András]’s efforts to keep the pen carriage light by using a smart mechanism to offload the pen lifting actuator to the main body.

[András] has plans available, but you’re going to have to pay for them. Still, it’s always nice to see a new machine in the wild. Video after the break.

Continue reading “Delta Pen Plotter Draws In Multiple Colors”

How Film Industry Data Website The-Numbers.com Got Mauled By Bots

A lot has been made about the increase of automated traffic on the Internet, with the past years LLM-related crawlers having quite literally swarmed the picture here. Not only does this drive up traffic, it also increases load on web servers, whose owners find themselves faced with increased hosting costs. This recently led to The-Numbers.com going offline for a while as automated traffic was quite literally destroying their bottom line.

This saga is covered by [Stephen Follows], who had a chance to talk with the founder and CEO of the site, [Bruce Nash], after the site went basically offline for a few months. Since the website both licenses data for commercial purposes as well as offering the free access on its website, there were accusations of this being a ‘rug pull’.

The site was started in 1997, as a static HTML site on Geocities where [Bruce] provided box office analyses for investment purposes. Since that beginning traffic was generally polite, with human visitors and usually well-behaved search engine crawlers. Then around 2024 the first wave of scraper bots arrived, followed by a larger wave around December of 2025.

Despite implementing a few mitigations, such as LLM-targeted text, the increased traffic and the resulting load on a site architecture that was never designed for this ultimately led to a collapse. One of the major sources of traffic turned out to be from so-called ‘prediction markets’, like Polymarket, whose bots absolutely hammered the site.

Fortunately for [Bruce] and his team they do not rely on the free website for income, but they have had to massively rework the site’s architecture to bring back a semblance of the original features. As noted in the article, the amount of crawling traffic by these LLMs and ‘agentic AI’ tools is logarithmically more than that for search engines, which makes this a major challenge.

Issues like these is why services such as Cloudflare are offering blocking features for such automated traffic. After all, unless such traffic is of use to you, you may as well treat it like a DDoS attack and cut it off at the root.

Thanks to [Ben] for the tip.

Building A Fencing Scoring Box

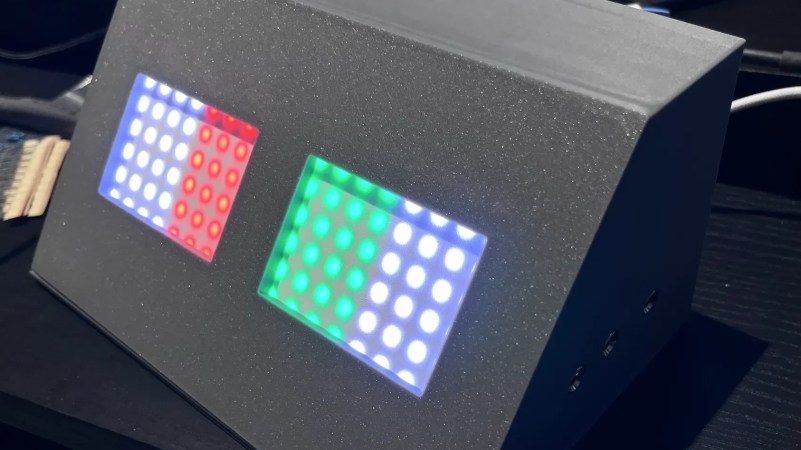
The sport of fencing requires keeping score, just like so many other similar pastimes. When their club’s existing scoring rig broke, [jc0025] stepped up to build a scoring box of their own, using the typical tools of the maker trade.

The brains of the operation is an Arduino Nano, running the venerable ATmega328P. It’s set up to drive a pair of 8×8 WS2812B addressable LED panels. It’s also hooked up to a pair of fencing socket blocks, which hook up to the lamé (jacket), weapon, and guard of each player for electronically scoring hits. The Arduino is thus programmed to respond to various conditions, lighting the LEDs in turn. For example, the tip of one player’s weapon hitting the other player’s lamé will fire a colored light, allowing the hit to be scored. Meanwhile, a tip hitting the floor will fire a white light, indicating off-target. There’s also a buzzer for sonic indication, as well. Everything is wrapped up in a tidy 3D-printed housing, while power is courtesy of a USB-C charger hooked up to the unit.

If you’re looking to replace some old broken fencing scoring gear on the cheap, this project is probably a good place to start. We’ve featured some other great scoreboard projects over the years, too. Meanwhile, if you’re whipping up your custom own gear for your local sporting club, we might like to hear about it on the tipsline.

An image of skyscrapers over a bay is shown, with some foliage along the bank. The sky and water are a pale blue-grey, while the foliage is pink.

Taking Tri-Camera True-Color Infrared Videos

Silicon-based CMOS camera sensors are cheap and plentiful, but they’re rarely used to their full potential: they can detect a greater range of wavelengths in the infrared spectrum than they can in the visible spectrum, but in most cameras this is blocked by an IR-cut filter. [Project 326]’s infrared camera system reverses this: it records infrared images in color while blocking out visible light.

The system uses three USB webcams, each with its IR cut filter removed and replaced with a different dichroic IR band-pass filter. One filter is centered at 750 nm, one at 850 nm, and one at 940 nm. There is no band overlap; in testing, each camera only detected an infrared flashlight tuned to its own filter wavelength. The original cameras didn’t hold the sensors in a consistent position, so [Project 326] designed new housings. Using three lenses, each with distinct aberrations, introduced some difficulties in alignment. [Project 326] originally intended to use a pair of beam-splitting prisms with only one lens, but this proved too difficult to align using 3D-printed frames.

A Raspberry Pi records a separate monochromatic stream from each camera, which can then be processed into a composite color video. The first frames need to be manually aligned, but afterwards a script can apply the alignment to the rest of the video. Finally, the channels are mapped to colors, with the precise mapping being freely changeable. There were some few unexpected issues: each camera has its own, not terribly precise, local oscillator, and they drifted apart by about one or two frames per minute. Parallax error, on the other hand, was less severe than might be expected: at close range it’s noticeable, but by a distance of 35 meters, it represents less than one pixel of distortion.

The resulting images look great, and it’s easy to forget that they’re being captured without the use of any visible light. We’ve seen a similar technique (though extending into the visible range) used to recreate the surreal effect of Aerochrome film.

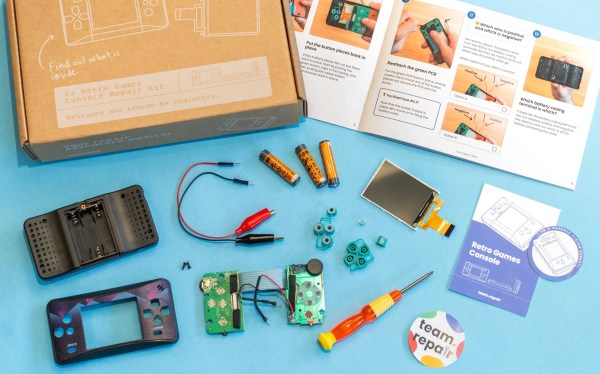
A cardboard box (top left), set of instructions (top right), and a disassembled gaming console (bottom half) are strewn across a light blue tabletop, giving the impression that repair is impending.

Team Repair Breaks Things To Teach People How To Fix Them

Would you buy a broken device, fix it, then return the repaired item? [Team Repair] hopes you will.

Many people would rather repair what they have than have to get a new device and deal with all the annoyances of shopping and getting used to a new item. The problem is, most people don’t have any experience fixing their broken electronics and are intimidated by the process. [Team Repair] has found that helping people through the process the first time is a big confidence boost, especially when they have a test piece to work with.

[Team Repair] started with workshops and now has a “Fixers Club” subscription box for 8-14 year olds where they will send a broken device every three months to fix. After the device is repaired, it gets sent back into Team Repair, or iFixit in the US, to be broken again and sent to the next fixer. For grownups, there is a similar smartphone repair kit, but it’s currently waitlisted. If you’re in the UK, they even have a classroom program if you want to recruit larger groups into your fixer corps.

Curious about other ways to get into repairing your own things? We don’t recommend starting with smart rings, but learning analog repairs like zippers or turning a laptop into a desktop could be good places to start?

Continue reading “Team Repair Breaks Things To Teach People How To Fix Them”