A Mechanical Laser Show With 3D-Printed Cams And Gears

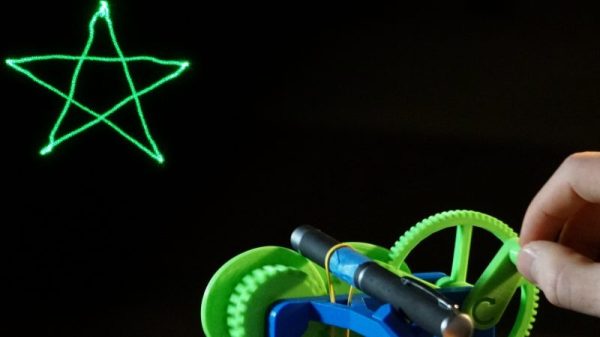
Everyone knows how to make a POV laser display — low-mass, first-surface mirrors for the X- and Y-axes mounted on galvanometers driven rapidly to trace out the pattern. [Evan Stanford] found a simpler way, though: a completely mechanical laser show from 3D-printed parts.

The first 10 seconds of the video below completely explains how [Evan] accomplished this build. A pair of custom cams wiggles the laser pointer through the correct sequences of coordinates to trace the desired pattern out when cranked by hand through a 1:5 ratio gear train. But what’s simple in concept is a bit more complicated to reduce to practice, as [Evan] amply demonstrates by walking us through the math he used to transfer display shapes to cam profiles. If you can’t follow the math, no worries — [Evan] has included all the profiles in his Thingiverse collection, and being a hand model software guy by nature, he’s thoughtfully developed a program to automate the creation of cam profiles for new shapes. It’s all pretty slick.

Looking for more laser POV goodness? Perhaps a nice game of laser Asteroids would suit you.

Continue reading “A Mechanical Laser Show With 3D-Printed Cams And Gears”

Portable ESP32 RGB Lasershow Has All The Trimmings

Perhaps there was a time when fancy laser effects were beyond those without the largest of bank accounts, but today they can be created surprisingly easily. [Corebb] shows us how with a neat unit using an off the shelf RGB laser module and mirror module, driven by a ESP32 with software designed to make it as easy as possible to use.

The video below the break is in Chinese so you’ll have to turn on the subtitles if you’re an Anglophone, and it takes us through the whole process. It’s mounted in an SLA 3D printed enclosure which neatly holds all the parts. The ESP32 module drives a couple of DACs which in turn drive the galvanometer motors through a pair of amplifiers.

Then the software allows all sorts of custom displays for your creative expression, including uploading quick sketches over WiFi. Beyond pretty patterns we see it mounted on a bicycle for a head-up display of speed and navigation info. Even if it does fall off and break at one point we can see that could be an extremely useful accessory.

All the code can be found in a GitHub repository should you wish to try for yourself. Meanwhile we’ve covered a lot of laser projector projects here in the past, including most recently this one using stepper motors in place of galvanometers.

Continue reading “Portable ESP32 RGB Lasershow Has All The Trimmings”

Laser Augmented Reality Glasses Show You The Way

Tech companies like Google and Microsoft have been working on augmented reality (AR) wearables that can superimpose images over your field of view, blurring the line between the real and virtual. Unfortunately for those looking to experiment with this technology, the devices released so far have been prohibitively expensive.

While they might not be able to compete with the latest Microsoft HoloLens, these laser AR classes from [Joel] promise to be far cheaper and much more approachable for hackers. By bouncing a low-power laser off of a piezo-actuated mirror, the hope is that the glasses will be able to project simple vector graphics onto a piece of reflective film usually used for aftermarket automotive heads-up displays (HUDs).

Piezo actuators are used to steer the mirror.

[Joel] has put together a prototype of what the mirror system might look like, but says driving the high-voltage piezo actuators poses some unique challenges. The tentative plan is to generate the vector data with a smartphone application, send it to an ESP32 microcontroller within the glasses, and then push the resulting analog signals through a 100 V DC-DC boost converter to get the mirror moving.

We’ve seen the ESP32 drive a laser galvanometer to play a game of Asteroids, but recreating such a setup in a small enough package to fit onto a pair of glasses would certainly be an impressive accomplishment. Early tests look promising, but clearly [Joel] has quite a bit of work ahead of him. As a finalist for the Rethink Displays challenge of the 2021 Hackaday Prize, we’re looking forward to seeing the project develop over the coming months.

Laser Light Show Turned Into Graphical Equalizer

The gold standard for laser light shows during rock concerts is Pink Floyd, with shows famous for visual effects as well as excellent music. Not all of us have the funding necessary to produce such epic tapestries of light and sound, but with a little bit of hardware we can get something close. [James]’s latest project is along these lines: he recently built a laser light graphical equalizer that can be used when his band is playing gigs.

To create the laser lines for the equalizer bands, [James] used a series of mirrors mounted on a spinning shaft. When a laser is projected on the spinning mirrors it creates a line. From there, he needed a way to manage the height of each of the seven lines. He used a series of shrouds with servo motors which can shutter the laser lines to their appropriate height.

The final part of the project came in getting the programming done. The brain of this project is an MSGEQ7 which  takes an audio input signal and splits it into seven frequencies for the equalizer. Each one of the seven frequencies is fed to one of the seven servo-controlled shutters which controls the height of each laser line using an Arduino. This is a great project, and [James] is perhaps well on his way to using lasers for other interesting musical purposes.

Continue reading “Laser Light Show Turned Into Graphical Equalizer”

Video Shows Power Isn’t Everything In Laser Engraving

When it comes to power tools, generally speaking more watts is better. But as laser maestro [Martin Raynsford] shows, watts aren’t everything. He shares a brief video showing his older 100 W laser being handily outperformed by a newer 30 W machine. Shouldn’t the higher power laser be able to do the same job in less time? One might think so, but wattage isn’t everything. The 30 W laser engraves and cuts a wooden tile in just under half the time it takes the 100 W machine to do the same job, and with a nicer end result, to boot.

Why such a difference? Part of the answer to that question lies in that the newer machine has better motion control and can handle higher speeds, but the rest is due to the tubes themselves. The older 100 W machine uses a DC-excited (big glass water-cooled tube) CO2 laser, and the newer 30 W machine uses an RF-excited laser that looks a bit like a big metal heat sink instead of oversized lab glassware. Both tubes output what is essentially the same beam, but the RF tube is overall capable of a more refined, more stable, and more finely focused point than that of the glass tube. Since engraving uses only a small fraction of even the 30 W laser’s power, the finer control that the RF laser has over the low end of the power scale results in a much higher quality engraving.

Embedded below is a short video showing both machines engraving and cutting the same tile, side by side. You may wish to consider watching this one full screen, to better see the fine details.

Continue reading “Video Shows Power Isn’t Everything In Laser Engraving”

Science Shows Green Lasers Might Be More Than You Bargained For

This may come as a shock, but some of those hot screaming deals on China-sourced gadgets and goodies are not all they appear. After you plunk down your pittance and wait a few weeks for the package to arrive, you just might find that you didn’t get exactly what you thought you ordered. Or worse, you may get a product with unwanted bugs features, like some green lasers that also emit strongly in the infrared wavelengths.

Sure, getting a free death ray in addition to your green laser sounds like a bargain, but as [Brainiac75] points out, it actually represents a dangerous situation. He knows whereof he speaks, having done a thorough exploration of a wide range of cheap (and not so cheap) lasers in the video below. He explains that the paradox of an ostensibly monochromatic source emitting two distinct wavelengths comes from the IR laser at the heart of the diode-pumped solid state (DPSS) laser inside the pointer. The process is only about 48% efficient, meaning that IR leaks out along with the green light. The better quality DPSS laser pointers include a quality IR filter to remove it; cheaper ones often fail to include this essential safety feature. What wavelengths you’re working with are critical to protecting your eyes; indeed, the first viewer comment in the video is from someone who seared his retina with a cheap green laser while wearing goggles only meant to block the higher frequency light.

It’s a sobering lesson, but an apt one given the ubiquity of green lasers these days. Be safe out there; educate yourself on how lasers work and take a look at our guide to laser safety. Continue reading “Science Shows Green Lasers Might Be More Than You Bargained For”

Little Laser Light Show Is Cleverly Packaged, Cheap To Build

We’re suckers for any project that’s nicely packaged, but an added bonus is when most of the components can be sourced cheaply and locally. Such is the case for this little laser light show, housed in electrical boxes from the local home center and built with stuff you probably have in your junk bin.

When we first came across [replayreb]’s write-up and saw that he used hard drives in its construction, we assumed he used head galvanometers to drive the mirrors. As it turns out, he used that approach in an earlier project, but this time around, the hard drive only donated its platters for use as low mass, first surface mirrors. And rather than driving the mirrors with galvos, he chose plain old brushed DC motors. These have the significant advantage of being cheap and a perfect fit for 3/4″ EMT set-screw connectors, designed to connect thin-wall conduit, also known as electromechanical tubing, to electrical boxes and panels. The motors are mounted to the back and side of the box so their axes are 90° from each other, and the mirrors are constrained by small cable ties and set at 45°. The motors are driven directly by the left and right channels of a small audio amp, wiggling enough to create a decent light show from the laser module.

We especially like the fact that these boxes are cheap enough that you can build three with different color lasers. In that case, an obvious next step would be bandpass filters to split the signal into bass, midrange, and treble for that retro-modern light organ effect. Or maybe figuring out what audio signals you’d need to make this box into a laser sky display would be a good idea too.

Continue reading “Little Laser Light Show Is Cleverly Packaged, Cheap To Build”