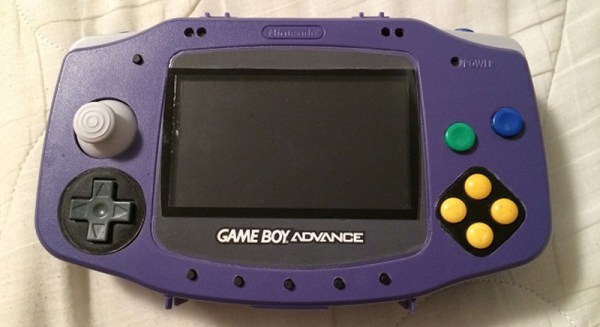
Breadboardable WS2812 LEDs

LED

Hackaday sees a ton of projects featuring the WS2812 series of digitally controllable RGB LEDs, in the form of bare chips, RGB LED strips, or some form of Adafruit’s NeoPixels. All these WS2812 LED products have one thing in common – they’re chip LEDs, making some projects difficult to realize. Now there’s a new member of the WS2812 family – a through-hole LED version – that should be available through the usual sources sometime later this year.

The key difference between these and the usual WS2812 LEDs is the packaging; these are 8mm LEDs with pins for power, ground, data in, and data out. With the preexisting libraries, this 8mm LED should work just the same as any other WS2812 LED.

Aside from a through-hole package, these new LEDs are very diffuse and aren’t as blinding as the normal chip LEDs. If you want to pick up a few of these LEDs, they’re available here, 13 LEDs for $15. There’s a lot of potential here for RGB LED cubes, something we hope to see sooner rather than later.

3D Printering: Making A Thing In FreeCAD, Part I

printering

I’ve been writing these tutorials on making an object in popular 3D modeling programs for a while now, and each week I’ve put out a call for what software I should do next. There is one constant in all those comment threads: FreeCAD. I don’t know if these suggestions reflect the popularity or difficulty of FreeCAD nevermind, it’s totally the difficulty.

FreeCAD is an amazing tool that, if used correctly, can be used to make just about any part, and do it in a manufacturing context. If you need a bauble that’s three times the size of the original, FreeCAD’s parametric modeling makes it easy to scale it up. If you’re designing a thumbscrew and want the head larger while keeping the threads the same, FreeCAD is for you. Basically, you can think of this as a graphical extension of the Thingiverse Customizer. Very powerful, very cool, and unlike a lot of CAD packages out there, free.

Our in-house, overpaid SEO expert (he’s really just a monkey someone trained to use a bullwhip) demands I link to the previous ‘Making a Thing’ tutorials:

The tutorial for FreeCAD continues below.

Continue reading “3D Printering: Making A Thing In FreeCAD, Part I”

ATMega & ATtiny Core Temperature Sensors

temp

We don’t know if this will come as a surprise to the regular Hackaday reader, but a whole bunch of Atmel microcontrollers have a very cool feature hidden away in their datasheets. Most of them – everything from the ATMega 168, 328, 32u4, to the ATtiny85 and  84 have a temperature sensor right on the chip. [Connor] did a little bit of research on this sensor and came up with a little bit of code that spits out the core temperature of these Atmel chips over the serial port.

The temperature sensor on these Atmel chips is accessed by writing a code – ‘100111’ for the Mega32u4 and ‘100010’ for the tiny84, for example – into the ADMUX register on the chip. According to the datasheet, the returned temperature is accurate to +- 10°C, but that can be easily calibrated by holding an ice cube (in a plastic bag, of course) up to the chip.

With a little more code, [Connor] is able to output the temperature of the microcontroller core over a serial port. In testing, his chip started out at 20°C and reached equilibrium at 24°C after about a minute. Pretty neat, and could be used as a temperature sensor for a project in a pinch.

3D Printering: Making A Thing In Autodesk 123D

printering

In the continuing battle against 3D printers used exclusively for fabricating plastic octopodes and useless trinkets, here’s yet another installment of a Making A Thing tutorial. If you’ve ever wanted to make one single object in multiple 3D design softwares, this is for you.

Previously, we’ve built a ‘thing’ in a few different 3D modeling programs, including:

See that ‘Read more…’ link below? You might want to click that.

Continue reading “3D Printering: Making A Thing In Autodesk 123D”

3D Printering: Making A Thing With Blender, Part II

printering

So you have a 3D printer and need to print something of your own design. That’s a problem if you don’t know how to create and edit 3D objects.  In this post, we’re continuing our previous misadventures with Blender by making a ‘thing’ torn from a very old book on drafting.

Previously, we’ve made the same part in other 3D design packages. Here’s some links to those other ‘Making a Thing’ posts:

We’ve already done half the work to make a ‘thing’ in Blender, so now it’s time to finish the job. Check out the rest of the tutorial below.

Continue reading “3D Printering: Making A Thing With Blender, Part II”

3D Printering: Making A Thing In Blender, Part I

printering

In case you weren’t aware, having a 3D printer is nothing like owning a real-life Star Trek replicator. For one, replicators are usually found on Federation starships and not hype trains. Secondly, the details of how replicated objects are designed in the 24th century is an issue completely left unexplored by TNG, and DS9, and only a minor plot point in a few Voyager episodes. Of the most likely possibilities, though, it appears replicated objects are either initially created by ‘scanning’ them with a teleporter, or commanding the ship’s computer to conjure something out of the hologrid.

No, with your own 3D printer, if you want a unique object you actually have to design it yourself. Without a holodeck. Using your hands to move a mouse and keyboard. Savages.

This series of ‘Making a Thing’ tutorials aims to fix that. With this post, we’re taking a look at Blender, an amazing 3D modeling and animation package.

Because we still haven’t figured out the best way to combine multiple blog posts together as a single resource − we’re working on that, though − here’s the links to the previous “Making a Thing” posts:

This list is sure to grow thanks to your suggestions on what 3D modeling software to feature, but for now let’s make a thing in Blender.

Continue reading “3D Printering: Making A Thing In Blender, Part I”

3DMonstr Printer: 8 Cubic Feet Of Build Volume

3D Monster

So you’re looking at 3D printers, but the build volumes for the current offerings just aren’t where you’d like them to be. [Ben Reylblat] had the same problem and came up with the 3DMonstr, an enormous printer that has (in its biggest configuration) a two foot cubed build volume, four extruders, and the mechanical design to make everything work.

Most of the ginormous 3D printers we’ve seen are basically upgraded versions of the common table-top sided models. This huge Ultimaker copy uses the same rods as its smaller cousin, and LeBigRap also uses woefully undersized parts. The 3DMonstr isn’t a copy of smaller machines, and instead uses very big motors for each axis, ball screws, and a proper welded frame. It’s highly doubtful anyone will call this printer a wobblebot.

The 3DMonstr comes in three sizes: 12 inches cubed, 18 inches cubed, and 24 inches cubed, with options for two to four extruders.  We caught up with the 3D Monstr team at the NYC Maker Faire, and from first impressions we have to say this printer is freakin’ huge and impeccably designed.