Generating Entangled Qubits And Qudits With Fully On-Chip Photonic Quantum Source

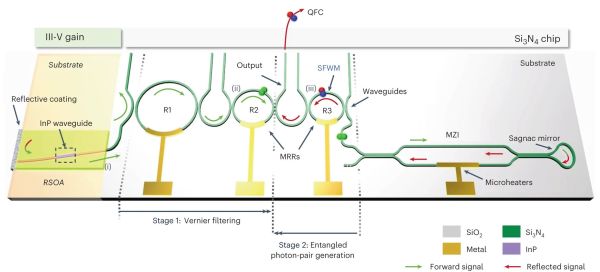
As the world of computing and communication draws ever closer to a quantum future, researchers are faced with many of the similar challenges encountered with classical computing and the associated semiconductor hurdles. For the use of entangled photon pairs, for example, it was already possible to perform the entanglement using miniaturized photonic structures, but these still required a bulky external laser source. In a recently demonstrated first, a team of researchers have created a fully on-chip integrated laser source with photonic circuitry that can perform all of these tasks without external modules.

In their paper published in Nature Photonics, Hatam Mahmudlu and colleagues cover the process in detail. Key to this achievement was finding a way to integrate the laser and photonics side into a single, hybric chip while overcoming the (refractive) mismatch between the InP optical amplifier and Si3N4 waveguide feedback circuit. The appeal of photon-based quantum entanglement should be obvious when one considers the relatively stable nature of these pairs and their compatibility with existing optical (fiber) infrastructure. What was missing previously was an economical and compact way to create these pairs outside of a laboratory setup. Assuming that the described approach can be scaled up for mass-production, it may just make quantum communications a realistic option outside of government organizations.

The Shuttle Engine Needed 3D Printing, But…

If we asked you to design a circuit to blink a flashing turn signal, you would probably reach for a cheap micro or a 555. But old cars used bimetallic strips in a thermomechanical design. Why? Because, initially, 555s and microcontrollers weren’t available. [Breaking Taps] has the story of NASA engineers who needed some special cooling chambers in a rocket design for the Space Shuttle. Today you’d 3D print them, but in the 70s, that wasn’t an option. So they used wax. You can see a video about the process, including a build of a model rocket engine, in the video below.

The issue is the creation of tiny cooling channels in the combustion chamber. You can use additional thin pipes brazed onto the engine. However, there are several disadvantages to doing this way, but early rocket engines did it anyway. Having the cooling path integrated into the system would be ideal, but without 3D printing, it seems difficult to do. But not impossible.

Continue reading “The Shuttle Engine Needed 3D Printing, But…”

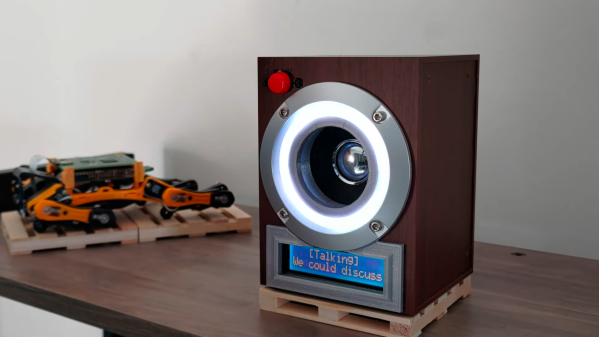
A small speaker with an LCD showing chatbot responses

AI-Powered Speaker Is A Chatbot You Can Actually Chat With

AI-powered chatbots are pretty cool, but most still require you to type your question on a keyboard and read an answer from a screen. It doesn’t have to be like that, of course: with a few standard tools, you can turn a chatbot into a machine that literally chats, as [Hoani Bryson] did. He decided to make a standalone voice-operated ChatGPT client that you can actually sit next to and have a conversation with.

The base of the project is a USB speaker, to which [Hoani] added a Raspberry Pi, a Teensy, a two-line LCD and a big red button. When you press the button, the Pi listens to your speech and converts it to text using the OpenAI voice transcription feature. It then sends the resulting text to ChatGPT through its API and waits for its response, which it turns into sound again through the eSpeak speech synthesizer. The LCD, driven by the Teensy, shows the current status of the machine and also provides live subtitles while the machine is talking.

To spice up the AI box’s appearance, [Hoani] also added an LED ring which shows a spectrogram of the audio being generated. This small addition really makes the thing come alive, turning it into what looks like a classic Sci-Fi movie prop. Except that this one’s real, of course – we are actually living in the future, with human-like AI all around us.

All code, mostly written in Go, is freely available on [Hoani]’s GitHub page. It also includes a separate audio processing library called toot that [Hoani] wrote to help him interface with the micophone and do spectral analysis. Anyone with basic electronic skills can now build their own AI companion and talk to it – something that ham radio operators have been doing for a while.

Continue reading “AI-Powered Speaker Is A Chatbot You Can Actually Chat With”

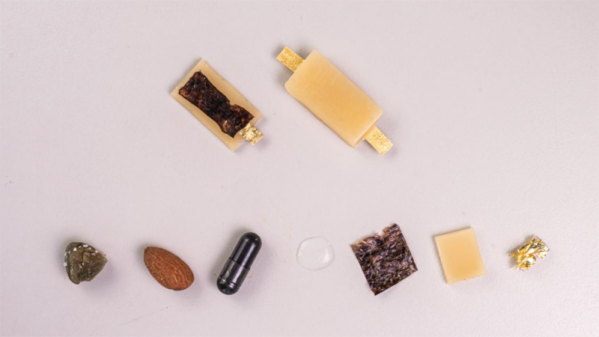
A series of food items along the bottom of the frame including an unidentified grey block, an almond, a food supplement capsule, a square of seaweed, a square of beeswax, and a crumpled up piece of gold foil. At the top of the image is a fully assembled battery with electrodes sticking out the ends of a block of beeswax and a half finished battery with the nori separator visible.

A Delicious Advancement In Battery Tech

Electronics have been sent to some pretty extreme environments, but inside a living host is a particularly tricky set of conditions, especially if you don’t want to damage the organism ingesting the equipment. One step in that direction could be an edible battery cell. (via Electrek)

Developed by scientists at the Istituto Italiano di Tecnologia, this new cell is made from food additives and ingredients to skirt any nasty side effects one might experience from ingesting a less palatable battery chemistry like NiCd. A riboflavin anode is coupled with a quercetin cathode, both with activated carbon to increase conductivity. Encapsulated in beeswax and with a separator made of nori algae, the battery is completely non-toxic.

The cell generates a modest 0.65V with a max sustained current of 48 µA for 12 min, but it shows promise as a power source for ingestible medical sensors, even if it won’t be powering your next mobile Raspberry Pi project. This isn’t the first time we’ve seen edible electronics; check out this screaming chocolate rabbit or robots made of candy.

Tiny Three-Tube Receiver Completes Spy Radio Suite

In our surface-mount age, it’s easy to be jaded about miniaturization. We pretty much expect every circuit to be dimensionally optimized, something that’s easy to do when SMDs that rival grains of sand are available. But dial the calendar back half a century or so and miniaturization was a much more challenging proposition.

Challenging, perhaps, but by no means unachievable, as [Helge Fyske (LA6NCA)] demonstrates with this ultra-compact regenerative vacuum tube receiver. It’s a companion to his recent “spy transmitter,” a two-tube radio built in — or on, really — an Altoids tin. The transmitter was actually a pretty simple circuit, just a crystal-controlled oscillator and an RF amplifier really, but still managed about 1.5 Watts output on the 80-meter ham band.

The receiver circuit ended up being much more complicated, as receivers do, and therefore harder to cram into the allotted space. [Helge]’s used a three-tube regenerative design, with one tube each devoted to the RF amp, detector/mixer, and audio amplifier stages. As in the transmitter, the receiver tubes are mounted on the outside of the box, with the inside crammed full of components. [Helge] had to be quite careful about component positioning, to prevent interstage coupling and other undesirable side effects of building in such close quarters.

Was it worth it? Judging by the video below, absolutely! We’ve rarely heard performance like that from even a modern receiver with all the bells and whistles, let alone from a homebrew design under such constraints. It sounds fantastic, and hats off to [Helge] for completing his spy radio suite in style.

Continue reading “Tiny Three-Tube Receiver Completes Spy Radio Suite”

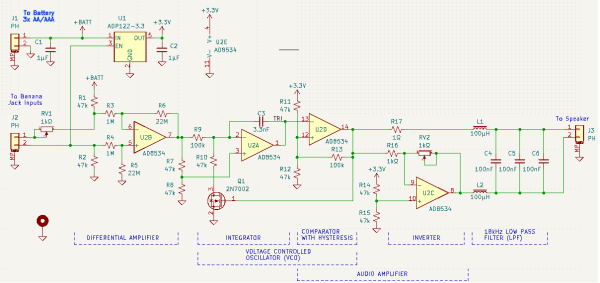
A schematic for a continuity tester that modulates its pitch based on the resistance measured

Op Amp Contest: Clever Continuity Tester Tells You Where The Problem Is

A continuity tester, as found on most multimeters today, is a great tool for finding broken connections and short circuits. But once you’ve found a short, it’s up to you to figure out which part of the circuit it’s in – a tedious job on a large PCB with hundreds of components. [John Guy] aims to ease this task with a continuity tester that modulates the beeper’s tone according to the resistance measured in the circuit. Tracking down a short circuit is then simply a matter of probing multiple points along a track and observing whether the pitch goes up or down.

The circuit is based on a single AD8534 quad op amp chip. The first stage measures the voltage across the circuit under test in response to small current and amplifies it. The resulting signal is fed into a voltage-controlled oscillator (VCO) made from one op amp connected as an integrator and another working as a comparator with hysteresis. Op amp number four amplifies the resulting square wave and drives a speaker. A low-pass filter makes the sound a bit more pleasing to the ears by removing the higher notes.

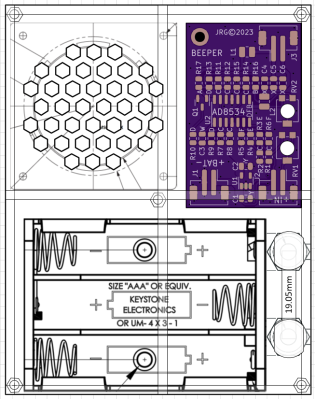
[John] paid particular attention to the PCB design to make it easy to assemble despite having a large number of SMD components on a small board. He even placed a parts list on the rear silkscreen, so anyone can assemble it even without the accompanying documents. The resulting board can be placed in a laser-cut acrylic case, turning it into a neat handheld instrument that will definitely find a place in any engineer’s toolbox. Measuring resistance through sound is not as accurate as using a full four-wire setup with an ohmmeter, but will be much faster and easier if you just want to find that annoying solder bridge hiding somewhere on your board.

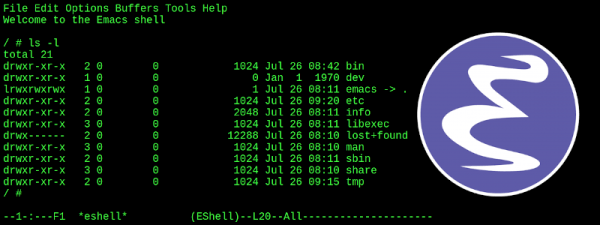
Build Your Own Bootable Emacs Environment

An old joke is that Emacs is a text editor with an operating system included, given that its extensibility and customization often goes far beyond traditional text editors. Part of its well-earned reputation comes from being built in Lisp which allows it to be expanded to do almost anything. Despite this in-joke in the community, though, you will still need an actual operating system to run it, but not much more than that.

This project uses User-Mode Linux (UML) as a foundation to load almost nothing other than an Emacs editor. UML is a virtualization technology that allows running multiple Linux kernel instances as separate virtual machines, so once the Linux environment is started and Emacs is compiled, the virtual machine can essentially boot straight into an Emacs environment. Some tools are needed outside of the Linux kernel like mount which allows the virtual file system to access the files needed to build Emacs, but as far as lightweight or minimalist Linux distributions go this one definitely gets at least an honorable mention.

While UML is virtualization software rather than a full-fledged Linux distribution, we would expect a similarly minimalist build could easily be done with something more hardware-based like Linux From Scratch. Emacs has been around for so long and had such a wide reach that it’s difficult to imagine a world without it. Even in more modern technology like browsers, knowing a little bit about Emacs can be an extremely powerful tool.