Man-in-the-Middle PCB Unlocks HP Ink Cartridges

It’s a well-known secret that inkjet ink is being kept at artificially high prices, which is why many opt to forego ‘genuine’ manufacturer cartridges and get third-party ones instead. Many of these third-party ones are so-called re-manufactured ones, where a third-party refills an empty OEM cartridge. This is increasingly being done due to digital rights management (DRM) reasons, with tracking chips added to each cartridge. These chip prohibit e.g. the manual refilling of empty cartridges with a syringe, but with the right tweak or attack can be bypassed, with [Jay Summet] showing off an interesting HP cartridge DRM bypass using a physical man-in-the-middle-attack.

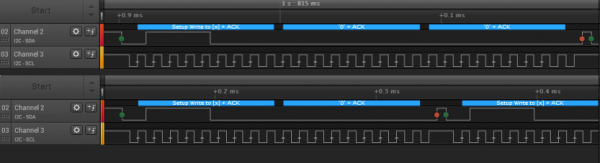
This bypass takes the form of a flex PCB with contacts on both sides which align with those on the cartridge and those of the printer. What looks like a single IC in a QFN package is located on the cartridge side, with space for it created inside an apparently milled indentation in the cartridge’s plastic. This allows is to fit flush between the cartridge and HP inkjet printer, intercepting traffic and presumably telling the printer some sweet lies so that you can go on with that print job rather than dash out to the store to get some more overpriced Genuine HP-approved cartridges.

Not that HP isn’t aware or not ticked off about this, mind. Recently they threatened to brick HP printers that use third-party cartridges if detected, amidst vague handwaving about ‘hackers’ and ‘viruses’ and ‘protecting the users’ with their Dynamic Security DRM system. As the many lawsuits regarding this DRM system trickle their way through the legal system, it might be worth it to keep a monochrome laser printer standing by just in case the (HP) inkjet throws another vague error when all you want is to just print a text document.

Continue reading “Man-in-the-Middle PCB Unlocks HP Ink Cartridges”

Rescuing High-Res Displays From Older Macs

When Apple started rolling out its Retina displays, it multiplied the amount of pixels compared to their standard, non-Retina displays by four. This increased pixel density while keeping the standard screen size — idea for those needing a lot of detail for their work. But, as is common with Apple, using these displays outside of the Apple ecosystem can be quite a challenge. Retina displays have been around for about a decade now, though, with some third-party hardware able to break them free of their cage. This post details how [Kevin] liberated the 5K display from a 2017 iMac for more general use with support for USB-C.

The first step was to find a used iMac for the right price, and then sell off most of its parts to recoup most of the initial cost. That brought the cost of the panel itself to about $250. The key to getting the display working without all of the Apple hardware is the R1811 driver board, which can be had for around $300. A new 156 watt power supply was added to the mix, and [Kevin] also put in a few extras like a USB cable extension and a latching push-button which kills the display’s power. Additionally, he attempted to get the original iMac speakers working with this setup too, but none of his attempts resulted in anything close to quality sound so he’s mostly abandoned that extra feature for now.

With that all buttoned up, he has a 27″ 5K display with USB-C input for around $650 which is quite a deal. The MacRumors thread that [Kevin] added his project to currently has around 1,700 posts about similar builds too, so it can be a wealth of information for all kinds of models. As Apple drops support for their older machines, these displays will become more and more common and projects like these can keep a lot of e-waste out of the landfill while also providing decent hardware at a bargain price. Don’t just look for iMacs and MacBooks though; there’s a similar process to use various iPad displays for other things as well.

Microsoft Sculpt Keyboard Lives Again With RP2040

Hackaday readers are likely the kind of folks that have a favorite keyboard, so you can probably imagine how devastating it would be to find out that the board you’ve sworn by for years is going out of production. Even worse, the board has some internal gremlins that show up after a few years of use, so functional ones in the second-hand market are becoming increasingly rare. So what do you do?

This is the position [TechBeret] recently found himself in with his beloved Sculpt keyboard. When Microsoft decided to step back from the peripheral market last year, he started looking at alternatives. Finding none of them appealing, he decided instead to breathe new life into the ergonomic keyboard with the RP2040. Every aspect of the resurrection is covered in a phenomenally detailed write-up on his blog, making this a valuable case study in modernizing peripherals with the popular microcontroller.

Continue reading “Microsoft Sculpt Keyboard Lives Again With RP2040”

Reconfigurable Tracked Robot Has Some Neat Flexible Abilities

When you think of tracked robots, you might think of bomb disposal robots or others used in military applications. You probably haven’t seen anything quite like this, however—it’s a “reconfigurable continuous track robot” from researchers [Tal Kislasi] and [David Zarrouk (via IEEE Spectrum).

Neat party trick!

The robot looks simple, like some kind of tracked worm. As its motors turn, the track moves along as you would expect, propelling the robot along the ground. Its special feature, though, is that the track can bend itself up and down, just like a snake might as it rises up to survey a given area.

The little tracked robot can thus tilt itself up to climb steps, and even bend itself over small obstacles. It can even try and hold itself up high as it inches along to try and bridge its way over a gap.

The robot can selectively lock each link (or not) as it passes by.

How does it achieve this? Well, the robot is able to selectively lock the individual links of its outer track in various orientations. As the links pass over the front of the robot, a small actuator is used to lock each link in a 20-degree orientation, or a straight orientation, or leave them loose.

The ability to lock multiple links into a continuous rigid structure allows the robot to rise up from the ground, form itself into a stiff beam, or conform to the ground as desired. A mechanism at the back of the robot unlatches the links as they pass by so the robot retains flexibility as it moves along.

It’s a nifty design, and one we’d like to see implemented on a more advanced tracked robot. We’ve explained the benefits of tracked drivetrains before, too.

Continue reading “Reconfigurable Tracked Robot Has Some Neat Flexible Abilities”

I2C For Hackers: The Basics

You only really need two data wires to transfer a ton of data. Standards like UART, USB2, I2C, SPI, PS/2, CAN, RS232, SWD (an interface to program MCUs), RS485, DMX, and many others, all are a testament to that. In particular, I2C is such a powerful standard, it’s nigh omnipresent – if you were to somehow develop an allergy to I2C, you would die.

Chances are, whatever device you’re using right now, there’s multiple I2C buses actively involved in you reading this article. Your phone’s touchscreen is likely to use I2C, so is your laptop touchpad, most display standards use I2C, and power management chips are connected over I2C more often than not, so you’re covered even if you’re reading this on a Raspberry Pi! Basically everything “smart” has an I2C port, and if it doesn’t, you can likely imitate it with just two GPIOs.

If you’re building a cool board with a MCU, you should likely plan for having an I2C interface exposed. With it, you can add an LCD screen with a respectable resolution or a LED matrix, or a GPS module, a full-sized keyboard or a touchpad, a gesture sensor, or a 9 degree of freedom IMU – Inertial Measurement Unit, like a accelerometer+compass+gyroscope combination. A small I2C chip can help you get more GPIOs for your MCU or CPU, or a multi-channel motor driver, or a thermal camera, or a heap of flash memory; if you’re adding some sort of cool chip onto your board, it likely has an I2C interface to let you fine-tune its fancy bits.

As usual, you might have heard of I2C, and we sure keep talking about it on Hackaday! There’s a good few long-form articles about it too, both general summaries and cool tech highlights; this article is here to fill into some gaps and make implicit knowledge explicit, making sure you’re not missing out on everything that I2C offers and requires you to know!

Continue reading “I2C For Hackers: The Basics”

Making An Aluminium Foil Glider To Prototype Hydroforming

Hydroforming is a very effective way to turn a ductile metal like aluminium or stainless steel into a specific shape, either using a die or by creating a closed envelope in which the hydraulic fluid is injected. While trying to think of ways to create a hydroformed airplane without spending big bucks on having it done professionally – or learning to weld sheet metal together with waterproof welds along the seams – [Adrian Perez] decided that using plain aluminium foil as found in the average kitchen might be a good way to get his feet wet here. When stuck together with double-sided tape, the foil is both strong and light enough to be inflated like a party balloon and still fly better than a lead balloon (which do fly, albeit poorly).

The basic design for the initial Luma glider that he assembled is based around a Kline-Fogleman (KA) airfoil. This type of airfoil is mostly characterized by the simplicity of construction, having been devised in the 1960s for paper airplanes. It uses a stepped approach rather than a continuous airfoil and has seen mostly attention in hobby circles. Even if this Luma glider brings to mind the ill-fated Goodyear Inflatoplane, a hydroformed version of these foil prototype gliders would not have to rely on being inflated to function.

For small-scale prototypes, using low-cost aluminium foil or similar to test out shapes before committing to a design to be welded and hydroformed does seem like a useful approach.

Continue reading “Making An Aluminium Foil Glider To Prototype Hydroforming”

The BAPPR Keeps Your Addressable LED System Cool

We all love a nice strip or grid of addressable LEDs. It can add flair or an artistic touch to many projects, and it can make gaming computers look extra 1337. However, providing enough current to a long strip of addressable LEDs can sometimes be difficult. Often a separate voltage rail is needed to supply enough juice. At the same time, continually sending out data to animate them can often use 100% of the microcontroller’s CPU power, especially if the serial bus is being bit-banged. A crash or badly timed interrupt can leave the system in a weird state and sometimes with the LEDs not displaying the correct colours. Or you might just want to enter a power-saving mode from time to time on your main MCU? Well, the BAPPR is designed to address all of these problems.

[TheMariday] created the BAPPR and made it fully open-source. It’s a switch-mode power supply that can accept anywhere from 7 V to 17 V and converts it into a strong 5 V rail for typical addressable LEDs. It also has a “smart” mode where it monitors the data line going to the LEDs to see if there is activity. If for some reason the system stops sending data, the BAPPR can intervene and shut off the power to the LEDs, which can help prevent strange colour combinations from being displayed while the system recovers. Once data starts flowing again, power is restored and the light party can resume.

Continue reading “The BAPPR Keeps Your Addressable LED System Cool”