Stepper Killer Killer Killed, Repair Attempted

The low-cost servo motor in [Clough42]’s lathe’s electronic leadscrew bit the dust recently, and he did a great job documenting his repair attempts ( see video below the break ). When starting the project a few years ago, he studied a variety of candidate motors, including a ClearPath servo motor from Teknic’s “Stepper Killer” family. While that motor was well suited, [Clough42] picked a significantly lower-cost servo motor from China which he dubbed the “Stepper Killer Killer”.

He does a very thorough post-mortem of the motor’s integrated servo controller, checking the circuits and connections on the interface PCB first. Not finding any obvious problem, he proceeds to the main PCB which contains the microcontroller, motor driver transistors, and power supplies. There is no visible damage, but a check of the logic power supply shows 1.65V where 3.3V is expected. Looking at the board with a smart-phone mounted IR camera, he quickly finds the bad news — the microcontroller has shorted out.

Continue reading “Stepper Killer Killer Killed, Repair Attempted”

Cart Cruises Abandoned California Rail

Southern California is known for its nearly perfect year-round climate, excellent surf, and extremely high cost of living, but once you get away from the coast things are radically different. Rural California has huge tracts of land run by the Bureau of Land Management (BLM), which is publicly accessible to anyone willing to venture into the deserts. There’s not much in the way of infrastructure out there, but [Ryan] does have a unique way of traveling through it using abandoned railroad lines and this custom rail cart.

The frame of this cart is simple enough, it’s little more than 2×3 framing with a plywood deck. Some extra support is added for the motor mount and for the seating location. It uses slightly longer go-kart axles to accommodate the width of the railroad, and a small six horsepower gas engine with a single gear to power the rear axle. There are no brakes other than the riders’ shoes, and while this all seems straightforward enough the real hack here is [Ryan]’s custom wheels. He found that steel or cast wheels were not particularly comfortable on long journeys so after a few attempts he has come up with a home-built polyurethane wheel which is cast in a mold around a steel go-cart wheel and then trimmed on a lathe.

For pure exploration, there’s almost no better place to go than the American west thanks to all the public BLM land available. In this cart, you can explore long distances using an extremely low-cost method of transportation. We’ve added another video of [Ryan] exploring this area below the break to show the cart being used, too, but if you’d like a more multipurpose vehicle to use on abandoned rail near you, take a look at this bicycle which is converted to operate on the railroad.

Continue reading “Cart Cruises Abandoned California Rail”

Two pairs of steel parallel pliers sit on a rough wooden benchtop. The pair on the left is open and the pair on the right is closed, demonstrating the parallel nature of the pliers' jaws over their entire range of motion. There are three brass pins flush with the steel surface of the handles and you can just barely make out the brass and copper filler material between the steel outer surfaces of the handles.

Producing A Pair Of Parallel Pliers

A regular pair of pliers is fine most of the time, but for delicate work with squarish objects you can’t go wrong with a pair of parallel pliers. [Neil Paskin] decided to make his own pair from scratch. (YouTube)

The jaws were machined down from round stock in [Paskin]’s mill before heat treating and tempering. The steel portions of the handles were cut from 16 gauge plate steel and half of them were stamped on a fly press to make the bridging section around the pivot bolt. The filler for the handles is copper on one side and brass on the other as [Paskin] didn’t have enough brass of the correct size to do both.

The steel and filler were joined with epoxy and copper pins before beveling the edges and sanding to give a comfortable contour to the handles. The bolts for the pliers started as ordinary hex bolts before being machined down on the lathe to a more aesthetically-pleasing shape and size. The final touches included electrolytically etching a logo into the bridge and then spraying down the pliers with a combination lubricant and corrosion preventative spray. This is surely a pair of pliers worth handing down through the generations.

For more mesmerizing machining, checkout this pocket safe or this tiny adjustable wrench.

Continue reading “Producing A Pair Of Parallel Pliers”

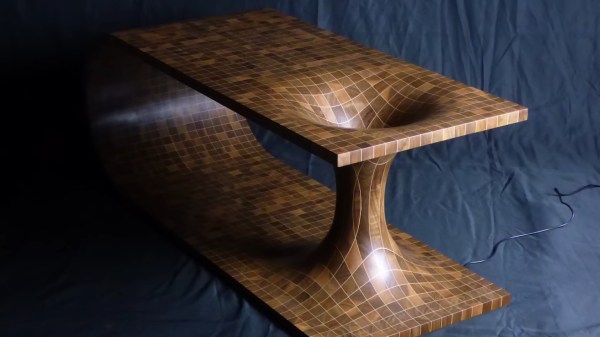
A wooden table with walnut squares and a maple grid. The table has a large barrel-shaped curve on one end and the other is a representation of a wormhole with what look like two stretched cones connected through a narrow cylinder. The wooden grid looks stretch to follow the curvature of spacetime.

Wormhole Coffee Table Takes Woodworking To Another Dimension

While some people are happy with a simple coffee table to hold their snacks while watching Star Trek reruns, others want their furniture to go where no furniture has gone before. [Olivier Gomis] has definitely satisfied this need with his Wormhole Coffee Table. [YouTube]

The complicated shape and curvature of a (3D representation of a) wormhole isn’t easy to create, but [Gomis] managed to carve one without the aid of a CNC or 3D printer. Starting with walnut planks and maple veneer laminated together, he created a grid stackup to replicate the common representation of spacetime as a 2D grid. Using various arrangements of these grids, he built up the central section of the wormhole which looked like a low poly vase before he put it on the lathe for turning.

The lathe work on this build is simultaneously impressive and terrifying. Turning down the central portion of the wormhole required working between two large spinning squares of walnut, which [Gomis] admits was “scary.” Multiple custom jigs were required to keep parts flat and deal with the extreme curvature of the inside of the wormhole’s opening. If that weren’t enough, if you look down the wormhole, he has installed a set of LED lights that show the spacetime grid continuing on to parts unknown.

If you’d like to see another impressive wormhole, check out this Amazing STARGᐰTE With DHD And Infinity Mirror Wormhole.

Continue reading “Wormhole Coffee Table Takes Woodworking To Another Dimension”

Machining With Electricity Explored In The Hack Chat

As a Hackaday reader, it’s safe to assume you’ve got a better than average understanding of electricity. There’s also an excellent chance you’re familiar with machining, and may even have a lathe or old mill in the workshop. But combining the two, and actually machining a piece of metal with electricity, isn’t something that many home gamers can boast first-hand experience with.

Daniel Herrington

Of course, that doesn’t mean there isn’t an interest. To help answer the burning (or at least, sparking) questions from the community, CEO and founder of Voxel Innovations Daniel Herrington stopped by this week’s Hack Chat to talk about the cutting edge of both electric discharge machining (EDM) and the closely related field of electrochemical machining (ECM). While his company uses the technology to produce components at incredible scales, Daniel got his start tinkering in the garage like so many of us, enabling him to provide both a professional and hobbyist prospective on the technologies.

Naturally, the first big question to be addressed was the difference between EDM and ECM. Put simply, electric discharge machining uses high-voltage to literally blast away material from the workpiece. The resulting finish is generally rough, and progress through the material tends to be slow, but it’s relatively simple to implement.

In contrast electrochemical machining could be thought of as a sort of reverse electroplating process, as the material being removed from the workpiece is dissolved and transferred to the cathode — though in practice the flow of pressurized electrolyte keeps it from actually plating the negatively charged tool. ECM is a faster process than EDM and allows for an exceptionally smooth surface finish, but is considerably more challenging from a technical perspective. Continue reading “Machining With Electricity Explored In The Hack Chat”

Building A Chain Drive Differential From Junkyard Parts

A differential is a very useful thing for a vehicle. It allows two driven wheels to rotate at different speeds, such as when going around a corner. [Workshop From Scratch] needed a chain driven differential, so set about building one from a salvaged automotive unit.

The differential itself was taken from a BMW E46 3-Series, specifically a 2.0-liter diesel model. The work began by removing the differential’s center gears from its big, hefty iron housing. Disassembly then ensued, with the spider gears removed from their carrier and the other components discarded. The differential gears themselves were installed instead in a new compact housing, fabricated with much welding and lathery. The housing was fitted with a large chain sprocket to deliver drive, in place of the original differential’s ring gear and pinion.

The video’s description states it would be an ideal differential for a go-kart, buggy, or other such small vehicle. Given the differential gears were originally built to handle a full-sized car, they should be more than capable of dealing with such applications.

If you’re a little unfamiliar with how differentials work, check out this primer from the early 20th century. It’s widely considered to be the best education on the topic. Video after the break.

Continue reading “Building A Chain Drive Differential From Junkyard Parts”

Homebrew LED Bulbs Keep Your Circadian Rhythms Steady

There was a time when LED light bulbs were a premium product that commanded a premium price, mainly because of limited supply and the usual marketing tricks. But now is not that time, since you can pick up an LED bulb for a buck or two at pretty much any store. So why in the world would you go to the effort to make your own light bulb?

For [DiodeGoneWild], the answer is simple: it’s all about staying in rhythm. Circadian rhythm, that is. We all know how light toward the blue end of the spectrum is bad for our sleep cycle, since it convinces our lizard brain that dawn is at hand. But even if you pick an LED bulb with a warm, or reddish, color temperature, there’s still a lot of UV light being emitted thanks to the phosphor LEDs that are typically used in them.

[DiodeGoneWild]’s first attempt at a design, in the first video below, mostly avoids phosphor LEDs in favor of a mix of yellow, red, and yellow-green LEDs to get a warmer spectrum. He used the housing and base from an expired bulb to enclose his custom circular PCB, the fabrication of which using a hand drill as a lathe and a Dremel to machine concentric tracks in the cladding was a real treat. So was the power supply, for that matter — a dropping capacitor followed by a bridge rectifier and a filtering cap. We like the discharge resistors across the caps and the fusible resistor on the mains side — it’s nice to see safety factored in from the start. And what’s not to like about using a DVD as a makeshift spectroscope?

We see that [DiodeGoneWild] has just dropped a second design, this time in a much smaller bulb and with relatively more phosphor LEDs.

Continue reading “Homebrew LED Bulbs Keep Your Circadian Rhythms Steady”