It’s IP, Over TOSLINK!

At the recent 38C3 conference in Germany, someone gave a talk about sending TOSLINK digital audio over fiber optic networks rather than the very low-end short distance fibre you’ll find behind your CD player. This gave [Manawyrm] some ideas, so of course the IP-over TOSLINK network was born.

TOSLINK is in effect I2S digital audio as light, so it carries two 44.1 kilosamples per second 16-bit data streams over a synchronous serial connection. At 1544 Kbps, this is coincidentally about the same as a T1 leased line. The synchronous serial link of a TOSLINK connection is close enough to the High-Level Data Link Control, or HDLC, protocol used in some networking applications, and as luck would have it she had some experience in using PPP over HDLC. She could configure her software from that to use a pair of cheap USB sound cards with TOSLINK ports, and achieve a surprisingly respectable 1.47 Mbit/s.

We like this hack, though we can see it’s not entirely useful and we think few applications will be found for it. But she did it because it was there, and that’s the essence of this game. Now all that needs to happen is for someone to use it in conjunction with the original TOSLINK-over network fiber, for a network-over-TOSLINK-over-network abomination.

Pi Pico Makes SSTV Reception A Snap

There’s a paradox in amateur radio: after all the time and effort spent getting a license and all the expense of getting some gear together, some new hams suddenly find that they don’t have a lot to talk about when they get in front of the mic. While that can be awkward, it’s not a deal-breaker by any means, especially when this Pi Pico SSTV decoder makes it cheap and easy to get into slow-scan television.

There’s not much to [Jon Dawson]’s SSTV decoder. Audio from a single-sideband receiver goes through a biasing network and into the Pico’s A/D input. The decoder can handle both Martin and Scottie SSTV protocols, with results displayed on a TFT LCD screen. The magic is in the software, of course, and [Jon] provides a good explanation of the algorithms he used, as well as some of the challenges he faced, such as reliably detecting which protocol is being used. He also implemented correction for “slant,” which occurs when the transmitter sample rate drifts relative to the receiver. Fixing that requires measuring the time it took to transmit each line and adjusting the timing of the decoder to match. The results are dramatic, and it clears up one of the main sources of SSTV artifacts.

We think this is a great build, and simple enough that anyone can try it. The best part is that since it’s receive-only, it doesn’t require a license, although [Jon] says he’s working on an encoder and transmitter too. We’re looking forward to that, but in the meantime, you might just be able to use this to capture some space memes.

Continue reading “Pi Pico Makes SSTV Reception A Snap”

This Week In Security: IOCONTROL, (Location) Leaking Cars, And Passkeys

Claroty’s TEAM82 has a report on a new malware strain, what they’re calling IOCONTROL. It’s a Linux malware strain aimed squarely at embedded devices. One of the first targets of this malware, surprisingly, is the Iraeli made Orpak gas station pumps. There’s a bit of history here, as IOCONTROL is believed to be used by CyberAv3ngers, a threat actor aligned with Iran. In 2023 a group aligned with Israel claimed to have compromised the majority of the gas stations in Iran. IOCONTROL seems to have been deployed as retribution.

There are a few particularly interesting aspects of this malware, and how TEAM82 went about analyzing it. The first is that they used unicorn to emulate the obscure ARM platform in question. This was quite an adventure, as they were running the malicious binary without the normal Linux OS under it, and had to re-implement system calls to make execution work. The actual configuration data was encrypted as the data section of the executable, presumably to avoid simple string matching detection and analysis.

Then to communicate with the upstream command and control infrastructure, the binary first used DNS-Over-HTTPS to resolve DNS addresses, and then used the MQTT message protocol for actual communications. Once in place, it has the normal suite of capabilities, like code execution, cleanup, lateral scanning, etc. An interesting speculation is that the level of control this malware had over these gas pumps, it was in a position to steal credit card information. This malware family isn’t limited to gas pumps, either, as it’s been spotted in IoT and SCADA devices from a whole host of vendors. Continue reading “This Week In Security: IOCONTROL, (Location) Leaking Cars, And Passkeys”

38C3: Taking Down The Power Grid Over Radio

You know how you can fall down a rabbit hole when you start on a project? [Fabian Bräunlein] and [Luca Melette] were looking at a box on a broken streetlamp in Berlin. The box looked like a relay, and it contained a radio. It was a Funkrundsteueremfänger – a radio controlled power controller – made by a company called EFR. It turns out that these boxes are on many streetlamps in many cities, and like you do, they thought about how cool it would be to make lights blink, but on a city-wide basis. Haha, right? So they bought a bunch of these EFR devices on the used market and started hacking.

They did a lot of background digging, and found out that they could talk to the devices, both over their local built-in IR port, but also over radio. Ironically, one of the best sources of help they found in reversing the protocol was in the form of actually pressing F1 in the manufacturer’s configuration application – a program’s help page actually helped someone! They discovered that once they knew some particulars about how a node was addressed, they could turn on and off a device like a street lamp, which they demo with a toy on stage. So far, so cute.

But it turns out that these boxes are present on all sorts of power consumers and producers around central Europe, used to control and counteract regional imbalances to keep the electrical grid stable. Which is to say that with the same setup as they had, maybe multiplied to a network of a thousand transmitters, you could turn off enough power generation, and turn on enough load, to bring the entire power grid down to its knees. Needless to say, this is when they contacted both the manufacturer and the government.

The good news is that there’s a plan to transition to a better system that uses authenticated transmissions, and that plan has been underway since 2017. The bad news is that progress has been very slow, and in some cases stalled out completely. The pair view their work here as providing regulators with some extra incentive to help get this important infrastructure modernization back on the front burner. For instance, it turns out that large power plants shouldn’t be using these devices for control at all, and they estimate that fixing this oversight could take care of most of the threat with the least effort.

National power grids are complicated machines, to say the least, and the impact of a failure can be very serious. Just take a look at what happened in 2003 in the US northeast, for instance. And in the case of real grid failure, getting everything back online isn’t as simple a just turning the switches back on again. As [Fabian] and [Luca] point out here, it’s important to discover and disclose when legacy systems put the grid in potential danger.

LED Wall Clock Gets Raspberry Pi Pico Upgrade

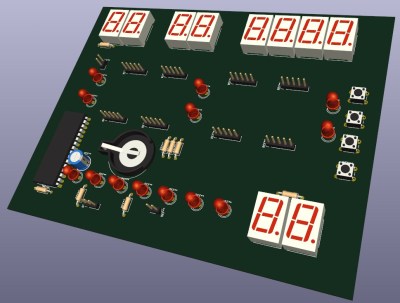
When [Rodrigo Feliciano] realized that the reason his seven-segment LED wall clock wasn’t working was because the original TG1508D5V5 controller was fried, he had a decision to make. He could either chuck the whole thing, or put in the effort to reverse engineer how the displays were driven and replace the dead controller with something a bit more modern. Since you’re reading this post on Hackaday, we bet you can guess which route he decided to take.

If you happen to own the same model of clock as [Rodrigo], then you really lucked out. He’s done a fantastic job documenting how he swapped the original controller out for a Raspberry Pi Pico W, which not only let him bring the clock back to life, but let him add new capabilities such as automatic time setting via Network Time Protocol (NTP).

But even if you don’t have this particular clock there’s probably something you can learn from this project, as it’s a great example of practical reverse engineering. By loading a high-resolution image of the back of the PCB into KiCad, [Rodrigo] was able to place all the components into their correct positions and following traces to see what’s connected to what.

Pretty soon he not only had a 3D model of the clock’s PCB, but a schematic he could use to help wire in the Pi Pico. Admittedly this is a pretty straightforward PCB to try and reverse engineer, but hey, you have to start somewhere.

We had high hopes for KiCad’s image import feature when it was introduced, and it’s great to see real-world examples like this trickle in as more folks learn about it.

Continue reading “LED Wall Clock Gets Raspberry Pi Pico Upgrade”

[Kerry Wong] Talks (and Talks) About A 300 MHz Oscilloscope

There aren’t many people who could do an hour-long video reviewing an oscilloscope, but [Kerry Wong] is definitely one of them. This time, he’s looking at a UNI-T MSO2304X 300 MHz scope. The review might be a little long, but the scope — like many modern scopes — has a lot of features for measuring power, accommodating digital signals with an add-on pod, and protocol decoding.

The scope has a touchscreen and four normal inputs, plus two frequency generator outputs. You can also use a mouse or an external display. But, of course, what you really want to know is how the scope performs when reading signals.

Continue reading “[Kerry Wong] Talks (and Talks) About A 300 MHz Oscilloscope”

38C3: Xobs On Hardware Debuggers

If you just want to use a debugger for your microcontroller project, you buy some hardware device, download the relevant driver software, and fire up GDB. But if you want to make a hardware debugger yourself, you need to understand the various target chips’ debugging protocols, and then you’re deep in the weeds. But never fear, Sean [Xobs] Cross has been working on a hardware debugger and is here to share his learnings about the ARM, RISC-V, and JTAG debugging protocols with us.

He starts off with a list of everything you need the debugger hardware to be able to do: peek and poke memory, read and write to the CPU registers, and control the CPU’s execution state. With that simple list of goals, he then goes through how to do it for each of the target chip families. We especially liked [Xobs]’s treatment of the JTAG state machine, which looks pretty complicated on paper, but in the end, you only need to get it in and out of the shift-dr and shift-ir states.

Continue reading “38C3: Xobs On Hardware Debuggers”