A handheld device to measure electromagnetic fields

Measuring Electromagnetic Fields With Just An Arduino And A Piece Of Wire

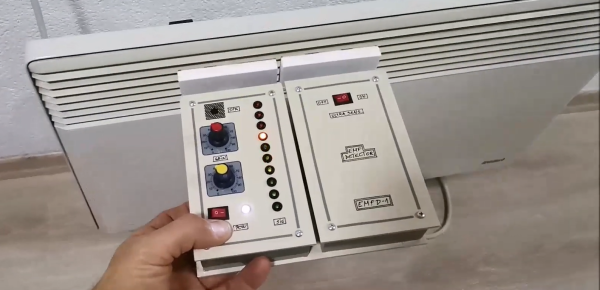
Electromagnetic interference problems can be a real headache to debug. If you need to prove what causes your WiFi to slow down or your digital TV signal to drop, then the ability to measure electromagnetic fields (EMF) can be a big help. Professional equipment is often very expensive, but building an EMF detector yourself is not even that difficult: just take a look at Arduino expert [Mirko Pavleski]’s convenient hand-held electromagnetic field detector.

The basic idea is quite simple: connect an antenna directly to an Arduino’s analog input and visualize the signal that it measures. Because the input of an ADC is high impedance, it is very sensitive to any stray currents that are picked up by the antenna. So sensitive in fact, that a resistor of a few mega-Ohms to ground is required to keep the sensor from triggering on any random kind of noise. [Mirko] made that resistance adjustable with a few knobs and switches so that the detector can be used in both quiet and noisy environments.

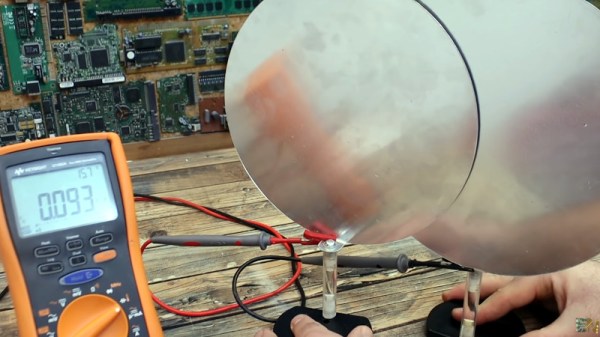
Making the whole device work reliably was an interesting exercise in electromagnetic engineering: in the first few iterations, the detector would trigger off its own LEDs and buzzer, trapping itself in a never-ending loop. [Mirko] solved this by encasing the Arduino inside a closed, grounded metal box with only the required wires sticking out. The antenna’s design was largely based on trial-and-error; the current setup with a 7 cm x 3 cm piece of aluminium sheet seemed to work well.

While this is not a calibrated professional-grade instrument, it should come in handy to find sources of interference, or even simply to locate hidden power cables. You can view this as a more advanced version of [Mirko]’s Junk Box EMF Detector; if you have a second Arduino lying around, you can use that one to generate interference instead. Continue reading “Measuring Electromagnetic Fields With Just An Arduino And A Piece Of Wire”

Solaris Might Be Free If You Want It

There was a time when “real” engineering workstations ran Linux Unix. Apollo and Sun were big names and Sun’s version was Solaris. Solaris has been an iffy proposition since Oracle acquired Sun, but Oracle announced last month that you can download and use Solaris 11.4 CBE free for non-production use.

Do you care? If you ever wanted to run “real” Unix this is an option although, honestly, so is Free BSD and it probably has better community support. On the other hand, since you can virtualize a machine to spin up, it might be worth a little time to install it.

On the other hand, if you have an old SPARC machine — this could be big news. We aren’t sure how far back the hardware this will support will go, but this could be just what you need to breathe new life into that eBay pizza box from Sun you’ve had in the basement. Of course, if you have an FPGA SPARC system, this might be interesting too, but we have no idea how much other stuff you need to implement to be able to benefit from Solaris.

Will you install Solaris? If so, tell us why. We are sure we won’t have to prompt you to tell us why not. In 2017, we thought we’d seen the end of Solaris, but apparently not. Maybe this will help those folks still on Solaris 9.

Laptop USB-C Charging Hack Lets You Leave The Brick At Home

At their best, laptops are a compromise design. Manufacturers go to great lengths to make the slimmest, lightest, whatever-est laptops possible, and the engineering that goes into doing so is truly amazing. But then they throw in the charger, which ends up being a huge brick with wire attached to it, and call it a day.

Does it have to be that way? Probably, but that doesn’t mean we can’t try to slim down the overall footprint of laptops at least a little. That’s what [Joe Gaz] did when he hacked his laptop to allow for USB-C charging. Tired of the charger anchoring down his HP X360, [Joe] realized that he could harvest the PCB from a USB-C charger adapter dongle and embed it inside his laptop. We’ve seen similar modifications made to Thinkpads in the past, and it’s good to see the process isn’t that far removed with other brands.

After popping open the laptop, which is always an adventure in reverse mechanical engineering, he found that removing the OEM charger jack left just enough room for the USB-C charger. Mounting the board required a 3D printed bracket, while enlarging the original hole in the side of the laptop case took some cringe-inducing work with a file. It looked like it was going to be pretty sloppy at first, but he ended up doing a pretty neat job in the end. The whole modification process is in the video below.

The end result is pretty slick — [Joe] can now carry a much more compact USB wall-wart-style charger, or eschew the charger altogether and rely on public USB charging stations. Either way, it sure beats lugging a brick around. If you’re interested in laptop hacking, or even if you just want to harvest the goodies from a defunct machine, check out this guide to laptop anatomy by our own [Arsenijs Picugins].

Continue reading “Laptop USB-C Charging Hack Lets You Leave The Brick At Home”

KiCAD Plugin Gives Your PCBs That Handmade Look

The first PCBs we built involved a draftsman laying out large pieces of tape. The finished artwork would be photographically reduced to produce the board. This solved a few problems. It was easier to work on the large pieces and any errors were reduced by the scale amount. Boards from this era have a distinct appearance because the tracks are generally curved. But when computer-aided drafting took over, the early packages couldn’t deal with wavy lines making all sorts of angles. So traces started appearing at very common angles like 45 degrees or 90 degrees only. If you use KiCAD, though, there’s no reason to have rectilinear traces. Now there is a plugin to help make your boards appear like old-fashioned circuit boards.

The video by [mitxela] below talks about how we got here and debunks some common myths about PCB design. The plugin produces rounded corners and teardrop-shaped pads. There’s also a second post on the topic with more details. The effect isn’t just ornamental. There are some reasons graceful traces might be better than sharp angles.

Continue reading “KiCAD Plugin Gives Your PCBs That Handmade Look”

Taking A Close Look At Parallel Plate Capacitors

Of course, we all know that capacitors are conceptually two conductors separated by a dielectric of some sort. But outside of air-variable capacitors you normally don’t see them looking like that. For example, a film capacitor has its plates rolled up in a coil with an insulating film in between. You can’t really see that unless you take them apart. But [Electronoobs] makes some giant capacitors using large plates and does a few experiments to demonstrate their characteristics. You can see his work in the video below.

The arrangement reminded us of a Leyden jar except there’s no physical motion. He also had some entertaining footage of electrolytic capacitors exploding when connected backwards. The reason, by the way, is that electrolytic capacitors have conductive goo in them. By putting a controlled current through them during manufacturing, a very thin insulating layer forms on one electrode. The thinner the layer, the higher the potential capacitance is. The downside is that putting current in the opposite way of the formation current causes catastrophic results, as you can see.

The value of a capacitor depends on the area, the spacing, and the type of dielectric between the plates. The video covers how each of those alters the capacitor value. Real capacitors also have undesirable characteristics like leakage and parasitic resistance or inductance.

It used to be that capacitance meters were exotic gear, but these days many meters have that capability. This would be a great set of experiments for a classroom or as the basis for a kid’s science project. For example, measuring different dielectric materials to determine which is the best for different purposes.

Granted, capacitors are pretty basic physics, but it is easy to get wrapped up in using them and not think about what’s going on inside. This video is a good introduction or a refresher, if you need one. It is easy enough to make your own variable capacitors or even special capacitors for high voltages.

Continue reading “Taking A Close Look At Parallel Plate Capacitors”

A purple PCB with an OLED display and various chips

A Neat Little Tool To Reset The Fuses On Your ATtiny

If you’re an experienced hacker, you’ve probably run into a problem at some point and thought “let’s make a tool to automate that”. A few hours later you’ve got your tool, but then realize that the amount of work you put into making the tool vastly exceeds what you would have needed to solve the original problem manually. That really doesn’t matter though: developing a fancy tool can be a rewarding experience that teaches you way more about the original problem than you would have learned otherwise. [sjm4306]’s ATtiny High Voltage Fuse Reset-er is a clever device that firmly falls into this category.

The problem it solves is familiar to anyone who’s ever worked with Atmel/Microchip’s ATtiny series of microcontrollers: set one of the configuration fuses incorrectly and you’re no longer able to reprogram your chip. Getting the ATtiny back to its original configuration requires a high-voltage programming step that involves pulling the reset pin to 12 V in what’s otherwise a 5 V system. You could simply grab a spare 12 V supply and hack together a level shifter with a few transistors, but where’s the fun in that?

[sjm4306]’s solution is built on a pretty purple PCB that contains an ATmega328, an OLED display, and sockets to accommodate various versions of the ATtiny series microcontrollers. To generate the required 12 V, one could simply use an off-the-shelf boost converter IC. But instead, he decided it would be interesting to make such a circuit out of discrete components and control it using the ATmega. After all, this chip already contains timers to generate PWM signals and an ADC to measure the converter’s output voltage, so all it took was to write some control logic in the form of a PID controller.

The end result, as you can see in the video embedded below, is a convenient little PCB that runs off a 5 V USB power supply and resets the fuses on your ATtiny at the push of a button. Sometimes, simple tools that do one thing well are all you need; however, if you’re looking for an all-in-one AVR programmer that also supports HV programming, check out this AVR Multi-Tool.

Continue reading “A Neat Little Tool To Reset The Fuses On Your ATtiny”

RSS Printer Gives You The Hard Copy News You Desire

The days of yore saw telex machines and dot-matrix printers with continuous feed paper churning out data in hardcopy form in offices around the world. [Jan Derogee] wanted a bit of that old-school charm, and set about building a RSS news printer using a venerable old printer in his possession. 

The build relies on an ESP8266, with the WiFi-enabled microcontroller readily capable of jumping online and querying RSS feeds for content. It scrapes the XML files for title, description, and publication date information, and formats this for output to the printer. The microcontroller then spits out the data over a Commodore serial interface to a Brother HR-5C printer. Unlike dot-matrix printers of its contemporary era, the HR-5C is a thermal printer. Once loaded up with a roll of the appropriate paper, it can print continuously without requiring any hard-to-source ink ribbons.

Armed with a continuous supply of wireless internet and 210 mm rolls of thermal printer paper, [Jan]’s system should provide news summaries to him for years to come. We’ve seen similar retro news ticker projects before, too. Video after the break.

Continue reading “RSS Printer Gives You The Hard Copy News You Desire”