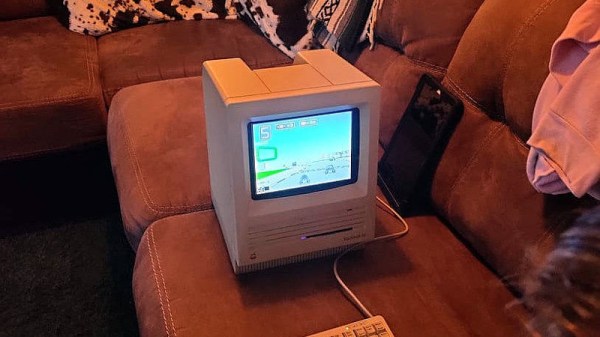
Exploring The World Of Nintendo 3DS Homebrew

When Nintendo officially ended production of the 3DS in September 2020, it wasn’t exactly a surprise. For one thing, some variation of the handheld system had been on the market since 2011. Which is not to say the product line had become stagnant: the system received a considerable mid-generation refresh, and there was even a more affordable variant introduced that dropped the eponymous stereoscopic 3D effect, but nearly a decade is still a fairly long life in the gaming industry. Of course Nintendo’s focus on the Switch, a hybrid device that blurs the line between console and handheld games, undoubtedly played a part in the decision to retire what could effectively be seen as a competing product.

While putting the 3DS out to pasture might have been the logical business move, a quick check on eBay seems to tell a different story. Whether it’s COVID keeping people indoors and increasing the demand for at-home entertainment, or the incredible library of classic and modern games the system has access to, the fact is that a used 3DS in good condition is worth more today than it was when it was brand new on the shelf this time last year.

I’ve certainly made more expensive mistakes.

In short, this was the worst possible time for me to decide that I finally wanted to buy a 3DS. Then one day I noticed the average price for a Japanese model was far lower than that of its American counterpart. I knew the hardware was identical, but could the firmware be changed?

An evening’s worth of research told me the swap was indeed possible, but inadvisable due to the difficulty and potential for unexpected behavior. Of course, that’s never stopped me before.

So after waiting the better part of a month for my mint condition 3DS to arrive from the land of the rising sun, I set out to explore the wide and wonderful world of Nintendo 3DS hacking.

Continue reading “Exploring The World Of Nintendo 3DS Homebrew”

CubeSat For Under $1000?

Want to build your own CubeSat but have been put off by the price? There may be a solution in the works — [RG Sat] has challenged himself to design and build one for less than $1,000. (Video, embedded below.)

He begins by doing a survey of available low-cost options in the first video, and finds there isn’t a complete package for less than $10,000. By the time you added all necessary “options”, the final tally would probably be well over $20,000.

His idea isn’t just a pipe dream, either. In the the fifteen months since he began the project, [RG Sat] has designed and built the avionics and electrical power system circuit boards, and is currently testing his sun tracker design. Software is written in Rust, just because he wants to learn something new. You can check out the hardware and software design files on the project’s GitHub repositories, if you are inclined to build one yourself.

[RG Sat] lays out a compelling case, but we wonder if there’s a major gotcha lurking in the dark somewhere. In fact, [RG Sat] himself asks the question, “where do these high costs come from?” Our first instinct is to point the finger at qualifying parts for space and/or testing. But if you don’t care about satellite longevity or failure rates, then maybe [RG Sat] is onto something here.

Stepping back and looking at the big picture, however, the price of a CubeSat can be a drop in the bucket when compared to the launch costs, unless you’ve got a free ride. Is hardware the best place to focus cost reduction efforts?  Regardless, [RG Sat]’s project is bound to provide interesting and useful results whether he succeeds in his goal or confirms that indeed you need $10,000 to build a CubeSat. We’ll be following his progress with interest.

We’ve written about open source CubeSats before, and also a port-mortem analysis of a failed mission that contains some good lessons. Thanks to [Jeremy Grosser] for the tip.


Run Out Of GPIO On Your Pi? Don’t Despair!

When the first Raspberry Pi rolled off the production line back in 2012 it sported a 26-pin expansion header that seemed to conceal endless possibilities. A later upgrade to the 40-pin header we have today unleashed a few more precious interfaces, but even then it’s still possible to run out. This was the problem faced by [woj], who needed a PWM line to drive a cooling fan  but whose other work had used everything on the header. The solution? Dive into the other connectors on board looking for an unused GPIO.

Every full-sized Pi has a connector for the camera and the LCD screen, and to operate some of the functions of those peripherals they contain a few extra GPIOs that aren’t normally used by end users. If  the camera or LCD is not being used then these lines are potentially up for grabs. In particular there’s a GPIO that turns the camera on or off that’s relatively easy to solder a wire to, and it was this one that fed the PWM line.

There are of course a few other ways to  find some more lines on a Pi and indeed almost any microcontroller, with one of the many types of GPIO expansion chips.  This trick is a particularly simple one though. and perhaps unsurprisingly it has surfaced here before.

Boat Anchor Nixie Clock Plays The Cold Warrior Role Convincingly

The early Cold War years may have been suffused with existential dread thanks to the never-ending threat of nuclear obliteration, but at least it did have a great look. Think cars with a ton of chrome, sheet steel toys with razor-sharp edges, and pretty much the entire look of the Fallout franchise. And now you can add in this boat anchor of an electromechanical Nixie clock, too.

If [Teti]’s project looks familiar, perhaps it’s because the build was meant as an homage to the test equipment of yore, particularly some of the sturdier offerings from Hewlett-Packard. But this isn’t some thrift store find that has been repurposed; rather, the entire thing, from the electronics to the enclosure, is scratch built. The clock circuit is based on 4000-series CMOS chips and the display uses six IN-1 Nixies. Instead of transistors to drive the tubes, [Teti] chose to use relays, which in the video below prove to be satisfyingly clicky and relaxing. Not relaxing in any way is the obnoxious alarm, which would be enough to rouse a mission control officer dozing in his bunker. [Teti] has a blog with more details on the build, the gem of which is information on how he had the front panel so beautifully made.

We can’t say enough about the fit and finish of this one, as well as the functionality. What’s even more impressive is that this was reportedly [Teti]’s first project like this. It really puts us in mind of some of the great 6502 retrocomputer builds we’ve been seeing lately.

Continue reading “Boat Anchor Nixie Clock Plays The Cold Warrior Role Convincingly”

DIY Grader Box + Rocks = No Need For Shocks

Between the mini bike and the nearby woods, [HowToLou] has a lot for the rest of us to be envious of. Unfortunately, the terrain on the dirt path is too bumpy and uneven for a nice ride. But rather than spend hundreds to buy or rent an official grader box, [Lou] looked at his riding mower and said, I can do that myself (YouTube, embedded below).

This grader box is made from a heavy-duty oak pallet, plus a piece of particle board to complete the rocks box. [Lou] hooks up tow straps to the hooks and drags it behind the riding mower a few times to get the path nice and even. The line of lag bolts busts up the bumps, and the boards smooth out the surface under the weight of several large rocks. We think the result looks great, and doubt that [Lou] could have done any better with a fancy grader box. Check it out in action after the break.

Don’t have a riding mower? This is a pretty good excuse to buy one, but if that’s not in the cards, maybe you could build something suitable out of plywood and bike parts.

Continue reading “DIY Grader Box + Rocks = No Need For Shocks”

Supersized Van De Graaff Generator Packs A Punch

The Van de Graaff generator is a staple of science museums, to the point that even if the average person might not know its name, there’s an excellent chance they’ll be familiar with the “metal ball that makes your hair stand up” description. That’s partly because they’re a fairly safe way to show off high voltages, but also because they’re surprisingly cheap and easy to build.

In his latest Plasma Channel video [Jay Bowles] builds a large Van de Graaff generator that wouldn’t look out of place in a museum or university, which he estimates is producing up to 500,000 volts. It can easily throw impressive looking (and sounding) sparks 10 inches or more, and as you can see in the video below, is more than capable of pulling off those classic science museum tricks.

Lower pulley assembly.

It’s really quite amazing to see just how little it takes to generate these kinds of voltages with a Van de Graaff. In fact there’s nothing inside that you’d immediately equate with high voltage, the only electronic component in the generator’s base beyond the battery pack is a motor speed controller. While everything else might look suspiciously like magic, our own [Steven Dufresne] wrote up a properly scientific explanation of how it all works.

In this particular case, the motor spins a nylon pulley in the base of the generator, which is connected to a Teflon pulley in the top by way of a neoprene rubber belt. Combs made from fine metal mesh placed close to the belt at the top and bottom allow the Van de Graaff to build up a static charge in the sphere. Incidentally, it sounds like sourcing the large metal sphere was the most difficult part of this whole build, as it took [Jay] several hours to modify the garden gazing ball to fit atop the acrylic tube that serves as the machine’s core.

In the past we’ve seen Van de Graaff generators built out of literal trash, and back in 2018, [Jay] himself put together a much smaller and more simplistic take on the concept. But this beauty certainly raises the bar beyond anything we’ve seen previously.

Continue reading “Supersized Van De Graaff Generator Packs A Punch”

How Best To Get Your Project On Hackaday

We’re blessed to have such a great community at Hackaday. Our tipline often overfloweth with all manner of projects and builds of all stripes. We see it all here, from beginners just starting out with their first Arduino to diehard hackers executing daringly complex builds in their downtime, and everything in between.

If you’re sitting there in the grandstands, watching in awe, you might wonder what it takes to grace these hallowed black pages. In life, nothing is guaranteed, but I’ve been specially authorised to share with you a few tips that can maximise your chances of seeing your project on Hackaday.

Continue reading “How Best To Get Your Project On Hackaday”