DIY Pulse Oximeter

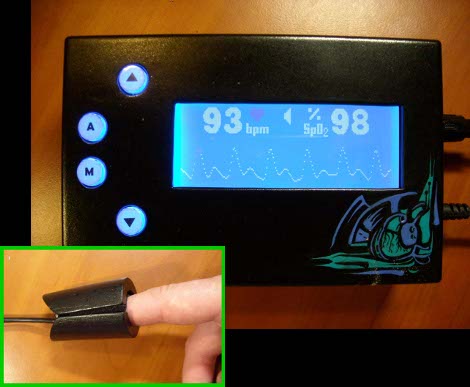
This pulse oximeter turned out very nicely. It is based around a Freescale microcontroller and detects pulse as well as oxygen saturation in your blood. The sensor is made of two wood pieces and allows two wavelengths of light to be shined through your finger. A sensor picks up the light on the other side of your stubby digit and the readings are compared to calculate saturation. Check out the finished project after the break.

We saw an Arduino-based oximeter a few months ago. These kind biometric hacks are rare around here. If you’ve got a well documented project don’t forget to tell us about it.

Continue reading “DIY Pulse Oximeter”

Pulse Oximeter

[youtube=http://www.youtube.com/watch?v=GdN5IRVJOXI]

[Mike] is building his own Pulse Oximeter which uses light to measure the oxygen saturation in blood. One collateral benefit of this measurement is that pulse rate can be calculated from the same data. The parts used for the detector include a red LED, infrared LED, and a TSL230R light intensity measuring chip. As explained in the video above, each LED is shined through the tip of your finger and onto the light sensor. The IR LED is used as a baseline and compared to the red LED, which has some of its intensity absorbed by the red blood in your finger. This is a pretty approachable biometric concept so you may want to start here before moving on to more involved biometric interfaces.

[Thanks Russ]

This Air Particulate Sensor Can Also Check Your Pulse Rate

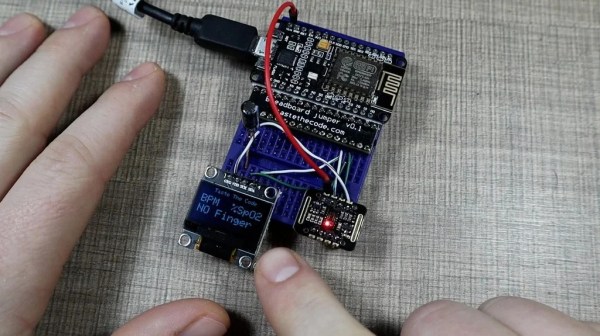
The MAX30105 is an optical sensor capable of a great many things. It can sense particulate matter in the air, or pick up the blinking of an eye. Or, you can use it as a rudimentary way to measure your heart rate and blood oxygen levels. It’s by no means a medical grade tool, but this build from [Taste The Code] is still quite impressive.

The MAX30105 contains red, green, and infrared LEDs, and a very sensitive light detector. The way it works is by turning on its different LEDs, and then carefully measuring what gets reflected back. In this way it can measure particles in the air,  such as smoke, which is actually what it was designed for originally. Or, if you press your finger up against it, it can measure the light coming back from your blood and determine its oxygenation level. By detecting the variation in the light over time, it’s possible to pick up your pulse, too.

Getting this data out of the sensor is remarkably easy. One need only hook it up to a suitable microcontroller like the ESP8266 and use the MAX3010X library to talk to it. [Taste The Code] did exactly that, and also hooked up a screen for displaying the captured data. Alternatively, if you want the raw data from the sensor, you can get that too.

It should be noted that this build was done for educational purposes only. You shouldn’t rely on a simple DIY device for gathering useful medical data; there are reasons the real gear is so expensive, after all. We’ve looked at this sensor before, too, not long after it first hit the market. Continue reading “This Air Particulate Sensor Can Also Check Your Pulse Rate”

Retrotechtacular: A Closer Look At The VT Proximity Fuze

Here at Hackaday, our aim is to bring you only the freshest of hacks, which carries the burden of being Johnny-on-the-spot with our source material. So if something of obvious interest to our readers goes viral, we might just choose to skip covering it ourselves, figuring you all have probably seen it already. But, if we can dig a little deeper and bring extra value over and above what the viral content provides — well then that’s another story.

That’s pretty much the story behind the excellent video recently released by [Real Engineering] about “The Secret Weapon That Changed World War 2.” It concerns the VT series of proximity fuzes — it’s a legitimate alternate spelling of “fuse” if a somewhat archaic one — that were used for artillery shells and spin-stabilized rockets in World War II. The video gives an excellent overview of the development of the VT, which was used primarily in anti-aircraft artillery (AAA). The details about the development of the American VT fuze are excellent, although curiously there’s no mention that British experiments with a radio proximity fuze were part of the goldmine of information brought to America at great risk by the Tizard mission in 1940. While there has been plenty of contention about the exact role the British work played, it’s fair to say that it at least informed the development and fielding of the American VT fuze.

Continue reading “Retrotechtacular: A Closer Look At The VT Proximity Fuze”

A Tale Of Two Pulse Modulators

In the realm of test equipment, there are a number of items that you don’t know you need until you need one. That’s probably the case with the HP11720A pulse modulator. [Tom] acquired two of these even though, by his own admission, he had “no need for these things.” We’d like to say we don’t get that, but — alas — we do.

The good news, though, is he used one of them to measure the quality of some coax cable and shared the exercise with us in the post and a video, which you can watch below. The device can generate pulses with extremely fast rise and fall times (under 10 nanoseconds) at frequencies from 2 to 18 GHz. These were often used in pulsed radar applications and probably cost quite a bit more new than [Tom] shelled out for them.

Continue reading “A Tale Of Two Pulse Modulators”

Scrambling Pocket Calculators Made Easy With EMP Box V2

[Rostislav Persion] has for some time been interested in making small, portable EMP devices capable of interfering with nearby electronics. In these EMP devices, high voltage is used to create a portable spark gap generator, whose operation in turn creates electromagnetic pulses capable of resetting or scrambling nearby electronics such as pocket calculators.

Bridging adjacent holes narrows the spark gap, resulting in more frequent pulses.

His original EMP box designs relied on spark gaps constructed from metal screws threaded into a clear plastic insulator, but this newest design ditches fussy screw adjustments and relies on perfboard. By cutting out a single row of plated perfboard holes and soldering the high voltage terminals to each end, the empty holes in between form the essential parts of a spark gap.

It’s even adjustable: one simply bridges adjacent holes with solder to effectively decrease the gap. As for generating the high voltage itself, a DC voltage multiplier from Amazon takes care of that. Watch the device reset some calculators in the short video below.

Looking for high-voltage experiments that aren’t so sketchy? Get yourself a Van de Graff generator, some metal balls, and a little bit of oil, and make some art.

Continue reading “Scrambling Pocket Calculators Made Easy With EMP Box V2”

A brick mailbox with a LIDAR sensor mounted inside

Using A LIDAR Sensor To Monitor Your Mailbox

The inconvenience of having to walk to your mailbox to check for mail has inspired many hackers to install automated systems that let them know when the mail has been delivered. Mailbox monitors have been made based on several different mechanisms: some measure the weight of the items inside, some use cameras and machine vision, while others simply trigger whenever the mailbox’s door or flap is moved. When [Gary Watts] wanted to install a notification system for his 1940s brick letterbox, his options were limited: with no flap or door to monitor, and limited space to install mechanical contraptions, he decided to use a LIDAR sensor instead.

Probably best-known for their emerging application in self-driving cars, LIDAR systems send out a laser pulse and measure the time it takes for it to be reflected off a surface. In the case of [Gary]’s mailbox, that surface is either the brick wall or a letter leaning against it. Since letters are inserted through a vertical slot, they will usually be leaning upright against the wall, providing a clear target for the laser.

The LIDAR module, a VL53L0X made by ST, is hooked up to a Wemos D1 Mini Pro. The D1 communicates with [Gary]’s home WiFi through an external antenna, and is powered by an 18650 lithium battery charged through a solar panel. The whole system is housed inside a waterproof plastic case, with the LIDAR sensor attached to the inside of the mailbox through a 3D-printed mounting bracket. On the software side, the mailbox notifier is powered by Home Assistant and MQTT. The D1 spends most of its time in deep-sleep mode, only waking up every 25 seconds to read out the sensor and send a notification if needed.

We’ve seen quite a few fancy mailbox monitors over the years: some are extremely power efficient, some use multiple sensors to allow for different use-cases, and some others are simply beautifully designed.