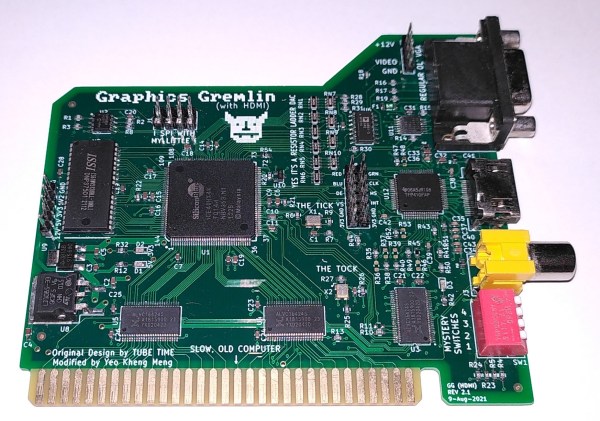
An 8-bit ISA card with VGA, HDMI and composite video connectors

Upgraded Graphics Gremlin Adds HDMI Video To Vintage PCs

Although new VGA-equipped monitors can still be bought, the old standard is definitely on its way out by now, being replaced by high-speed digital interfaces like HDMI and DisplayPort. It therefore makes sense to prepare for a VGA-less future, as [Yeo Kheng Meng] is doing. He designed an 8-bit ISA display card with an HDMI output that enables even the very first generation of PCs to talk to a modern monitor.

The design is based on the Graphics Gremlin by [Tube Time], which is an 8-bit ISA display card that aims to be software compatible with the obsolete MDA and CGA display formats while outputting a clean VGA signal. [Yeo Kheng Meng] modified the board by adding a TFP410 HDMI bus driver and replacing the rarely-used 9-pin RGBI connector with an HDMI version. He also updated the HDL code for the Lattice FPGA, which forms the heart of the graphics card, to account for the new digital output. While he was at it, he also added a few features he was missing in the original product, such as the option to select the color displayed in MDA mode and the ability to output both HDMI and composite video at the same time.

The video below shows the updated card in action in an IBM 5155 Portable PC. The HDMI port connects to a modern monitor, while the composite video output is routed to the 5155’s internal CRT as well as a small color monitor on top. The IBM thereby joins a small list of retro computers that have received an HDMI upgrade — the Amiga 500 and PlayStation 2 being other examples. HDMI might be a lot more complex to work with than VGA, but luckily there are open-source implementations that do much of the work for you.

Continue reading “Upgraded Graphics Gremlin Adds HDMI Video To Vintage PCs”

Commodore 64 Upgrade In Modern Package

While the Commodore 64 was an immensely popular computer for its time, and still remains a strong favorite within the retrocomputing community, there’s a reason we’re not using modern Commodore-branded computers today. Intense competition, company mismanagement, and advancing beyond 8-bit computers too late in the game all led to the company’s eventual downfall. But if you’re still a Commodore enthusiast and always wished you were able to get an upgraded C64, you might want to take a look at the Commander X16, a modern take on this classic computer.

We’ve actually seen the Commander X16 before, but this was back in its early days of prototyping and design. This video from [Adrian’s Digital Basement], also linked below the break, takes a look at how it’s come in the four years since [David Murray] started this project. At its core, it’s an 8-bit 6502-based computer like you’d find in the 1980s but built with new components. There are some more modern updates as well such as the ability to use an SD card as well as built-in SNES controller ports, but the real magic here is the VERA module. Built around an FPGA, this module handles graphics, some of the audio, and the storage capabilities and does all of these things much better than the original Commodore, while still being faithful to what made these computer great.

While the inclusion of the FPGA might offend some of the most staunch 8-bit purists, it turns out to be necessary due to the lack of off-the-shelf video chips and really makes this build shine in the end. It’s also capable of running 6502-based software from other machines too, including the original NES. The VERA module makes it possible to run other software too, including a sample of Sonic the Hedgehog from the Sega Genesis which [Adrian] demonstrates in his video. 6502-based computers are quite versatile as the Commander X16 demonstrates, and it’s even possible to build a rudimentary 6502 on a breadboard with just a few parts.

Continue reading “Commodore 64 Upgrade In Modern Package”

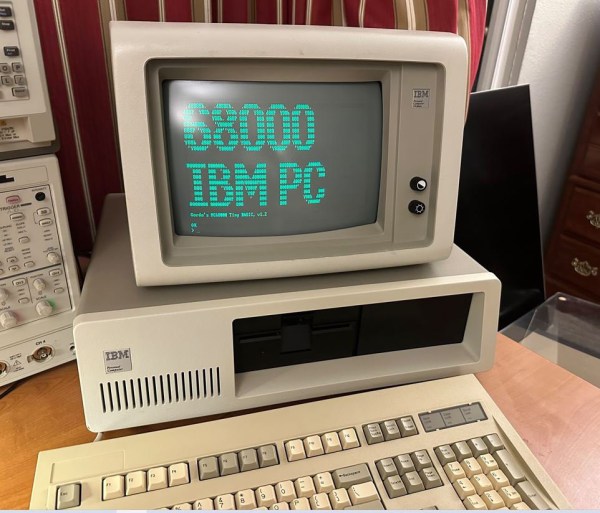
An IBM PC showing "68000 IBM PC" on its monitor

IBM PC Runs BASIC With Motorola 68000 CPU Upgrade

Although ARM CPUs have been making headway in several areas of computing over the last decade or so, the vast majority of desktop, laptop and server CPUs are still based on the x86 architecture. How that came to be is no secret, of course: IBM chose the Intel 8088 to power its model 5150 PC back in the early 1980s, and since it became the dominant PC platform, everyone else followed suit. But what if IBM’s purchasing department had got a good deal at Motorola instead? [Ted Fried] has been experimenting with that scenario, by equipping an IBM PC with a 68000 CPU.

To be fair, he didn’t use an actual Motorola chip; instead, he emulated a 68k core on a Teensy 4.1 and implemented the 8088’s bus interface on its pins. The emulated core does exactly the same thing an actual CPU would do, while the rest of the computer works the same way it always did – data is stored in the motherboard’s DRAM chips, keystrokes are processed by the standard 8255 chip and progam output is displayed on the monitor through the MDA video card. Continue reading “IBM PC Runs BASIC With Motorola 68000 CPU Upgrade”

The 4004 Upgrade You’ve Been Waiting For

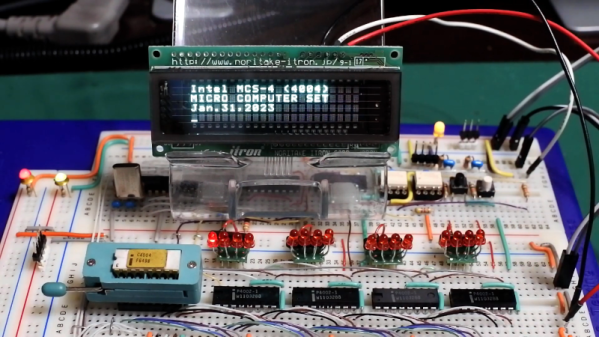
You know how it is. You have an older computer, and you can’t run the latest software on it. Time to upgrade, right? Well, if you have been in this situation a very long time, [ryomuk] may have an answer for you. The emu8080on4004 project (Google Translate) offers a way to run 8080 code on a 4004 CPU. Finally!

The 4004 development board is a homebrew affair, and the emulator works well enough that an 8080 Tiny BASIC interpreter ran with very few changes to the source code. You can see it working in the video below. It would be cool to run CP/M, but we imagine that would be a little harder, especially resource-wise.

A few things are missing. For example, the DAA instruction doesn’t exist, and there are no provisions for interrupts. There’s only one I/O port, and using the IN instruction will block until you receive a serial port character. There is an option to implement the parity flag in the 8080 flags register, but its operation is untested.

Still, pretty impressive for a 4-bit CPU running at 740 kHz with very little memory. If you want to see more about the development board itself, check out the second video below. Want to know more about the chip that launched a family of processors that is still around? Read its biography. You can also read about the designer who put his signature on the die.

Continue reading “The 4004 Upgrade You’ve Been Waiting For”

DIY GameTank Game Console Gets Upgraded Cartridge

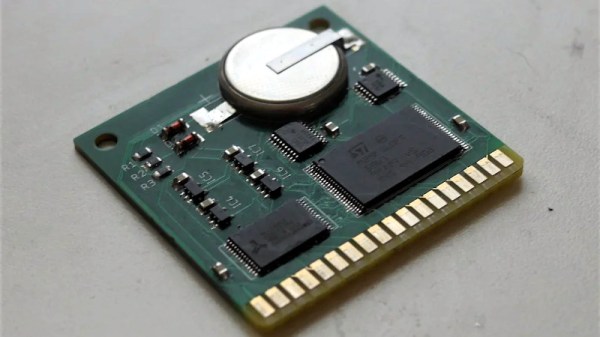
Over the summer, you might recall seeing a homebrew 6502 game console called the GameTank grace these pages. The product of [Clyde Shaffer], the system was impressively complete, very well documented, and even had a budding library of games.

Recently, [Clyde] took to the r/electronics subreddit to show off the latest improvement to the GameTank: a revised removable cartridge. The biggest change this time around is the addition of 32 KB of battery-backed SRAM that gives games (or any other software that might be on the cartridge) some persistent storage to work with. Continue reading “DIY GameTank Game Console Gets Upgraded Cartridge”

A NABU PC opened up and powered on

NABU PC Gets CPU Upgrade, Emulates A TRS-80

The NABU PC caused a bit of a buzz in the retrocomputing community a couple weeks back. After all, it doesn’t happen often that a huge batch of brand-new computers from the 1980s suddenly becomes available on eBay. Out of the box, the computer itself isn’t that useful: with no internal storage, or any application software whatsoever, it can really only serve as a bare-bones development platform. But since its hardware is quite similar to that of other contemporary home computers, emulating one of those shouldn’t be too difficult, which is exactly what [Ted Fried] did: he managed to turn his NABU into a TRS-80 clone by using his MCLZ8 CPU emulator.

The MCLZ8 is basically an 800 MHz Teensy CPU with an adapter board that allows it to be plugged into a Z80 socket. It emulates the Z80 CPU in real-time, but it also holds the TRS-80 ROM and performs real-time translation between peripherals. On the input side, it reads out the ASCII characters coming in from the NABU’s 8251A UART and stores them in the virtual TRS-80’s keyboard buffer. On the output side, it transfers the TRS-80’s video data to the NABU’s TMS9918 video chip.

The motherboard of a NABU PC with a Teensy-based CPU upgradeOne problem [Ted] ran into was a difference in screen resolution: the NABU has a 40×24 character display, while the TRS-80 generates a 64×16 character image. [Ted] solved the vertical difference by simply keeping the NABU logo on the screen at all times, and decided to just ignore the 24 characters that drop off the right side – it’s not a big issue for a typical BASIC program anyway.

The repurposed NABU might not be a perfect TRS-80 clone, but that’s not the point: it shows how easily the NABU’s hardware can be reprogrammed to do other things. For example, [Ted] has already started work on a new project that doesn’t emulate the Z80, but instead runs code directly on the Teensy’s ARM A9 processor. As you might imagine, this gives the NABU several orders of magnitude more processing power, although the practical use of this is limited because the CPU still has to wait for the NABU’s slow data bus and display chip. [Ted] explains the setup and runs a few impressive demos in the video embedded below.

[Ted]’s NABU experiments are a great example of the Teensy board’s flexibility: we’ve already seen how it can emulate a Z80 as well as an 8088. We’re also curious to see what others will develop with the NABU’s hardwareif they can still buy it, of course.

Continue reading “NABU PC Gets CPU Upgrade, Emulates A TRS-80”

PySpectrometer version 2, showing mini spectroscope, 4 inch display and hand for scale

Pi-based Spectrometer Gets An Upgrade

Here at Hackaday, we love to see projects re-visited and updated after we’ve covered them on the site. It’s always exciting to see what the creators come up with next, and this Pi-Based Spectrometer project is a great example of that.

[LesWright] found himself with a problem when the new version of Raspberry Pi operating system was released (Bullseye), and it broke some functionality on his original software. Rather than just fix the issues, [Les] chose to rewrite the software more dramatically and has ended up with a much more capable spectrometer that is able to match professional devices costing many times more.

Screenshot of Waterfall Display for PySpectrometer 2

By using multi-wavelength calibration and polynomial regression data, the new version is much more accurate and can now resolve wavelengths down to +/- 1nm.

The whole project is now written in OpenCV, and there’s a nifty new waterfall spectrum display, that will show changes in measured spectra over time.

A low-cost benchtop spectroscope is coupled to a RaspberryPi Camera via a CCTV zoom lens and the whole setup is mounted to a small block of aluminium for thermal and mechanical stability. The spectroscope is pointed at a fluorescent lamp and the user is guided through a calibration routine to tune the software to the hardware.

We’re impressed with the precision [Les] has achieved with his builds, and the write-up is sufficiently detailed to allow others to follow in his footsteps. We’d love to see if readers build one themselves, and what they use them for!

If you want to read up on the original build, you can find our article here. We’ve covered several spectrometry projects in the past, including this Gamma-Ray Spectrometer and this one based around an STM32 Nucleo board. Continue reading “Pi-based Spectrometer Gets An Upgrade”