This project began simply enough but got very complicated in short order. Initially the goal was to get the GameCube keyboard controller integrated with the game Animal Crossing. The GameCube keyboard controller is a genuine part manufactured and sold by Nintendo but the game Animal Crossing isn’t compatible with this controller. Rather, Animal Crossing has an on-screen keyboard which players can use with a standard controller. [Hunter] found this frustrating to use so he created an adapter which would intercept the keyboard controller protocol and replace it with equivalent “keypresses” from an emulated standard controller.
In theory, writing a Linux device driver shouldn’t be that hard, but it is harder than it looks. However, using libusb, you can easily deal with USB devices from user space, which, for many purposes, is fine. [Crescentrose] didn’t know anything about writing user-space USB drivers until they wrote one and documented it for us. Oh, the code is in Rust, for which there aren’t as many examples.
The device in question was a USB hub with some extra lights and gadgets. So the real issue, it seems to us, wasn’t the code, but figuring out the protocol and the USB stack. The post covers that, too, explaining configurations, interfaces, and endpoints.
There are other ancillary topics, too, like setting up udev. This lets you load things when a USB device (or something else) plugs in.
During Apple’s late-90s struggles with profitability, it made a few overtures toward licensing its software to other computer manufacturers, while at the same time trying to modernize its operating system, which was threatening to slip behind Windows. While Apple eventually scrapped their licensing plans, an interesting product of the situation was Rhapsody OS. Although Apple was still building PowerPC computers, Rhapsody also had compatibility with Intel processors, which [Omores] put to good use by running it on a relatively modern i7-3770 CPU.
[Omores] selected a Gigabyte GA-Z68A-D3-B3 motherboard because it supports IDE emulation for SATA drives, a protocol which Rhapsody requires. The operating system installer needs to run from two floppy disks, one for boot and one for drivers. The Gigabyte motherboard doesn’t support a floppy disk drive, so [Omores] used an older Asus P5E motherboard with a floppy drive to install Rhapsody onto an SSD, then transferred the SSD to the Gigabyte board. The installation initially had a kernel panic during installation caused by finding too much memory available. Limiting the physical RAM available to the OS by setting the maxmem value solved this issue.
After this, the graphical installation went fairly smoothly. A serial mouse was essential here, since Rhapsody doesn’t support USB. It detected the video card immediately, and eventually worked with one of [Omores]’s ethernet cards. [Omores] also took a brief look at Rhapsody’s interface. By default, there were no graphical programs for web browsing, decompressing files, or installing programs, so some command line work was necessary to install applications. Of course, the highlight of the video was the installation of a Doom port (RhapsoDoom).
Since October 1978, the National Oceanic and Atmospheric Administration (NOAA) has operated its fleet of Polar-orbiting Operational Environmental Satellites (POES) — the data from which has been used for a wide array of environmental monitoring applications, from weather forecasting to the detection of forest fires and volcanic eruptions. But technology marches on, and considering that even the youngest member of the fleet has been in orbit for 16 years, NOAA has decided to retire the remaining operational POES satellites on June 16th.
Under normal circumstances, the retirement of weather satellites wouldn’t have a great impact on our community. But in this case, the satellites in question utilize the Automatic Picture Transmission (APT), Low-Rate Picture Transmission (LRPT), and High Resolution Picture Transmission (HRPT) protocols, all of which can be received by affordable software defined radios (SDRs) such as the RTL-SDR and easily decoded using free and open source software.
As such, many a radio hobbyist has pointed their DIY antennas at these particular satellites and pulled down stunning pictures of the Earth. It’s the kind of thing that’s impressive enough to get new folks interested in experimenting with radio, and losing it would be a big blow to the hobby.
Luckily, it’s not all bad news. While one of the NOAA satellites slated for retirement is already down for good, at least two remaining birds should be broadcasting publicly accessible imagery for the foreseeable future.
Saleae logic analyzers seem to have it all: good sampling rates, convenient protocol decoding, and plenty of channels – but not a good way to set rising or falling-edge triggering. [James] found this rather inconvenient when debugging embedded devices, and shared a workaround that replicates these simple triggering modes.
Crucially, the logic analyzer’s software has a repeated triggering mode that fires when the protocol decoder detects a preset value. [James] used a clever trick to turn this into a rising-edge trigger: he set up a simple parallel analyzer, and set the signal in question as both the sampled channel and the clock signal. Since he wanted to detect the rising edge, he set the clock mode accordingly. Next, he loaded the simple parallel decoder’s trigger configuration and set it to detect a value of one, the value of a high signal. When he ran the simple parallel trigger, every rising edge of the input signal would trigger the clock to check for a high value on the line, in turn triggering the analyzer.
It’s also possible to set up a falling-edge trigger by selecting the falling-edge clock mode and setting the trigger mode to detect a value of zero. Setting up more complex triggers involving multiple channels is as simple as calculating the hexadecimal value of the desired state and setting the parallel decoder to trigger on that value. For example, if you want to trigger when one input is low and another is high, you can set the decoder to trigger on a value or one or two, depending on which order the inputs come in.
The CIA ran a series of web sites in the 2000s. Most of them were about news, finance, and other relatively boring topics, and they spanned 29 languages. And they all had a bit of a hidden feature: Those normal-looking websites had a secret login and hosted CIA cover communications with assets in foreign countries. A password typed in to a search field on each site would trigger a Java Applet or Flash application, allowing the spy to report back. This isn’t exactly breaking news, but what’s captured the Internet’s imagination this week is the report by [Ciro Santilli] about how to find those sites, and the fact that a Star Wars fansite was part of the network.
This particular CIA tool was intended for short-term use, and was apparently so effective, it was dragged way beyond it’s intended lifespan, right up to the point it was discovered and started getting people killed. And in retrospect, the tradecraft is abysmal. The sites were hosted on a small handful of IP blocks, with the individual domains hosted on sequential IP addresses. Once one foreign intelligence agency discovered one of these sites, the rest were fairly easily identified. Continue reading “This Week In Security: CIA Star Wars, Git* Prompt Injection And More”→
Recently [Florin] was in the market for a basic uninterruptible power supply (UPS) to provide some peace of mind for the smart home equipment he had stashed around. Unfortunately, the cheap Serioux LD600LI unit he picked up left a bit to be desired, and required a bit of retrofitting.
To be fair, the issues that [Florin] ended up dealing with were less about the UPS’ capability to deal with these power issues, and more with the USB interface on the UPS. Initially the UPS seemed to communicate happily with HomeAssistant (HA) via Network UPS Tools over a generic USB protocol, after figuring out what device profile matched this re-branded generic UPS. That’s when HA began to constantly lose the connection with the UPS, risking its integration in the smart home setup.
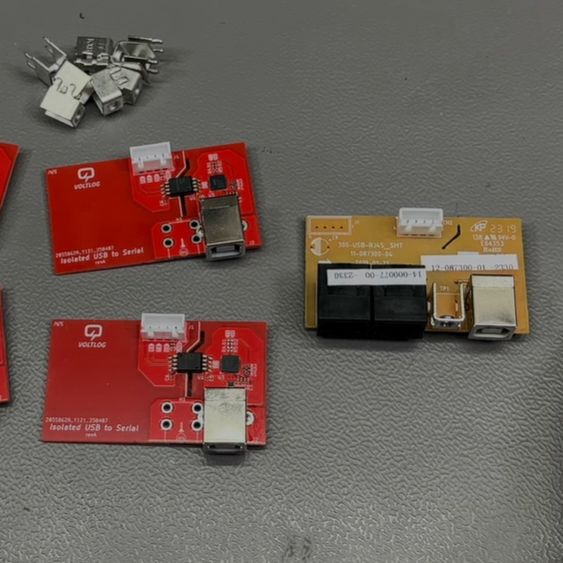
The old and new USB-serial boards side by side. (Credit: VoltLog, YouTube)
After tearing down the UPS to see what was going on, [Florin] found that it used a fairly generic USB-serial adapter featuring the common Cypress CY7C63310 family of low-speed USB controller. Apparently the firmware on this controller was simply not up to the task or poorly implemented, so a replacement was needed.
The process and implementation is covered in detail in the video. It’s quite straightforward, taking the 9600 baud serial link from the UPS’ main board and using a Silabs CP2102N USB-to-UART controller to create a virtual serial port on the USB side. These conversion boards have to be fully isolated, of course, which is where the HopeRF CMT8120 dual-channel digital isolator comes into play.
After assembly it almost fully worked, except that a Sonoff Zigbee controller in the smart home setup used the same Silabs controller, with thus the same USB PID/VID combo. Fortunately in Silabs AN721 it’s described how you can use an alternate PID (0xEA63) which fixed this issue until the next device with a CP2102N is installed
As it turns out, the cost of a $40 UPS is actually 10 hours of work and $61 in parts, although one cannot put a value on all the lessons learned here.