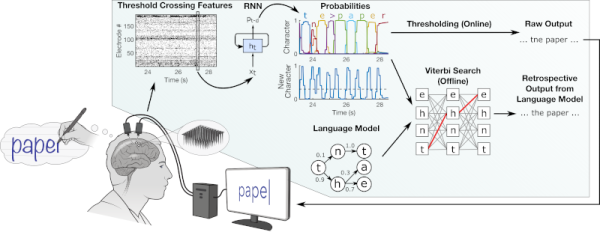
A Vintage Flip Clock Gets Some Modern Love

There are multiple reasons why we like [iSax]’s rebuild of a Bodet flip clock from the early 1980s. First there’s the retro charm of the timepiece itself, then the electronics used to drive it, its electromechanical month length and leap year system, and finally because here is a maker lucky enough to have a beautiful tabby cat to share the workbench with.

For those of you unfamiliar with a flip clock, these devices have their digits as a series of hinged cards on a central rotor, with each one being exposed in turn as the rotor turns. This one is part of a distributed clock system in which the clients receive a 1 Hz pulse from a central time server to drive their motors, something easily replicated with an Arduino and an H-bridge. Particularly fascinating though is the month length mechanism, part of the calendar rotor system, it has a small DC motor that is engaged to advance the days automatically by whichever number as part of the month transition. Originally this was powered by a couple of AA batteries, which have now been replaced with a small DC to DC converter. You can see it in action in the video below the break.

With or without tabby cats, we see quite a few projects featuring them. If you can’t find one, you can always make your own.

Continue reading “A Vintage Flip Clock Gets Some Modern Love”

Build An 8-bit CPU To Know “But How Do It Know?”

Sometime around 2009, [J. Clark Scott] published a book aimed to demystify computers for everyone by walking through construction of an 8-bit CPU from scratch. The book had a catchy, but somewhat confusing title But How Do It Know?. The back story on the title goes something like this: Joe is a very nice fellow, but has always been a little slow. He goes into a store where a salesman is standing on a soapbox in front of a group of people. The salesman is pitching the miracle new invention, the Thermos bottle. He is saying, “It keeps hot food hot, and cold food cold….” Joe thinks about this a minute, amazed by this new invention that is able to make a decision about which of two different things it is supposed to do depending on what kind of food you put in it. He can’t contain his curiosity, he is jumping up and down, waving his arm in the air, saying “but, but, but, but…” Finally he blurts out his burning question “But how do it know?” Joe looked at what this Thermos bottle could do, and decided that it must be capable of sensing something about its contents, and then performing a heating or cooling operation accordingly. Joe’s concept of how the bottle worked was far more complicated than the truth. With that introductory opening, [J. Clark Scott] goes on to cover basic number theory, leading on to logic gates, and finally the 8-bit CPU.

[Patrick LeBoutillier] decided to build a hardware version of the CPU/computer as described in [John Clark Scott]’s book. In order to keep size and cost within reasonable bounds, he choose a hybrid construction using a combination of micro-controllers and SN74HC logic IC’s. When used as a companion project alongside reading the book, he hopes people can get their hands dirty and try it out for themselves. He has published a series of 14 videos covering construction of the CPU and the first Introductory video is embedded after the break below. For the micro-controller part of the project, he is using four Arduino Nanos, the code and install instructions for which are available at his Git repo. The Fritzing schematic, also available at the repo, might look a bit daunting at first look, but when you follow along his video series, it becomes easier. You can preview the first three chapters of the book at the “But How Do It Know?” website.

If FPGA’s are more of a thing for you, or you’d like to dip your feet learning FPGA, then [Patrick] has another series of 17 videos (embedded below) where he goes through the same process using a Digilent BASYS3 FPGA development board. These aren’t your only options — if you just want to understand how it works, without having to build the hardware, then check out the online, browser based implementation of the [Clark Scott] CPU.

If it seems the breadboard build of this 8-bit CPU looks complex, then this
Home Made 8-bit CPU Is A Wiry Blinky Build and a veritable rats nest of jumper wires.

Continue reading “Build An 8-bit CPU To Know “But How Do It Know?””

How A Quadriplegic Patient Was Able To Eat By Himself Again Using Artificial Limbs

Thirty years ago, [Robert “Buz” Chmielewski] suffered a surfing accident as a teenager. This left him as a quadriplegic due to a C6 spinal cord injury. After becoming a participant in a brain-computer interface study at Johns Hopkins, he was recently able to feed himself through the use of prosthetic arms. The most remarkable thing about these prosthetic arms is primarily the neural link with [Buz’s] brain, which allows him to not only control the artificial arms, but also feel what they are touching, due to a closed-loop system which transfers limb sensory input to the patient’s brain.

The prosthetic limb in question is the Modular Prosthetic Limb (MPL) from Johns Hopkins Applied Physics Laboratory (APL). The Johns Hopkins Medicine Brain-Computer Interface study began a year ago, when [Buz] had six microelectrode arrays (MEA) implanted into his brain: half in the motor cortex and half in the sensory cortex. During the following months, the study focused on using the signals from the first set of arrays to control actuators, such as the MPL. The second set of arrays was used to study how the sensory cortex had to be stimulated to allow a patient to feel the artificial limb much as one feels a biological limb.

What makes this study so interesting is not only the closed-loop approach which provides the patient with feedback on the position and pressure on the prosthetic, but also that it involves both hemispheres of the brain. As a result, after only a year of the study, [Buz] was able to use two of the MPLs simultaneously to feed himself, which is a delicate and complicated tasks.

In the video embedded after the break one can see a comparison of [Buz] at the beginning of the study and today, as he manages to handle cutlery and eat cake, without assistance.

Continue reading “How A Quadriplegic Patient Was Able To Eat By Himself Again Using Artificial Limbs”

Laser Etching Stainless Steel With Mustard

[Brain] wanted to mark some scissors with his Ortur laser engraver. The problem? The laser won’t cut into the hard metal of the scissors. His solution? Smear the scissors with mustard. No kidding. We’ve heard of this before, and apparently, you can use vinegar, as well, but since the mustard is a paste it is easier to apply. You can see the result in the video, below.

In case you think you don’t need to watch because we’ve already told you the trick, you should know that [Brian] also goes into a lot of detail about preparing single line fonts to get a good result, among a few other tips like improvements to his air assist setup. On a laser cutter, the air assist blows away charred material leaving a clear field of view between the laser and the remaining uncut material. Using a proper air assist can really expand the capabilities of these inexpensive laser cutters — something we recently saw upgraded with a 3D-printed air assist nozzle.

You can buy a commercial marking solution called CerMark Black, but you probably already have mustard. If you are super cheap, you can probably pick up a packet next time you buy a burger somewhere. After all, you don’t need much. Although the video talks about the Ortur, this technique would work with any engraver. We’ve also heard you can do something similar with plaster and alcohol.

Continue reading “Laser Etching Stainless Steel With Mustard”

A Gesture Recognizing Armband

Gesture recognition usually involves some sort of optical system watching your hands, but researchers at UC Berkeley took a different approach. Instead they are monitoring the electrical signals in the forearm that control the muscles, and creating a machine learning model to recognize hand gestures.

The sensor system is a flexible PET armband with 64 electrodes screen printed onto it in silver conductive ink, attached to a standalone AI processing module.  Since everyone’s arm is slightly different, the system needs to be trained for a specific user, but that also means that the specific electrical signals don’t have to be isolated as it learns to recognize patterns.

The challenging part of this is that the patterns don’t remain constant over time, and will change depending on factors such as sweat, arm position,  and even just biological changes. To deal with this the model can update itself on the device over time as the signal changes. Another part of this research that we appreciate is that all the inferencing, training, and updating happens locally on the AI chip in the armband. There is no need to send data to an external device or the “cloud” for processing, updating, or third-party data mining. Unfortunately the research paper with all the details is behind a paywall.

Continue reading “A Gesture Recognizing Armband”

Metal Plating Plastic Or Metal Parts

Like most of us, [Clem] wants to 3D print in metal. Metal 3D printers do exist, but they are generally way out of reach for most of us garage hackers. As an alternative, [Clem] uses a homebrew electroplating system to get prints with a metallic coating.

The setup is quite simple. Small glass jars to act as the plating tanks and the machine uses an Arduino controller along with a PCB to hold things like a relay to control the 24V used for electroplating. To keep everything tidy, [Clem] designed a 3D printed box that stores all the cables and chemicals when you aren’t using them. Since the parts might get hot, the plastic is PETG.

The trick is that parts need to be conductive in order to use electroplating — typically plastic isn’t conductive. [Clem] paints the plastic parts to grant them conductivity. Graphite paint didn’t give great results. However, an iron-based paint worked better but obscures detail on the print. In addition to galvanization (plating with zinc or steel) you can see copper plating of a nail at around the 12 minute mark, with a plastic plating demo a minute later. The machine can even plate gold using an expensive gold-bearing electrolyte. In the video comments, someone also mentioned that it would be interesting to try plating conductive filament without using the paint. [Clem] tried to remove rust from a big part, but the power supply wasn’t up to the task.

Copper plating is often used as a step to make a part conductive so you can then plate with another metal. In addition to copper sulfate, you can use copper acetate. Sometimes, getting metal into fine details can be tough and it is easier to use a pen to plate those areas directly.

Continue reading “Metal Plating Plastic Or Metal Parts”

Simple Christmas Tree Christmas Tree Ornament

When the only tool you have is a hammer, every problem looks like a nail. An LED ornament for the Christmas tree can be built in any manner of simple, easy implementations. You certainly don’t need an ARM Cortex M4 CPU running at 120MHz having a mouthful of three letter features like FPU, ETM, ETB, ECC, RWW, TCM, EIC, AES, CAN bus and much, much more. But [Martin Held] built a super simple LED Christmas tree ornament using the ATSAME51 series micro-controller, which he regularly works with and had on hand, and lots of bi-color LEDs. He already had schematic symbols and programmers for the device from other projects where he uses it more extensively, so putting it all together in time for the festive season was that much faster for him, despite the fact that the micro-controller was most likely the cheapest part of the BOM, besides the passives.

At this point it might be tempting to argue that it would have been so much simpler to use addressable LED’s, such as the WS2812B or the APA102C. You can drive them using a more basic micro-controller, and not require so many GPIO pins. But using such “smart pixel” LED’s for hand assembled prototypes can sometimes lead to unexpected results. If they are not stored in sealed tape/reel form, then storage conditions can have an adverse effect leading to dead pixels. And, they need a specific baking procedure before being soldered. Doing that for a few LEDs at home can be tricky.

So for the LED’s, he again went a bit off the beaten path, selecting to use three different color styles of bi-color LED’s with easy to hand-solder, 1206 footprints. This allows him to get a fairly random mix of colors in the completed ornament.

The LED array is pseudo-charlieplexed. One terminal of each LED goes to a GPIO pin on the micro-controller and the other terminal of all the LED’s are connected to a single complimentary pair of N-channel/P-channel MOSFETs — connected in totem-pole fashion. Depending on which MOSFET is switched on via a GPIO pin driving the gate pin high or low, the second terminal of each LED gets connected to either supply or ground. In combination with the GPIO pins being driven high/low, this allows the bi-color LED to be biased in either direction. Getting each LED to emit one color is simple enough — setting all LED GPIOs low, and MOSFET gate GPIO high will bias the LEDs in one direction. Reverse the GPIO logic, and the LEDs will be biased in the other direction. If this is done slow enough, the two colors can be differentiated easily. If the driving logic is made fast, changing states every 10us, the two separate colors merge to form a third hue. With some clever bit of code, he also adds some randomness in the GPIO output states, resulting in a more appealing twinkling effect. [Martin] does a detailed walk through in the video embedded below.

If you have the same bunch of parts lying around and wish to replicate the project, be warned that the KiCad source files will need some work to clean up errors — [Martin] was in a hurry and knew what he was doing so there are some intentional mistakes in the schematic such as using the same symbol for the N-channel and P-channel MOSFETs, and uni-directional LED symbol in place of the bi-directional one. And for programming, you will need one of these pricey pogo-pin style cables, unless you decide to edit the PCB before sending off the Gerbers.

[Martin] built just three of these bespoke ornaments, retaining one and giving away the other two to a neighbour and a co-worker. But if you would really like to build a tree ornament with addressable LEDs, then check out the Sierpinski Christmas Tree which can be cascaded to form an array of tree ornaments.

Continue reading “Simple Christmas Tree Christmas Tree Ornament”