Tiny Chain-Link Fence Made With Hand-Cranked Brilliance

Chain link fences are woven with a mechanism that is almost hypnotic to watch, so [Levsha] decided to build his own tiny hand-crank tabletop version to make tiny copper wire fences.

Chain link consist of a series of wires bent and woven in a zigzag pattern. The zigzag bends are made by winding the wire around a rotating flat plate inside a stationary tube with a spiral slot in the side to keep the spacing of the bends consistent. [Levsha]’s version is roughly 1/10 scale of the real thing, and only does the bending and winding parts. Linking the bent wire together is up to the operator. All the components were machined on a lathe and CNC router, and beautifully finished and assembled on a wood base. The hardest part was the tube with the spiral slot, which took a few attempts to get right. [Levsha] initially tried to use steel wire, but it was too stiff and caused the winding mechanism to lock up. 0.4 mm copper wire turned out to be the best choice.

Although there is no practical use for this device that we can see, the craftsmanship is excellent, and it is one of those videos that reminds us how badly we want some machine tools.

Fine attention to detail is really what makes videos like this enjoyable to watch. Wee seen a few other such project, like a beautiful scratch-built lathe, or a pneumatic powered drone that can’t fly.

Continue reading “Tiny Chain-Link Fence Made With Hand-Cranked Brilliance”

Booting A PC From Vinyl For A Warmer, Richer OS

If you’ve scrolled through the list of boot options offered on any PC’s BIOS, it reads like a history of storage technology. Up top we have the options to boot from disk, often a solid-state drive, then USB disk, optical drive, removable media, and down the bottom there’s usually an option to boot from the network. Practically no BIOS, however, has an option to boot a PC from a vinyl record — at least until now.

Clearly a project from the “Because why not?” school of hacking, [Jozef Bogin] came up with the twist to the normal booting process for an IBM-PC. As in the IBM-PC — a model 5150, with the putty-colored case, dual 5-1/4″ floppies, and one of those amazing monochrome displays with the green slow-decay phosphors. To pull off the trick, [Jozef] leverages the rarely used and little known cassette tape interface that PCs had back in the early days. This required building a new bootloader and burning it to ROM to make the PC listen to audio signals with its 8255 programmable peripheral interface chip.

Once the PC had the right bootloader, a 64k FreeDOS bootable disk image was recorded on vinyl. [Jozef] provides infuriatingly little detail about the process other than to mention that the audio was sent directly to the vinyl lathe; we’d have loved to learn more about that. Nonetheless, the resulting 10″ record, played back at 45 RPM with some equalization tweaks to adapt for the RIAA equalization curve of the preamp, boots the PC into FreeDOS just fine, probably in no more time than it would have taken to boot from floppy.

It’s may not be the first time we’ve seen software on vinyl, but it’s still a pretty cool hack. Want to try it yourself but lack a record-cutting lathe? Maybe laser-cutting your boot disc will work.

Continue reading “Booting A PC From Vinyl For A Warmer, Richer OS”

Hackaday Podcast 094: Fake Sun, Hacked Super Mario, Minimum Viable Smart Glasses, And 3D Printers Can’t Do That

Hackaday editors Elliot Williams and Mike Szczys traverse the hackerscape looking for the best the internet had to offer last week. Nintendo has released the new Game & Watch handheld and it’s already been hacked to run custom code. Heading into the darkness of winter, this artificial sun build is one not to miss… and a great way to reuse a junk satellite dish. We’ve found a pair of smartglasses that are just our level of dumb. And Tom Nardi cracks open some consumer electronics to find a familiar single-board computer doing “network security”.

Take a look at the links below if you want to follow along, and as always, tell us what you think about this episode in the comments!

Direct download (~60 MB)

Places to follow Hackaday podcasts:

Continue reading “Hackaday Podcast 094: Fake Sun, Hacked Super Mario, Minimum Viable Smart Glasses, And 3D Printers Can’t Do That”

DIY Heavy Duty Linear Slides

The rise of cost-effective CNC platforms like 3D printers, routers, and laser cutters has gone hand in hand with the availability of affordable and accurate linear rails and extrusions. However, they quickly become expensive when you need something for heavy loads. [Andy Pugh] found himself in need of a large linear slide, so he resorted to making his own with steel square tubing and a bit of PTFE (Teflon).

The PTFE slider/spacers

[Andy] needed a compact motorcycle lift for his small workshop, so he designed one with a single vertical tube that mounts on his floor. The moving part of the lift is a slightly larger tube, onto which the motorcycle mounts. To allow the outer part to slide easily [Andy] machined a set of 16 PTFE spacers to fit between the surfaces of the tubes. The spacers have a small shoulder that lets them mount securely in the outer tube without pushing out. After a bit of fine-tuning with a file, it slides smoothly enough for [Andy]’s purposes. With a large lead screw mounted onto the lift, he can easily lift his 200 kg motorcycle with a cordless drill, without taking up all the floor space required by a traditional motorcycle lift.

Although the Teflon spacers will wear with regular use and, they are more than good enough for the occasional motorcycle service, and are also easy to replace. You may not want to use this on your next CNC machine build, but it is a handy blueprint to keep in your mental toolbox for certain use-cases. These spacers were machined on a lathe, but we found that very similar looking PTFE parts are sold as “wrist pin buttons” for the piston of old air cooled VW engines, and could be modified for the purpose.

For other lifting applications, check out this hydraulic workbench, and this forklift for moving stuff in your crawl space without crawling.

Optical Centrepunch Is An Easy Build If You Need One

Tired of getting his centerpunches thereabouts but not quite there, [Uri] decided something had to be done. A common tool to solve this problem is the optical centerpunch, but models on sale were just a little too pricy for something so basic. Instead, [Uri] elected to build his own.

An optical centerpunch is a simple tool that helps machinists hit a centerpunch dead on target, time after time. A guide is used that holds a clear plastic rod with a dot in the center. This dot is lined up over the spot to be centerpunched. The plastic rod is then removed and replaced with the actual punch that does the work. Not content to build something utilitarian, [Uri] instead sculpted the tool into a likeness of Sgt Pepper (of Yellow Submarine fame). Seeing the hunk of bare brass quickly become a recognisable figure on camera is a testament to [Uri’s] skill as a sculptor.

It’s a tool that can be readily built by anyone with a lathe, or, at the very least, a decent drill press. We imagine it would be particularly useful for those without perfect vision, making it easier to get punches on the mark on a regular basis. [Uri] has graced these pages before, too — he previously built an ornate tool to make all the other hammers jealous. Video after the break.

Continue reading “Optical Centrepunch Is An Easy Build If You Need One”

Hackaday Links Column Banner

Hackaday Links: October 11, 2020

If you’re interested in SDR and digital signal processing but don’t know where to start, you’re in luck. Ben Hillburn, president of the GNU Radio Project, recently tweeted about an online curriculum for learning SDR and DSP using Python. The course was developed by Dr. Mark Lichtman, who was a lead on GNU Radio, and from the look of it, this is the place to go to learn about putting SDRs to use doing cool things. The course is chock full of animations that make the concepts clear, and explain what all the equations mean in a way that’s sure to appeal to practical learners.

It’s not much of a secret that the Hackaday community loves clocks. We build clocks out of everything and anything, and any unique way of telling time is rightly applauded and celebrated on our pages. But does the clock motif make a good basis for a video game? Perhaps not, but that didn’t stop Clock Simulator from becoming a thing. To “play” Clock Simulator, you advance the hands of an on-screen clock by pressing a button once per second. Now, thanks to Michael Dwyer, you don’t even have to do that one simple thing. He developed a hardware cheat for Clock Simulator that takes the 1PPS output from a GPS module and wires it into a mouse. The pulse stream clicks the mouse once per second with atomic precision, rendering the player irrelevant and making the whole thing even more pointless. Or perhaps that is the point.

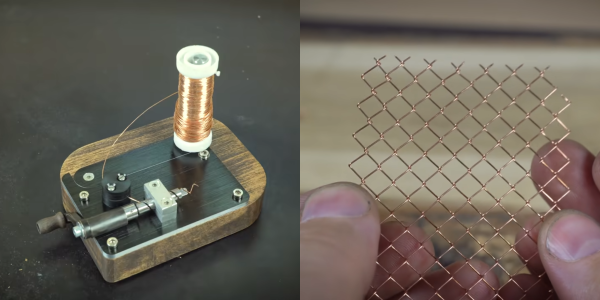
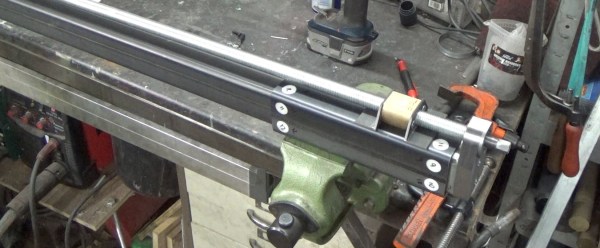
Maybe we were a little hard on Clock Simulator, though — we can see how it would help achieve a Zen-like state with its requirement for steady rhythm, at least when not cheating. Another source of Zen for some is watching precision machining, and more precise, the better. We ran into this mesmerizing video of a CNC micro-coil winder and found it fascinating to watch, despite the vertical format. The winder is built from a CNC lathe, to the carriage of which a wire dispenser and tensioning attachment have been added. The wire is hair-fine and passes through a ruby nozzle with a 0.6 mm bore, and LinuxCNC controls the tiny back and forth motion of the wire as it winds onto the form. We don’t know what the coil will be used for, but we respect the precision of winding something smaller than a matchhead.

Dave Jones over at EEVblog posted a teardown video this week that goes to a place few of us have ever seen: inside a processor module for an IBM System/390 server. These servers earned the name “Big Iron” for a reason, as everything about them was engineered to perform. The processor module Dave found in his mailbag was worth $250,000 in 1991, and from the look of it was worth every penny. From the 64-layer ceramic substrate supporting up to 121 individual dies to the stout oil-filled aluminum enclosure, everything about this module is impressive. We were particularly intrigued by the spring-loaded copper pistons used to transfer heat away from each die; the 2,772 pins on the other side were pretty neat too.

Here’s an interesting question: what happens if an earthquake occurs in the middle of a 3D printing run? It’s probably not something you’ve given much thought, but it’s something that regular reader Marius Taciuc experienced recently. As he relates, the magnitude 6.7 quake that struck near Kainatu in Papua New Guinea (later adjusted to a 6.3 magnitude) resulted in a solid 15 seconds of shaking at his location, where he was printing a part on his modified Mendel/Prusa i2. The shaking showed up clearly in the part as the machine started swaying with the room. It’s probably not a practical way to make a seismograph, but it’s still an interesting artifact.

Homemade Gear Cutting Indexer Blends Art With Engineering

Ordinarily, when we need gears, we pop open a McMaster catalog or head to the KHK website. Some of the more adventurous may even laser cut or 3D print them. But what about machining them yourself?

[Uri Tuchman] set out to do just that. Of course, cutting your own gears isn’t any fun if you didn’t also build the machine that does the cutting, right? And let’s be honest, what’s the point of making the machine in the first place if it doesn’t double as a work of art?

[Uri’s] machine, made from brass and wood, is simple in its premise. It is placed adjacent to a gear cutter, a spinning tool that cuts the correct involute profile that constitutes a gear tooth. The gear-to-be is mounted in the center, atop a hole-filled plate called the dividing plate. The dividing plate can be rotated about its center and translated along linear stages, and a pin drops into each hole on the plate as it moves to index the location of each gear tooth and lock the machine for cutting.

The most impressive part [Uri’s] machine is that it was made almost entirely with hand tools. The most advanced piece of equipment he used in the build is a lathe, and even for those operations he hand-held the cutting tool. The result is an elegant mechanism as beautiful as it is functional — one that would look at home on a workbench in the late 19th century.

[Thanks BaldPower]

Continue reading “Homemade Gear Cutting Indexer Blends Art With Engineering”