OpenWRT is one of my absolute favorite projects, but it’s had a rough week. First off, the official OpenWRT forums is carrying a notice that one of the administrator accounts was accessed, and the userlist was downloaded by an unknown malicious actor. That list is known to include email addresses and usernames. It does not appear that password hashes were exposed, but just to be sure, a password expiration has been triggered for all users.
Hackaday editors Mike Szczys and Elliot Williams discuss our favorite hacks of the past week. We accidentally chose a theme, as most of the projects use lasers and are about machining work. We lead off with a really powerful laser that can directly etch circuit boards, only to be later outdone by an even more powerful laser using a chemistry trick to etch glass. We look at how to mix up your own rocket motors, bootstrap your own laser tag, and go down the rabbit hole of building tools for embedded development. The episode wraps up as we discuss what exactly NVMe is and where hardware hacking might take it.
Take a look at the links below if you want to follow along, and as always, tell us what you think about this episode in the comments!
When it comes to machining, the material that springs to mind is likely to be aluminum, steel, or plastic. We don’t necessarily think of glass as a material suitable for machining, at least not in the chuck-it-up-in-the-lathe sense. But glass is a material that needs to be shaped, too, and there are a bunch of different ways to accomplish that. Few, though, are as interesting as micromachining glass with laser-induced plasma bubbles. (Video, embedded below.)
The video below is from [Zachary Tong]. It runs a bit on the longish side, but we found it just chock full of information. The process, formally known as “laser-induced backside wet-etching,” uses a laser to blast away at a tank of copper sulfate. When a piece of glass is suspended on the surface of the solution and the laser is focused through the glass from the top, some interesting things happen.
The first pulse of the laser vaporizes the solution and decomposes the copper sulfate. Copper adsorbs onto the glass surface inside the protective vapor bubble, which lasts long enough for a second laser pulse to come along. That pulse heats up the adsorbed copper and the vapor in the original bubble, enough to melt a tiny bit of the glass. As the process is repeated, small features are slowly etched into the underside of the glass. [Zachary] demonstrates all this in the video, as well as what can go wrong when the settings are a bit off. There’s also some great high-speed footage of the process that’s worth the price of admission alone.
We doubt this process will be a mainstream method anytime soon, not least because it requires a 50-Watt Nd:YAG fiber laser. But it’s an interesting process that reminds us of [Zachary]’s other laser explorations, like using a laser and Kapton to make graphene supercapacitors.
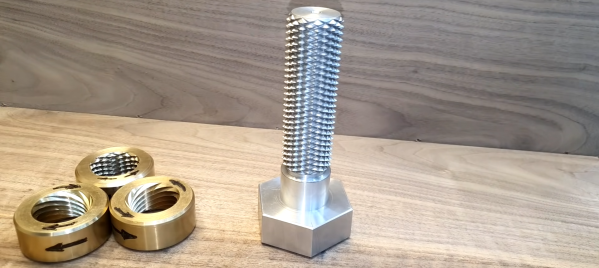
Metal lathes are capable machines that played a large role in the industrial revolution, and an incredible tool to have at your disposal. But that doesn’t mean they can’t be used to have a little fun, as demonstrated by [Oleg Pevtsov] who made a bidirectional bolt as a machining exercise just because he could.
Both videos after the break are in Russian, but the video and auto generated subtitles are enough to get the main points across. The bolt is an M42 size with a 40 mm pitch, with grooves cut in both directions to allow left-handed and right-handed nuts to be threaded. The large pitch means that instead of a single continuous groove like a normal bolt, ten separate grooves need to be cut for each threading direction to cover the bolt surface. Since this was all machined on a manual lathe, a dial indicator was required to maintain accurate spacing. It took [Oleg] four painstaking attempts to get it right, but the end result looks very good. Instead of a fixed cutter, he used a trimming router mounted on a custom clamp.
[Oleg] also machined three different brass nuts to go on the bolt with a fixed cutter. First left-hand and right hand threaded nuts were made, followed by a bidirectional nut. Due to the large pitch and careful machining, all three nuts will spin down the bolt under the force of gravity alone. Although the bidirectional nut doesn’t move as smoothly as the other two, it can change rotation and translation direction at random.
While this is a one-of-a-kind fidget toy, have any of our readers seen a bidirectional bolt or lead screw in the wild? We can imagine that the ability to move two nuts in opposite directions on a single lead screw might have some practical applications.
It’s possible to make incredible parts on a manual lathe. A handbuilt V10 engine and a pneumatic hexacopter model are just two examples of what’s possible with enough skill, knowledge, and patience. Sadly it is a fading form of craftsmanship, rendered mostly obsolete outside of hobby projects by CNC machines.
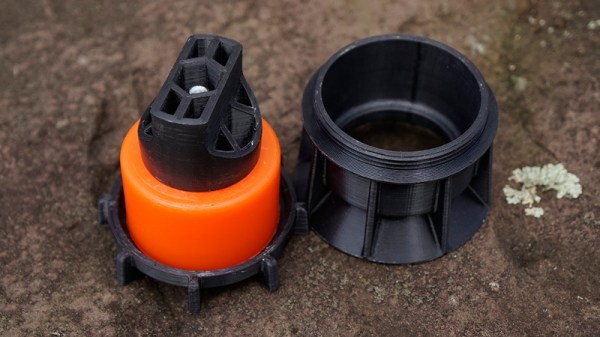
We’ll admit that most of the Hackaday staff wouldn’t get too far on a skateboard, but that doesn’t mean we can’t appreciate the impressive DIY wheels that [Chris McCann] has managed to cast using 3D printed molds. From unique color combinations to experimental materials, the process certainly opens up some interesting possibilities for those looking to truly customize their rides. Though it’s worth noting there’s a certain element of risk involved; should a set of homemade wheels fail at speed, it could go rather poorly for the rider.
Both the STL and STEP files for the mold have been released under the Creative Commons Attribution 4.0 license, meaning anyone with a 3D printer can follow along at home. Unfortunately, it’s not quite as simple as clicking print and coming back to a usable mold. Because of the layer lines inherent to FDM 3D printing, the inside of the mold needs to be thoroughly sanded and polished. [Chris] mentions that printing the mold in ABS and using vapor smoothing might be a workable alternative to elbow grease and PLA, but he hasn’t personally tried it yet.
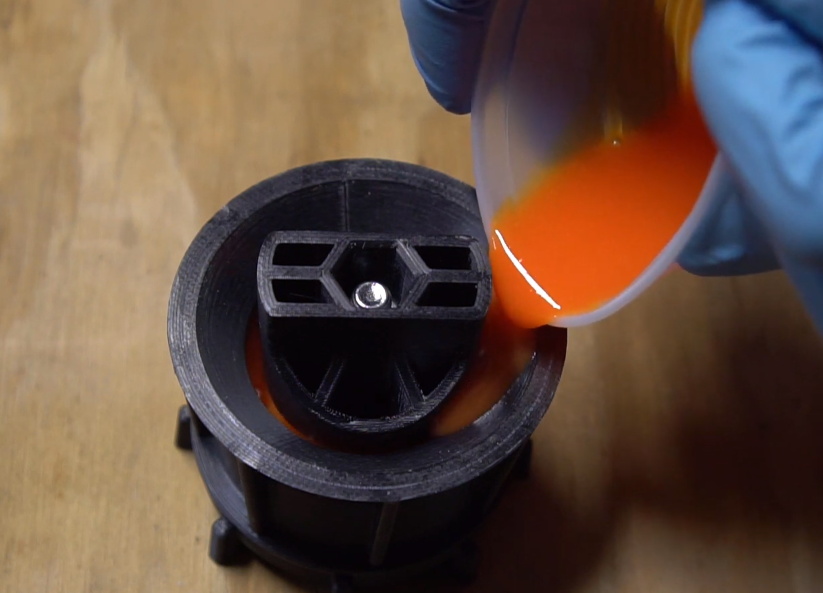
Once you’ve got the three part mold printed, smoothed, and coated with an appropriate release agent like petroleum jelly, it’s time to make some wheels. The core of each wheel is actually 3D printed from PETG, which should give it pretty reasonable impact resistance. If you have access to a lathe, producing aluminum cores shouldn’t be too difficult either. With the core loaded into the mold, urethane resin is poured in through the top until all the empty space is filled.
But you’re not done yet. All those little air bubbles in the resin need to be dealt with before it cures. [Chris] puts his filled molds into a pressure chamber, though he mentions that vacuum degassing might also be a possibility depending on the urethane mixture used. After everything is solidified, the mold can easily be taken apart to reveal the newly cast wheel.
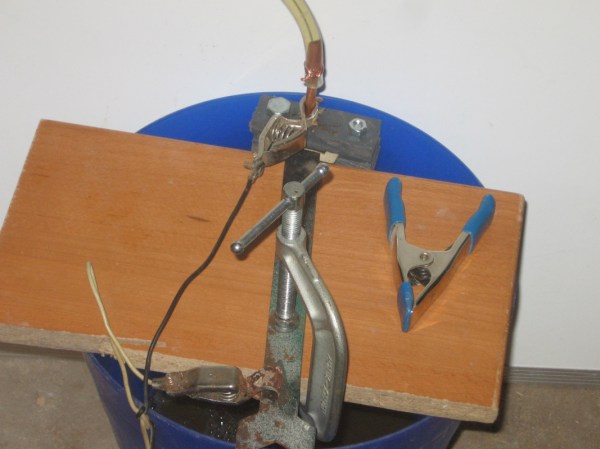
It’s a luxury to be able to access a modern machine shop, complete with its array of lathes, mills, and presses. These tools are expensive though, and take up a lot of space, so if you want to be able to machine hard or thick metals without an incredible amount of overhead you’ll need a different solution. Luckily you can bypass the machines in some situations and use electricity to do the machining directly.
This project makes use of a process known as electrochemical machining and works on the principle that electricity passed through an electrolyte solution will erode the metal that it comes in contact with. With a well-designed setup, this can be used to precisely machine metal in various ways. For [bob]’s use this was pretty straightforward, since he needed to enlarge an existing hole in a piece of plate steel, so he forced electrolyte through this hole while applying around half an amp of current in order to make this precise “cut” in the metal, avoiding the use of an expensive drill press.
There are some downsides to the use of this process as [bob] notes in his build, namely that any piece of the working material that comes in contact with the electrolyte will be eroded to some extent. This can be mitigated with good design but can easily become impractical. It’s still a good way to avoid the expense of some expensive machining equipment, though, and similar processes can be used for other types of machine work as well.
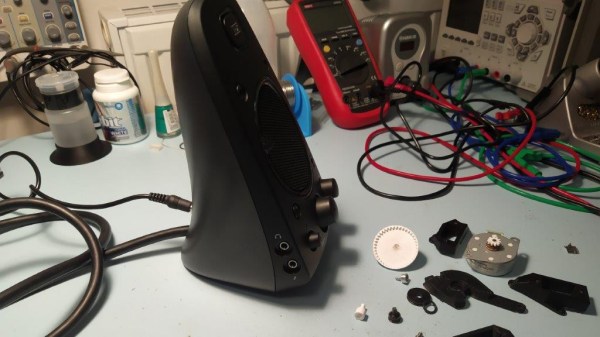
[Haris Andrianakis] likes his Logitech Z623 sound system. He likes it a lot. Which is why he was willing to hack in his own remote volume control rather than just get a new pair of speakers. But he certainly didn’t make things easy on himself. Rather than trying to tap into the electronics, he decided to take the long way around and motorize the volume knob.
The belt drive looked great, but didn’t work.
The idea seemed simple enough. Just drill a hole through the PCB behind the knob’s potentiometer, attach some kind of extension to the axle, and turn it with a small servo. Modifying the PCB and potentiometer went well enough, but the trouble came when [Haris] actually tried to turn the thing.
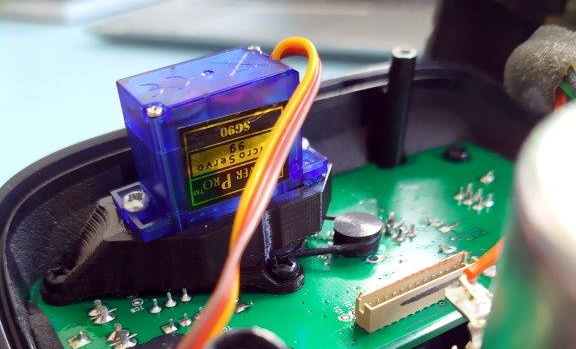
Attaching the servo directly to the axle worked, but it made turning the knob by hand extremely difficult. His next idea was to add a small belt into the mix so there would be some slip in the system. But after designing a 3D printed servo mount and turning custom pulleys on the lathe, it ended up having too much slip, and the knob didn’t always move when the servo turned.
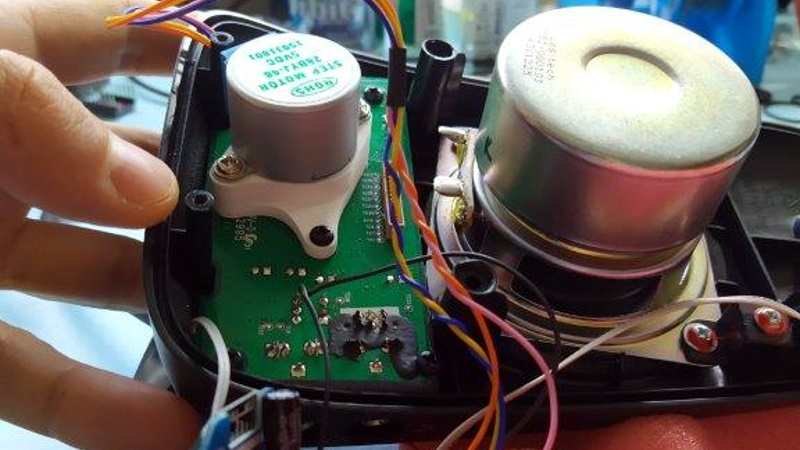
He then swapped out the servo for a small stepper motor. The motor was easy enough to spin when powered down, but didn’t have quite enough torque to turn the knob. He tried with a larger stepper motor that he salvaged from an old printer, but since he could only run it at half the recommended 24 VDC, it too had a tendency to skip steps.
After experimenting with some 3D printed reduction gears, [Haris] finally stumbled upon the 28BYJ-48. This small stepper with an integrated gearbox proved to be the perfect solution, as it had enough muscle to turn the knob while at the same time not restricting its movement when powered down. The rest of the project was relatively easy; with a DRV8825, an ESP8266, and an IR receiver, he’s able to spin the stepper with his TV’s remote. A simple web page running on the ESP8266 even allows him to control volume over the network with his smartphone. Based on similar projects we’ve seen, he could probably add support for HDMI CEC as well.
[Haris] says you shouldn’t follow his example, but we’re not so sure. He kept going when others would have given up, and the engineering and thought that went into each attempt is certainly commendable. Even if he hadn’t ultimately gotten this project working, we’d still say it was a valiant hack worthy of praise.