For interfacing with machines, most of us use our hands and fingers. When you don’t have use of your hands (permanently or temporarily), there are limited alternatives. [Dorothee Clasen] has added one more option, [In]Brace, which is basically a small slide switch that you can operate with your tongue.
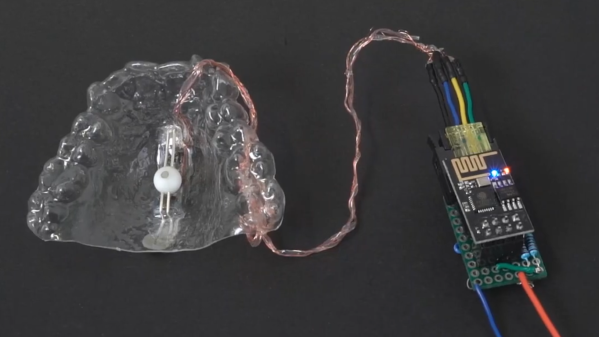
[In]Brace consists of a custom moulded retainer for the roof of your mouth, on which is a small ball with an embedded magnet, that slides long wire tracks. Above the track is a set of three magnetic sensors, that can detect the position of the ball. On the prototype, a wire from the three sensors run out of the corner of the users mouth, to a wireless microcontroller (Which looks to us like a ESP8266) hooked behind the user’s ear. In a final product, it would obviously be preferable if everything were sealed in the retainer. We think there is even more potential if one of the many 3-axis hall effect sensors are used, with a small joystick of rolling ball. The device could be used by disabled persons, for physical therapy, or just for cases where a person’s hands are otherwise occupied. [Dorothy] created a simple demonstration, where she plays Pong, or Tong in this case, using only the [In]Brace. Hygiene and making sure that it doesn’t somehow become a choke hazard will be very important if this ever became a product, but we think there is some potential.
[Kristina Panos] did a very interesting deep dive into the tongue as an HMI device a while ago, so this isn’t a new idea, but the actual implementations differ quite a lot. Apparently it’s also possible to use your ear muscles as an interface!
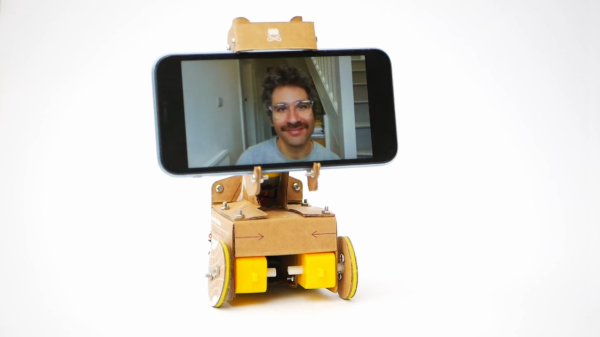
As time marches on and a good percentage of us are still isolating from society at large, the progress of technology isn’t kept as stagnant. Earlier this year we featured a project about a much-needed small telepresence robot with an exceptionally low barrier for entry, and with the progress of time it has received several upgrades and some crowdfunding, all while preserving its original intent of a simple and easily-operated way of keeping in contact with others.
The new robot is still based on the cardboard design that holds a smartphone and drives it around using a microcontroller platform, but thanks to its small size and low power requirement this seems to suit it nicely. Improvements over the original design include a more robust one-size-fits-all phone mount and a more refined cardboard body. Also, since the small size is a little bit of a downside when navigating anywhere that isn’t a desk or counter, the new version makes it easier to make modifications such as adding a pedestal which can elevate the phone and improve the experience of the remote driver. A number of other optional modifications are possible as well, including a grabbing arm.
While telepresence robots unfortunately are needed now more than ever, we are happy to see people like [Ross] take on projects like this which will hopefully help improve our shared situation by allowing us to have a more involved level of contact with people we would otherwise prefer to see in person. If you’d like to build your own without waiting on the crowdfunding, be sure to check out the original project we featured back in April.
Gesture recognition and machine learning are getting a lot of air time these days, as people understand them more and begin to develop methods to implement them on many different platforms. Of course this allows easier access to people who can make use of the new tools beyond strictly academic or business environments. For example, rollerblading down the streets of Atlanta with a gesture-recognizing, streaming TV that [nate.damen] wears over his head.
He’s known as [atltvhead] and the TV he wears has a functional LED screen on the front. The whole setup reminds us a little of Deep Thought. The screen can display various animations which are controlled through Twitch chat as he streams his journeys around town. He wanted to add a little more interaction to the animations though and simplify his user interface, so he set up a gesture-sensing sleeve which can augment the animations based on how he’s moving his arm. He uses an Arduino in the arm sensor as well as a Raspberry Pi in the backpack to tie it all together, and he goes deep in the weeds explaining how to use Tensorflow to recognize the gestures. The video linked below shows a lot of his training runs for the machine learning system he used as well.
[nate.damen] didn’t stop at the cheerful TV head either. He also wears a backpack that displays uplifting messages to people as he passes them by on his rollerblades, not wanting to leave out those who don’t get to see him coming. We think this is a great uplifting project, and the amount of work that went into getting the gesture recognition machine learning algorithm right is impressive on its own. If you’re new to Tensorflow, though, we have featured some projects that can do reliable object recognition using little more than a Raspberry Pi and a camera.
For most of us, electronic technology comes in the form of solid state devices. Transistors, integrated circuits, microcontrollers. But for the first sixty years or so of the field existing, these devices either hadn’t been invented yet or were at too early a stage in their development to be either cost-effective, or of much use. Instead a very different type of electronic component ruled the roost, the vaccum tube.
A set of electrodes in an evacuated glass envelope whose electrical properties depended on the modulation of the flow of electrons through them, these were ubiquitous in consumer electronics up until the 1960s, and clung on in a few mass-market applications even as far as the mid 1970s. As cheaper and more versatile semiconductors superseded them they faded from electronic parts catalogues, and the industry that had once produced them in such numbers disappeared in favour of plants producing the new devices. Consumer products no longer contained them, and entire generations of engineers grew up never having worked with them at all. If you were building a tube amplifier in the early 1990s, you were a significant outlier. Continue reading “Just Who Makes Tubes These Days?”→
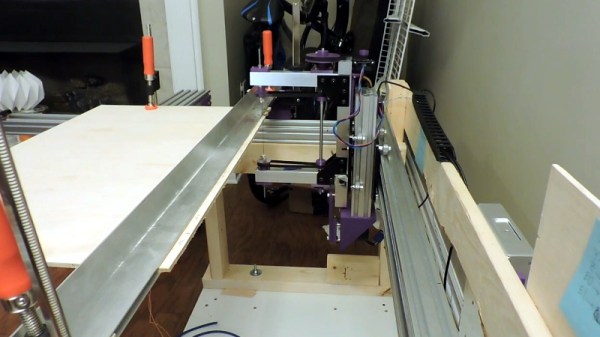
When [Andrew Consroe] tried to build a CNC scroll saw, he quickly learned how tricky of a design problem it is. With a blade that only cuts in one direction, you can’t simply move the tool in the X and Y dimensions like you can with a laser or router; either the work piece or the blade itself needs to continuously rotate towards the direction of the cut.
He’s recently shown off the third version of the machine, and while it’s still not exactly a practical tool, there’s no question it’s a brilliantly designed one, or that it works, slowly. Earlier attempts used a rotating table to spin the work piece, but [Andrew] found this to be an imperfect solution. Building a mechanism heavy duty enough to spin the material being cut while remaining accurate enough not to break the blade was a tall order, though he did get pretty close.
The earlier version used a rotating table.
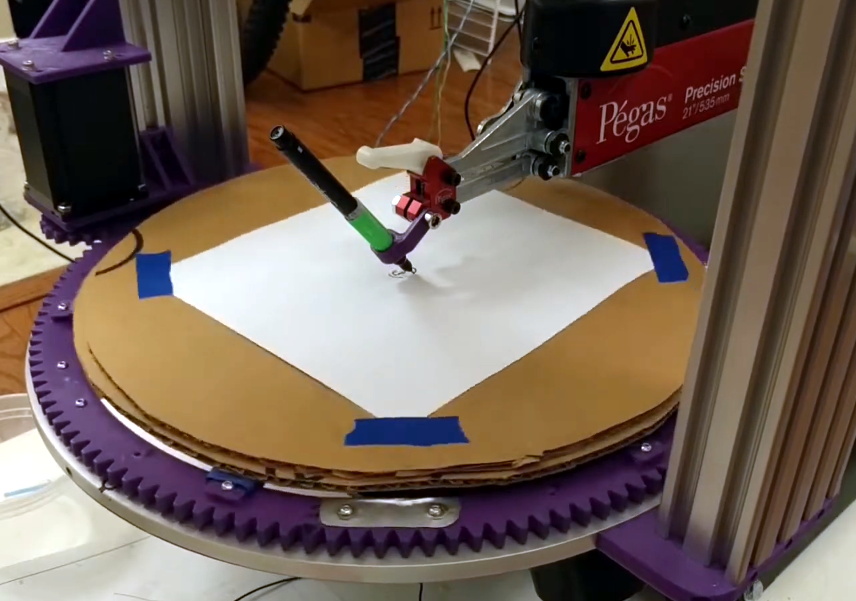
This time around he’s decided to simply rotate the blade itself. This can be accomplished with a single stepper motor and some suitably sized pulleys, while maintaining an exceptionally high degree of accuracy. The whole blade assembly moves up and down on an aluminum extrusion rail with a motor and crank arrangement. By synchronizing the rotation of the blade with the vertical movement of the saw, the software can be sure that everything is where it needs to be before the cutting stroke actually happens.
Judging by the video after the break, the system works quite well. The complex rounded shapes he cuts out of the piece of plywood look essentially perfect, and it sounds like this new version of the machine isn’t breaking blades due to positional errors like the previous one did. Unfortunately, it’s also very slow. There’s so many moving parts and careful positioning required that even when the video is sped up 10x, the saw still appears to only be creeping its way through the material.
On the back half of the video, [Andrew] details another approach to rotating the blade that would reduce the amount of moving mass in the saw. This would give the machine a considerable speed boost, and we’d love to see him implement it. By the way, before anyone says it: using a spiral blade is cheating.
How cool would it be if there was a material that couldn’t be cut or drilled into? You could make the baddest bike lock, the toughest-toed work boots, or the most secure door. Really, the list of possibilities just goes on and on.
Proteus chews through an angle grinder disc in seconds.
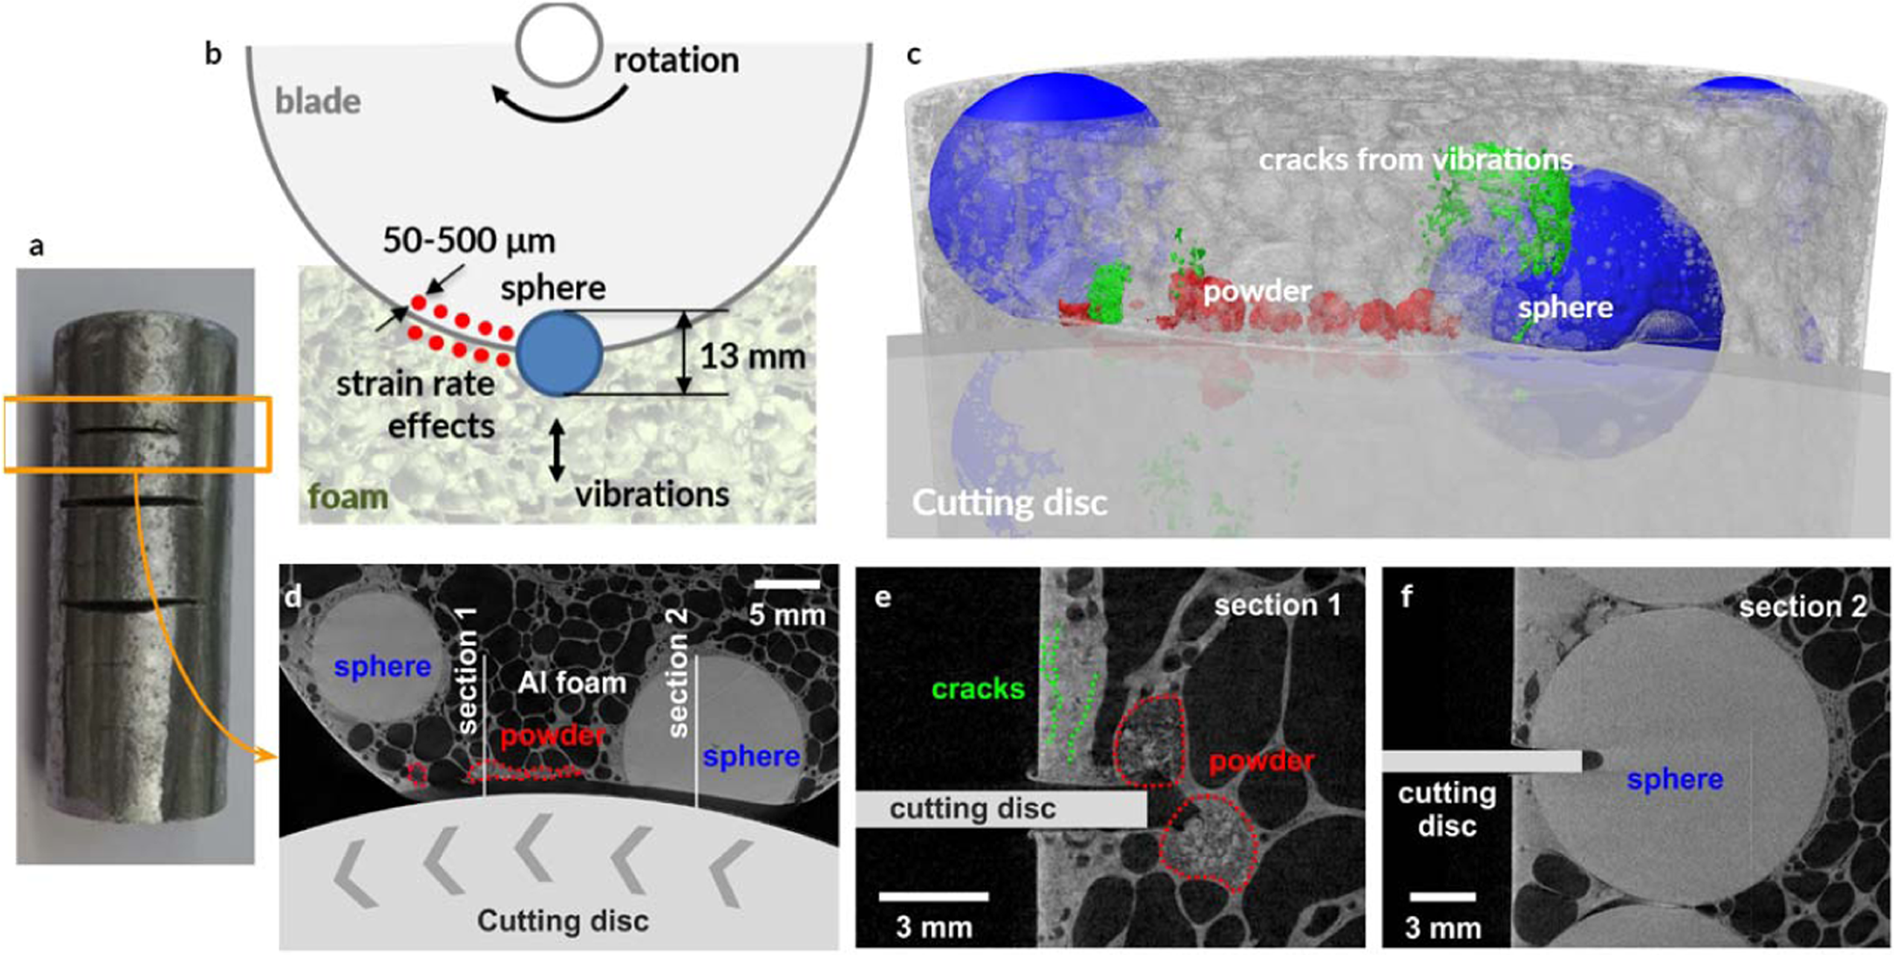
The material is made of aluminium foam that’s embedded with a bunch of small ceramic spheres. It works by inducing retaliatory vibrations into the cutting tools, which turns the tools’ force back on themselves and quickly dulls their edges.
The creators have named the material Proteus after the elusive and shape-shifting prophet of Greek mythology who would only share his visions of the future with those who could get their arms around him and keep him still. It sounds like this material could give Proteus a run for his money.
The ceramic spheres themselves aren’t indestructible, but they’re not supposed to be. Abrading the spheres only makes Proteus stronger. As the cutting tool contacts them, they’re crushed into dust that fills the voids in the aluminium foam, strengthening the material’s destructive vibratory effect. The physical inspiration for Proteus comes from protective hierarchical structures in nature, like the impact-resistant rind of grapefruit and the tendency of abalone shells to resist fracture under the impact of shark teeth.
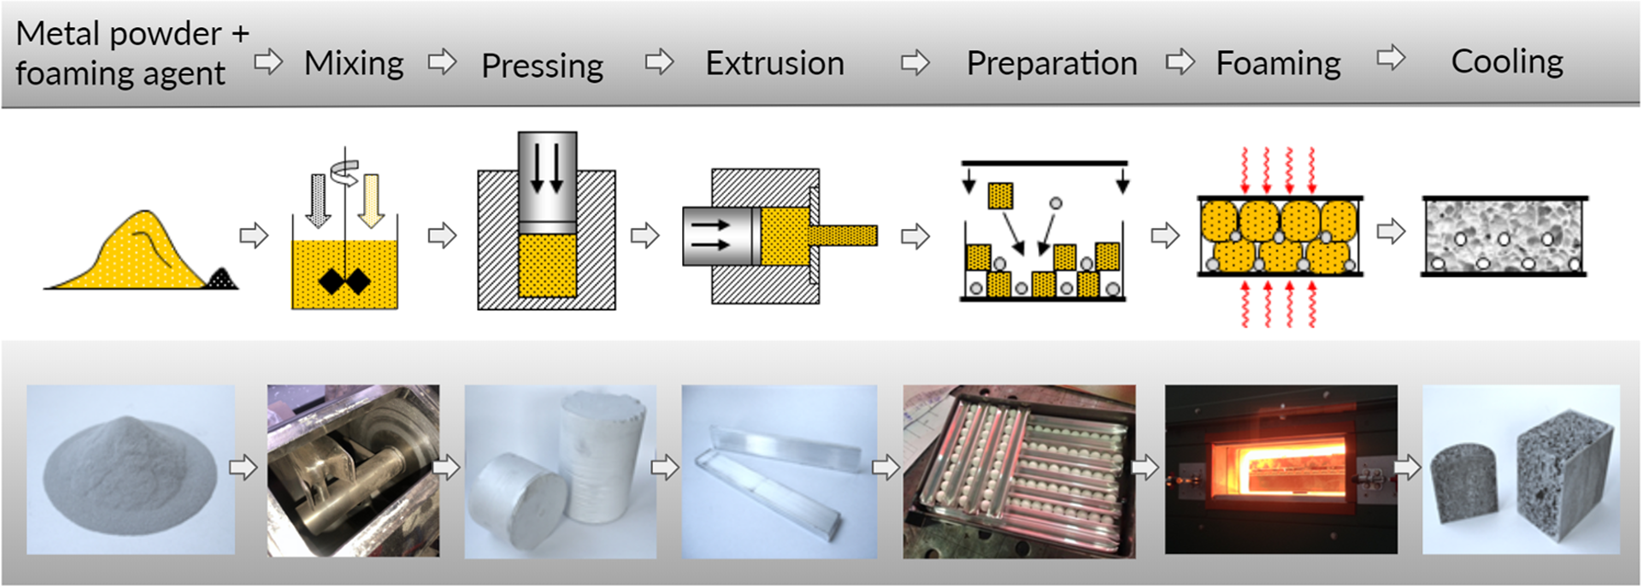
How It’s Made
Proteus recipe in pictures.
At this point, Proteus is a proof of concept. Adjustments would likely have to be made before it can be produced at any type of scale. Even so, the recipe seems pretty straightforward. First, an aluminium alloy powder is mixed with a foaming agent. Then the mixture is cold compacted in a compressor and extruded in dense rods. The rods are cut down to size and then arranged along with the ceramic spheres in a layered grid, like a metallurgical lasagna.
The grid is spot-welded into a steel box and then put into a furnace for 15-20 minutes. Inside the furnace, the foaming agent releases hydrogen gas, which introduces voids into the aluminium foam and gives it a cellular structure.
Effects of cutting into a cylinder of Proteus with an angle grinder.
According to their paper, the researchers tried to penetrate the material with an angle grinder, a water jet cutter, and a drill. Of these, the drill has the best chance of getting through because the small point of contact can find gaps more easily, so it’s less likely to hit a ceramic sphere. The researchers also made cylindrical samples without steel cladding which they used to test the compressive strength and prove Proteus’ utility as a structural material for beams and columns. It didn’t fare well initially, but became less compressible as the foam matrix collapsed.
The creation process lends some leeway for customization, because the porosity of the aluminium foam can be varied by changing the bake time. As for the drill bit problem, tightening up security is as easy as adjusting the size and/or density of the ceramic spheres.
In the video after the break, you can watch a chunk of Proteus eat up an angle grinder disc in under a minute. Some may argue about the tool wielder’s technique, but we think there’s something to be said for any material that can destroy a cutting disc that fast. They don’t claim that Proteus is completely impenetrable, but it does look impressive. We wish they would have tried more cutting tools like a gas torch, or experimented with other destructive techniques, like plastic explosives, but we suppose that research budgets only go so far.
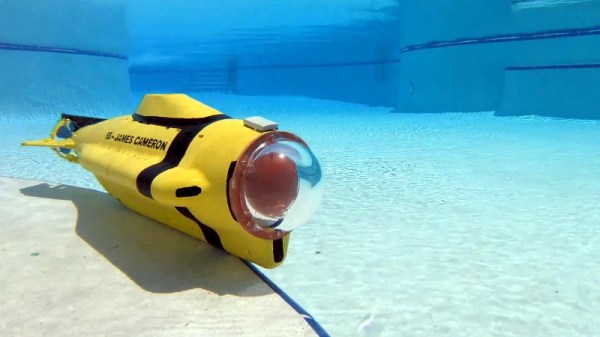
In Subnautica, players explore an alien underwater landscape with the help of a number of futuristic tools and vehicles. [Robert Cook] found himself particularly enamored with the large submarine you unlock towards the later parts of the game, so much so that he decided to build his own real-life version.
Even though the RC version of the Cyclops [Robert] has designed is only big enough to explore swimming pool sized alien landscapes, it’s by no means a simple build. In fact, the sub’s internal watertight compartment holds an impressive array of electronics and systems that are arguably overkill for what’s essentially a toy. Not that we’re complaining, of course.
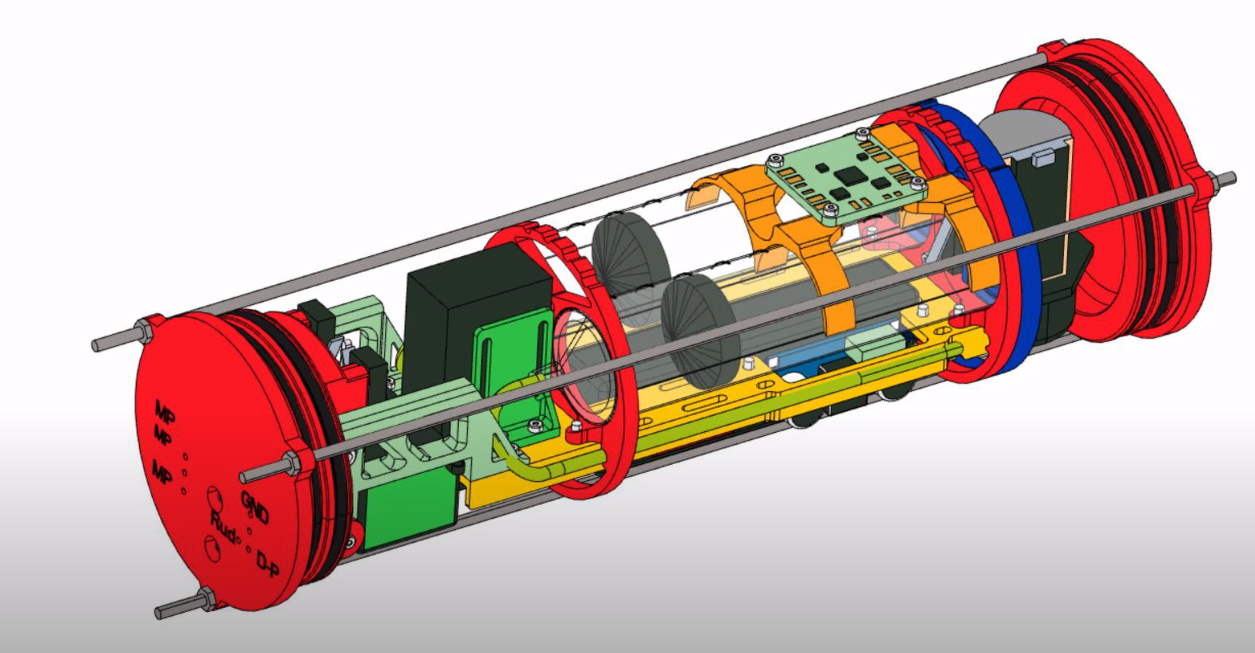
Beyond the electronics and a few key components, almost every part of the RC Cyclops has been 3D printed. From the bulkheads that cap off the internal watertight acrylic tube to the hull itself, there’s a lot of plastic aboard this ship. Which might explain why it takes nearly two kilograms of lead weight to get the sub close to neutral buoyancy. From there, a clever ballast tank arrangement made from a syringe and peristaltic pump allow the vehicle to dive and surface on command.
[Robert] is in the process of releasing the STL files for all the submarine’s 3D printed components, and has done an excellent job of documenting the roughly four months he’s spent working on the project in a series of videos on his YouTube channel. The videos contain a wealth of fascinating tips and tricks regarding DIY submersible vehicles, such as selecting the proper radio frequencies for maximum penetration through water and counteracting the permeability of 3D printed parts with a generous coating of epoxy.