HP 33120A Repair: Shutting Down The Eye Of Sauron

When a friend of [Tom Verbeure] came into possession of two HP 33120A 15 MHz function/arbitrary waveform generators, he could not resist giving them a try. Although not exactly high-end units, the HP 33120A makes for a pretty nice unit for a home lab. During the first test run, however, [Tom] discovered that one of the units had a dead output, which made it rather useless. Undeterred, [Tom] set to work diagnosing it, helped by the repair manual and full schematics.

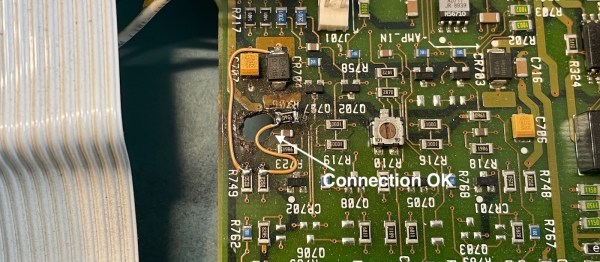
While the cause was quickly tracked down to the general area around an exploded MLCC, fixing the fried Zener diode that may have initiated the short on the -15V rail revealed an unpleasant surprise. To [Tom]’s horror, he saw a portal to Hell itself open when part of the PCB caught on fire due to an internal short. After making sure to capture a video of this event, he then proceeded to use a thermal camera to track down the hot spot and uses a drill to remove the short.

While one can argue with the use of a drill to remove shorts on inner layers of a PCB, ultimately the fix was effective. A look on the schematic and comparison with the functioning 33120A unit later, all it took was two bodge wires to restore functionality. After this event, [Tom]’s friend gave him the repaired unit as thanks, and definitely not because [Tom] had begun to refer to it as ‘his precious’.

How To Repair? The Death Of Schematics

There was a time when, if you were handy with a soldering iron, you could pretty easily open up a radio or TV repair business. You might not get rich, but you could make a good living. And if you had enough business savvy to do sales too, you could do well. These days there aren’t many repair shops and it isn’t any wonder. The price of labor is up and the price of things like TVs drops every day. What’s worse is today’s TV is not only cheaper than last year’s model, but probably also better. Besides that, TVs are full of custom parts you can’t get and jam-packed into smaller and smaller cases.

Case in point, I saw a “black Friday” ad for a 40-inch 1080p flatscreen with a streaming controller for $98. Granted, that’s not huge by today’s standards and I’m sure it isn’t a perfect picture. But for $98? Even a giant high-quality TV these days might cost a bit more than $1,000 and you can get something pretty great for well under $500.

Looking back, a Sears ad showed a great deal on a 19″ color TV in 1980. The price? $399. That doesn’t sound too bad until you realize that today that would be about $1,400. So with a ratio of about 3.5 to 1, a $30/hour service call would be, today, $105. So for an hour’s service call with no parts, I could just buy that 40″ TV. Add even one simple part or another hour and I’m getting close to the big league TVs.

Did you ever wonder how TV repair technicians knew what to do? Well, for one thing, most of the time you didn’t have to. A surprising number of calls would be something simple like a frayed line cord or a dirty tuner. Antenna wires destroyed by critters was common enough. In the tube days, you could pretty easily swap tubes to fix the bulk of actual problems.

Continue reading “How To Repair? The Death Of Schematics”

The LCD being replaced in an old laptop

Hackaday Prize 2022: Repairing A Vintage Laptop With Modern Components

Laptop computers may be ubiquitous today, but there was a time when they were the exclusive preserve of rich businesspeople. Back in the early ’90s, the significant added cost of portability was something that few were willing to pay. As a result, not many laptops from those days survive; for those that do, keeping them running can be quite a challenge due to their compact construction and use of non-standard components.

[Adalbert] ran into these problems when he got his hands on a Toshiba T3200SXC from 1991. As the first laptop ever to feature a color TFT display, it’s very much worth preserving as an historical artifact. Sadly, the original display was no longer working: it only displayed a very faint image and went completely blank soon after. Leaky capacitors then destroyed the power supply board, leaving the laptop completely dead. [Adalbert] then began to ponder his options, which ranged from trying to repair the original components to ripping everything out and turning this into a modern-computer-in-an-old-case project.

In the end he went for an option in between, which we as preservationists can only applaud: he replaced the display with a modern one of the correct size and resolution and built a new custom power supply, keeping the rest of the computer intact as far as possible. [Adalbert] describes the overall process in the video embedded below and goes into lots of detail on his hackaday.io page.

Connecting a modern LCD screen was not as difficult as it might seem: where the old display had an RGB TTL interface with three bits per color, the new one had a very similar system with six bits per color. [Adalbert] made an adapter PCB that simply connected the three bits from the laptop to the highest three bits on the screen. A set of 3D-printed brackets ensured a secure fit of the new screen in the classic case.

The internal power supply module of a laptopFor the power supply [Adalbert] took a similar approach. He designed a PCB with several DC/DC converters that fit easily inside the computer’s case, leaving enough space to add a battery. This made the old Toshiba more portable than it ever was — believe it or not, the original T3200SXC could only be used with a mains connection.

Once the laptop was restored to working order, [Adalbert] added a few finishing touches: a sound card and speakers made it suitable as a gaming platform, and a network card gave it rudimentary online capabilities. The end result is a T3200SXC that looks and feels exactly the way it did when it was new, but with a few added features. That’s a really satisfying result: many classic laptop projects add modern computing hardware, or even completely replace the original contents. You might also want to check out [Adalbert]’s unusual 3D printer based PCB manufacturing technique that he used for the new power supply.

Continue reading “Hackaday Prize 2022: Repairing A Vintage Laptop With Modern Components”

Carver M-400 Amplifier Repair Keeps The 1980’s Alive

Carver is a famous name in audio equipment although they have been known to use odd names for things. For example, the 1980’s vintage M-400 magnetic field power amplifier that [JohnAudioTech] is repairing (see the two videos below). That sounds like something off a bad Star Trek remake, but, apparently, we weren’t alone in thinking that, judging by this 1982 review of the unit from a UK magazine.

Still, it is an interesting high-power amplifier and we love seeing gear of this age torn apart. The beast is rated at 201 watts — you have to wonder if the extra watt is another marketing ploy.

There were actually two units and they looked pretty good for four-decade-old boxes. One sounded pretty good outside of some noticeable buzzing. The other had something shorted inside. If you enjoy watching repair videos, you’ll appreciate this two-parter.

We have to admit — and it may be a personal bias — there is something more pleasing about seeing a PCB populated with a bunch of interesting-looking through-hole components. Modern boards with a sea of surface mount parts tend to look a little bland, aesthetically speaking. Of course, when it comes time to make our own boards, we are happy to use SMD and forego all that hole drilling!

We like watching computer repair videos, in particular. Or sometimes, something really exotic.

Continue reading “Carver M-400 Amplifier Repair Keeps The 1980’s Alive”

RC Car Repair With Beer Can Solder Stencil

Sometimes it might seem as if your electronics are just jinxed. For [Niva_v_kopirce] it was the control board of his nephew’s RC car that kept frying the transistors. In situations like this, you can either throw it in the bin, invest your time in troubleshooting, hoping to find the error and try to fix it then, or get creative. He chose the latter, and designed and etched a replacement board.

Of course, etching your own PCB isn’t that noteworthy for the average Hackaday reader, although [Niva_v_kopirce] did go the extra mile and added purple solder mask to it, turning the stylishness definitely up to 11. This is also where it gets interesting, when you think of the solder mask as complementary layer for a solder paste stencil. Growing tired of manually applying solder paste, he thought to give a DIY stencil a try this time — using a beer can.

After cutting the can open and flattening it, along with some sanding, he transferred the cutouts from the solder mask onto it, and started etching holes in it. While the result may not be exactly precise, it did the job, especially for a homemade built.

Despite their convenience, stencils are still a rather exotic addition for hobbyists as they rarely pay off for a one-off project with limited SMD component usage. But maybe this was a new inspiration for you now. And if etching metal is outside your comfort zone, cutting plastic can be an alternative, as well as 3d printing.

Resulting tweezer assembly, with a 3D printed replacement case for both of the probes

Hackaday Prize 2022: Glue-Hindered Smart Tweezer Repair Involves A Rebuild

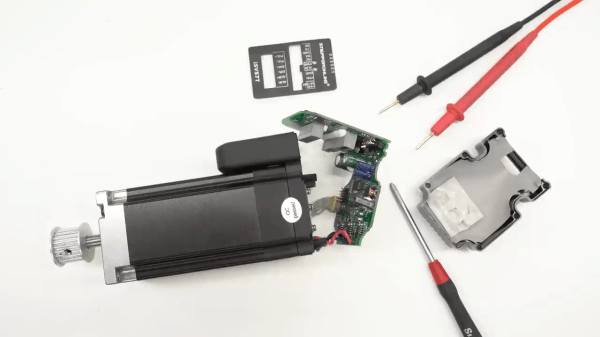
[Dan Julio] owns a pair of Miniware multimeter tweezers, a nifty helper tool for all things SMD exploration. One day, he found them broken – unable to recognize any component between the two probes. He thought it could be a broken connection problem, and decided to take them apart. Presence of some screws on their case fooled him – in the end, it turned out that the case was glued together, and could only be opened destructively. For an entry in the “Reuse, Recycle, Revamp” round of 2022 Hackaday Prize, he tells us how he brought these tweezers back from the dead.

During the disassembly, he broke a custom flexible PCB, which wasn’t reassuring either. However, that was no reason to give up – he reverse-engineered the connections and the charging circuitry, then assembled parts of the broken tweezers together using a small generic protoboard as a base. Indeed, it was likely a broken connection between probes, because the reassembled tweezers worked!

Of course, having exposed PCBs wouldn’t do, and from the very start, assembling these tweezers back together was not an option. Instead, he developed a replacement case in OpenSCAD, bringing the tweezers back to life as his trusty tool – and still leaving repairability on the table. If you’re interested in the details, he goes more into how these tweezers are designed when it comes to charging and connectivity, and we recommend that you give his write-up a read!

We’ve been seeing smart tweezers around for over a decade now, from reviews and hacks of commercially made ones, to DIY chopstick-based and PCB-based ones. If you already own a pair of tweezers you’ve grown attached to, you can neatly retrofit them with a capacitance sensing function!

An HP9830A opened up and running

The Epic Journey Of Repairing An HP 9830A Desktop Computer From The 1970s

We love our retrocomputers here at Hackaday, and we’re always delighted to see someone rescue an historic artefact from the landfill. Sometimes, all it takes is replacing a broken power switch or leaky capacitor; other times you need to bring out the oscilloscope and dig deeper into internal circuitry. But the huge amount of work [Jerry Walker] put into bringing an HP 9830A back on its feet is something you don’t see very often.

If you’re not familiar with the HP 9830A, it’s a desktop computer from the early 1970s, fully built from discrete logic gates. The machine on [Jerry]’s desk turned out to be completely dead, with not even the fan spinning up. This was caused by a dodgy power switch, but replacing that switch was just the beginning: there were several bad components inside the power supply as well as a huge amount of moist dirt on the back of the motherboard. After a thorough cleaning and the replacement of several failed components, all four power rails were running within spec again.

Continue reading “The Epic Journey Of Repairing An HP 9830A Desktop Computer From The 1970s”