Stereoscopic Macro Lens Shows Two Is Better Than One

You’d be forgiven if you thought [Nicholas Sherlock’s] new lens design was a macro lens that was 3D printed. In fact, it is, but it is also a macro lens that takes 3D images using two different cameras. If you have a pair of Sony E/FEs, you can 3D print your own copy today. If you don’t, you might have to adjust the design or wait for future releases. In any event, you are sure to enjoy the example photos, and there’s a video review of the device you can watch below.

The design merges two 4x microscope lenses to provide a 2X stereo image with a 5mm baseline. As you might expect, the secret is a prism in the assembly that allows one camera to shoot directly at the subject and the other to shoot with a 5mm offset. This is trickier than you might think because the cameras shift the image some, also.

Continue reading “Stereoscopic Macro Lens Shows Two Is Better Than One”

Pour One Out For This Bottle-Playing Robot

If you have an iota of musicality, you’ve no doubt noticed that you can play music using glass bottles, especially if you have several of different sizes and fill them with varying levels of water. But what if you wanted to accompany yourself on the bottles? Well, then you’d need to build a bottle-playing robot.

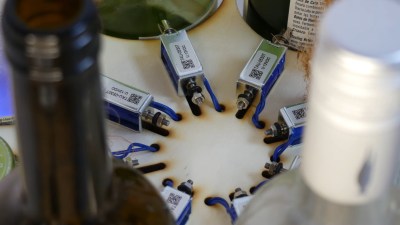
First, [Jens Maker Adventures] wrote a song and condensed it down to eight notes. With a whole lot of tinkling with a butter knife against their collection of wine and other bottles, [Jens] was able to figure out the lowest note for a given bottle by filing it with water, and the highest note by emptying it out.

With the bottle notes selected, the original plan was to strike the bottles with sticks. As it turned out, 9g servos weren’t up to the task, so he went with solenoids instead. Using Boxes.py, he was able to parameterize a just-right bottle holder to allow for arranging the bottles in a circle and striking them from the inside, all while hiding the Arduino and the solenoid driver board. Be sure to check it out after the break.

Don’t have a bunch of bottles lying around? You can use an Arduino to play the glasses.

Continue reading “Pour One Out For This Bottle-Playing Robot”

Hackaday Podcast 185: A 2022 Rotary Phone, How AI Imagines Zepplin, Are We Alone In The Universe

This week, Editor-in-Chief Elliot Williams and Managing Editor Tom Nardi start off by talking about the chip shortage…but not how you think. With a list that supposedly breaks down all of the electronic components that the Russian military are desperate to get their hands on, we can see hackers aren’t the only ones scrounging for parts. If you thought getting components was tricky already, imagine if most of the world decided to put sanctions on you.

We’ll also talk about kid-friendly DIY stereoscopic displays, the return of the rotary cellphone, and using heat to seal up 3D printed parts for vacuum applications. Join us as we marvel over the use of rubbery swag wristbands as tank treads, and ponder an array of AI-created nightmares that are supposed to represent the Hackaday writing crew. Finally we’ll talk about two iconic legacies: that of the 3.5 inch floppy disk, and astrophysicist Frank Drake.

Check out the links below if you want to follow along, and as always, tell us what you think about this episode in the comments!

Direct download, and burn it to your own CD!

Continue reading “Hackaday Podcast 185: A 2022 Rotary Phone, How AI Imagines Zepplin, Are We Alone In The Universe”

Mokeylaser: A DIY Laser Engraver That You Can Easily Build

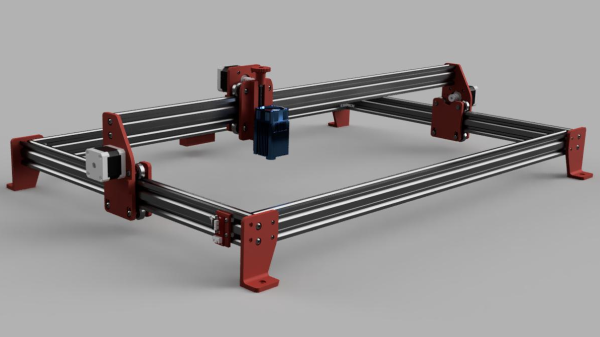
[Mark aka Mokey] borrowed his friend’s open-frame laser engraver for a while, and found it somewhat lacking in features and a bit too pricey for what it was. Naturally, he thought he could do better (video, embedded below.) After a spot of modelling in Fusion 360, and some online shopping at the usual places, he had all the parts needed to construct an X-Y bot, and we reckon it looks like a pretty good starting point. [Mark] had a Sainsmart FL55 5.5W laser module kicking around, so that was dropped into the build, together with the usual Arduino plus CNC shield combo running GRBL.

[Mark] has provided the full F360 source (see the mokeylaser GitHub) and a comprehensive bill-of-materials, weighing in at about $400, and based upon the usual 2040 aluminium extrusions. This makes MokeyLaser a reasonable starting point for further development. Future plans include upgrading the controller to something a bit more modern (and 32-bits) as well as a more powerful laser (we do hope he’s got some proper laser glasses!) and adding air assist. In our experience, air assist will definitely improve matters, clearing out the smoke from the beam path and increasing the penetration of the laser significantly. We think there is no need for more optical power (and greater risk) for this application. [Mark] says in the video that he’s working on an additional build video, so maybe come by later and check that out?

Obviously, MokeyLaser is by no means the only such beast we’ve featured, here’s the engravinator for starters. For even more minimalism, we covered a build with some smart optics doing all the work. But what if you don’t happen to have a 5W laser module “lying around” then perhaps try a more natural heat source instead?

Continue reading “Mokeylaser: A DIY Laser Engraver That You Can Easily Build”

Pet Docking Station Was Two Decades In The Making

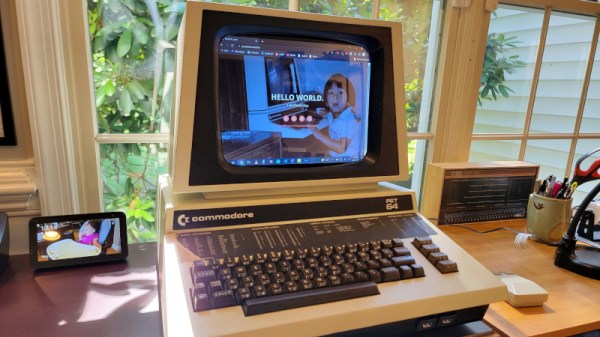
There are some projects which once might have been entirely appropriate, but which now seem sacrilegious. [Dave Luna]’s PC docking station in a Commodore Pet 64 case might at first sight seem to be one of them, but there’s a little more to it than gutting a cherished retrocomputer.

A much younger [Dave] had a dead Pet 64, and because over two decades ago such a thing was considered junk, set about converting it to a PC case. In the way of all ambitious projects it stalled, so here in 2022 he was starting with the metal case and keyboard of a Pet 64 rather than the full computer.

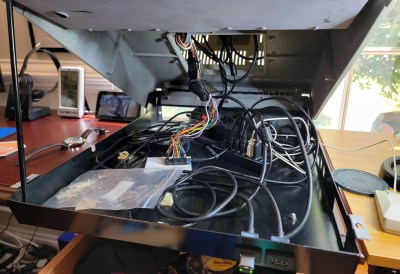
Into the case went a small color TFT monitor, a USB3 hub, a DisplayLink adapter, and and an Arduino Micro doing the job of USB-ifying the Commodore keyboard. The result is a pretty cool docking station, but one which he admits isn’t as nice to use as he’d like. Viewed through rose tinted glasses any PET was an amazing machine in its day, but a slightly lackluster keyboard and a tiny screen don’t quite have the same allure in a world of 4K monitors. Still, we’d have one on our desk.

The Pet appears in quite a few projects that have made it to these pages, for example showing YouTube videos.

Continue reading “Pet Docking Station Was Two Decades In The Making”

Owen with his laser cutter

A Home Made Laser Cutter For $700

While some decent lasers are out there for under $400 USD, they tend to be a little small. What if you wanted something a little nicer but didn’t want to jump to the $2,000 category? The answer for [Owen Schafer] was to build it with parts he had lying around and a few strategic purchases.

While he was initially planning on using a diode laser, doing anything more than engraving is tricky. He purchased a cheap 40 W CO2 laser tube, but it meant that he needed water cooling, mirrors, and more complex stuff that a diode doesn’t need. The frame is aluminum extrusion held together with 3D printed plates. Given there was a powerful laser bouncing around with mirrors, a plywood box formed the enclosure.

The stepper controller is an Arduino Mega running the Marlaser firmware, though [Owen] admits perhaps a laser cutter-specific driver board would have been better as he spent many hours trying to get the Arduino to do what he wanted. Air ventilation is a tube with a fan that vents out a nearby window. Water cooling is just a bucket of water with a pump in it. A simple nylon hose connected to a compressor with a maximum airflow valve provides an air assist while cutting. Finally, we’re happy to report that [Owen] bought safety glasses specific to his laser to protect his eyes and researched how to ground the high voltages generated.

We particularly loved seeing all of [Owen’s] test cuts. He proudly displayed his boxes, sharks, and lamp shades like anyone with their new laser cutter is wont to do. If you’re looking to upgrade your laser, there’s an add-on for detecting materials optically or a relatively cheap laser bed you can throw in your laser.

Continue reading “A Home Made Laser Cutter For $700”

Photo rail setup for stop motion

Stop-Motion Angels In The Light Field

Baseball jokes aside, holograms have been a dream for decades, and with devices finally around that support something like them, we have finally started to wonder how to make content for them. [Mike Rigsby] recently entered his stop-motion holographic setup into our sci-fi contest, and we love the idea.

Rather than a three-dimensional model or a 2d picture with pixels, the Looking Glass light field display supports a series of images as quantized points (hence light field). As you move around an object, images are interpolated between the frames you do know, giving a pretty convincing effect. In a traditional stop motion animation, you need to take anywhere between 12-24 frames to equal about one second of animation. Now that you need to take 48 pictures for one frame, over 1152 pictures for just one second of animation. Two problems quickly appear, how to take photographs accurately from the same position every time and how do you manage the deluge of photos sensibly. [Mike] started with a wooden stage for his actors. A magnet was mounted to the photo rail carriage, and a sensor allowed it to detect that it was in the same spot. An Arduino controls the rail, reads the magnet via a sensor, and controls the camera shutter. The DSLR he’s using can’t do that many frames per second, but that’s a problem for another sci-fi contest.

Holographic-ish displays are finally here, and they’re getting better. But if a display isn’t your speed, perhaps some laser-powered glasses can be the holographic experience you’re looking for?

This project was an entry into the 2022 Sci-Fi Contest. Check out all of the winning entries here.