LED Matrix Glasses Built With The Help Of Graph Paper

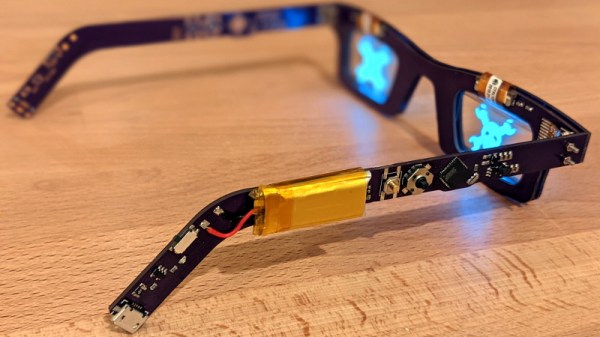
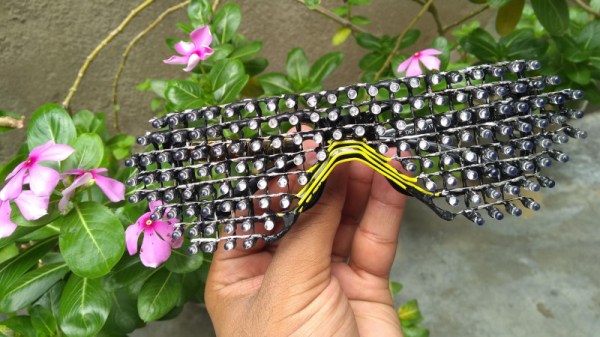
These days, there’s all manner of addressable LEDs out there that can be easily used to produce blinky, flashy projects. However, there’s nothing stopping makers from doing things the old fashioned way, and hacking together an matrix out of raw LEDs. [Deepak Khatri] did just that with his own custom build.

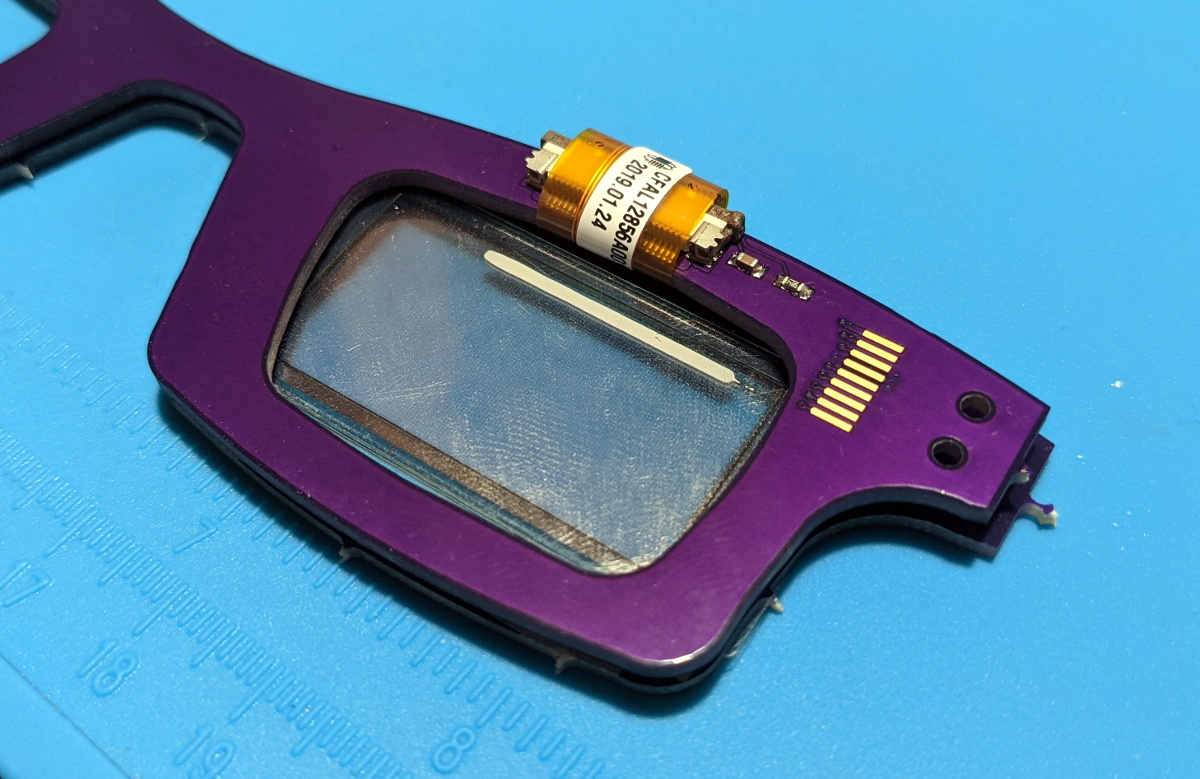
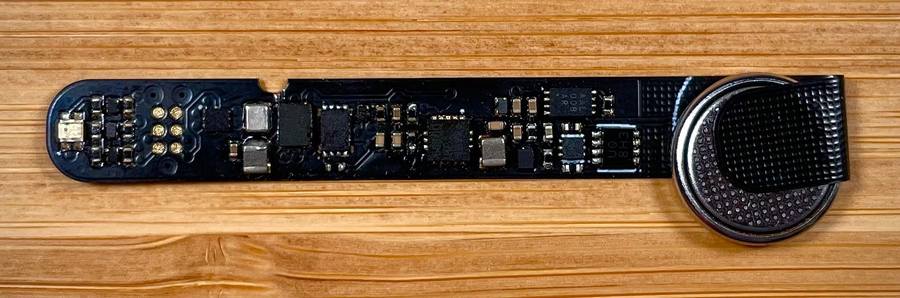
Rather than rely on a PCB or other substrate to hold the matrix together, [Deepak] elected to freeform the design instead. A matrix of holes was cut in a cardboard template with the aid of graph paper. LEDs were then inserted into the holes in the requisite pattern, and their own leads soldered together to create the frame for the glasses. Additional wires that were needed were then installed, doubling as a bridge to allow the glasses to rest comfortably on the nose. Black epoxy was then used on the back side to block the light from blinding the wearer. The matrix is controlled by a pair of shift registers addressed by a microcontroller, and the display animates impressively smoothly.

it’s a fun build, and one that we suspect looks particularly impressive at night. They’d also make it easy for your friends to spot you in a dark club. We’ve seen some impressively stylish LED glasses over the years, too, dating all the way back to [macetech]’s pair from 2012. Video after the break.

Continue reading “LED Matrix Glasses Built With The Help Of Graph Paper”

Heads Up: Smart Glass Multimeter

Sometimes it is hard to probe a circuit and then look over at the meter. [Electronoobs] decided to fix that problem by making a Google Glass-like multimeter using an OLED screen and Bluetooth module.

The custom PCB doesn’t have many surprises. A small board has a controller, a battery charger, a display, and a Bluetooth module. One thing he did forget is a switch, though, so the board is always on unless you arrange an external switch.

Continue reading “Heads Up: Smart Glass Multimeter”

The Future’s So Bright, You Gotta Wear Arduglasses

Tiny OLED displays are an absolute must-have in the modern parts bin, so what better way to show your allegiance to the maker movement than with a pair of Arduino-compatible OLED glasses? Created by Arduboy mastermind [Kevin Bates], these digital spectacles might not help you see any better — in fact, you’ll see a bit worse — but they’ll certainly make you stand out in the crowd at the next hacker con. (Whenever we can have one of those again, anyway.)

The key to this project is a pair of transparent CrystalFonts OLED displays, just like the ones [Sean Hodgins] recently used to produce his gorgeous volumetric display. In fact, [Kevin] says it was his success with these displays that inspired him to pursue his own project. With some clever PCB design, he came up with some boards that could be manufactured by OSH Park and put together with jewelry box hinges. Small flexible circuits, also from OSH Park, link the boards and allow the frames to fold up when not being worn.

The Arduglasses use the same ATmega32U4 microcontroller as the Arduboy, and with a few basic controls and a small 100 mAh rechargeable battery onboard, they can technically run anything from the open source handheld’s extensive software library. Of course, technically is the operative word here. While the hardware is capable of playing the games, [Kevin] reports that the OLED displays are too close to the wearer’s eyes to actually focus on them. That said the ability to easily create software for these glasses offers plenty of opportunity for memes, as we see in the video below.

For reasons that are probably obvious, [Kevin] considers the Arduglasses an experiment and isn’t looking to turn them into a commercial product or kit. But if there’s interest, he’s willing to put the design files up on GitHub for anyone who wants to add a pair of Arduino glasses to their cyberpunk wardrobe.

Continue reading “The Future’s So Bright, You Gotta Wear Arduglasses”

Turn-by-turn Smart Glasses Give You Direction

[SamsonMarch] designs electronic products by day and — apparently — does it in his spare time, too. His latest is a pair of really cool shades that give him turn-by-turn directions as he walks around town. Unlike some smart glasses, these get around the difficult problem of building a heads-up display by using a very simple interface based on colored LEDs visible to your peripheral vision in the temples of the frames.

The glasses themselves look great; designed in Fusion 360 and cut out of wood, no one would give them a second glance. [Sam] says you could 3D print them, too, but we think the wood looks best even if the stock is a cheap bamboo cutting board. He also cut the lenses out of acrylic.

The slots in the temples are where the action is, though. An iPhone app takes input and talks to Apple services to get directions. A lot of thought went into making the app work even though the phone keeps trying to put it to sleep. Each PCB hosts an RGB LED for indicating left/right turn and destination. They talk to the app using BLE and include accelerometers which put the boards — powered by coin cells — into sleep mode when no movement is detected.

Overall a fun and good looking project. There are even covers to hide the boards during normal use. The files you need to reproduce it are on GitHub. Usually, when we see smart glasses, they have some sort of screen which is harder to do. Of course, it is impossible to avoid comparisons to Google Glass.

Continue reading “Turn-by-turn Smart Glasses Give You Direction”

Printed It: Print-in-Place PCB Gripper

The goal of Printed It is to showcase creations that truly embrace the possibilities offered by desktop 3D printing. The most obvious examples are designs that can be printed quickly and cheaply enough that they’re a valid alternative to commercially available products. But as previous entries into the series have shown, there are also technical considerations. Is it simply a duplicate of something that could be produced via traditional means, or does the design really benefit from the unique nature of 3D printing?

A perfect example is the Print-in-Place PCB Holder/Gripper created by SunShine. This design is able to hold onto PCBs (or really, whatever you wish) without any additional components. Just pull it off the bed, and put it to work. While having to add a rubber band or generic spring would hardly be an inconvenience, there’s always something to be said for a design that’s truly 100% printable.

The secret is the dual flat spiral springs integrated into the device’s jaws. While most of the common thermoplastics used in desktop 3D printing are relatively stiff, the springs have been designed in such a way that they can be printed in standard PLA. The backside of the jaws have teeth that mesh together, so the energy of the springs is combined to provide a clamping force. Serrations have been added to the jaws to catch the edge of the PCB and help stabilize it.

Visually, it’s certainly striking. The design largely eschews right angles, giving it an almost biological appearance. Many have compared it to the head of a mantis, or perhaps some piece of alien technology.

There’s no question that the design leverages the strengths of 3D printing either; there’s no other way to produce its intricate interlocking components, especially without the use of any sort of fasteners. In short, this design is an ideal candidate for Printed It. But there’s still one question to answer: does it actually work?

Continue reading “Printed It: Print-in-Place PCB Gripper”

PCB Mill Turns Out Stylish Necklace

When needing a custom PCB, most of us will whip up design files and send them off to a board house. Prices are low and turnaround times are bearable, with quality that’s difficult to replicate at home. The old methods still have some value however, as [Bantam Tools] demonstrate with this attractive glowing hummingbird necklace.

The back side of the pendant neatly hides a button cell battery and a small SMD switch.

The necklace is made of copper-clad board, the type typically used by those who would etch their own PCBs at home. In this case, the board is placed on a [Bantam Tools] mill, which removes copper strategically and cuts out the final shape. This creates a series of traces on the back for a battery, LEDs and a small swtich, while creating areas on the other side of the board for light to shine through.

With a battery installed, the LEDs on the back side of the necklace glow through the fiberglass for a beautiful effect. With a PCB mill and a reflow oven, it’s remarkably easy to make, too. Of course, if you like your parts density a little higher, these FPGA earrings might be more your speed!

Making PCBs With A Vinyl Cutter

You might assume that you need a lot of expensive stuff to make your own PCBs, but that isn’t the case: you can do it with a vinyl cutter and a few common chemicals and tools. [Emiliano Valencia] has laid out the entire process. While we’ve seen plenty of make your own PCB guides before, this one goes a bit further as it covers using the vinyl cutter to make solder masks, so you can use it for surface mount designs.

The end result of the process that [Emilano] lays out is the tinyDice, a cute little electronic die that can fit on a keyring. The whole process is very well written up, and even experienced PCB makers will probably find a few useful tricks here.

The really interesting part for us was using the vinyl cutter to make three parts of the process: the etching mask, the solder mask that protects the traces and the solder stencil that applies the solder to the pads for surface mounting. Continue reading “Making PCBs With A Vinyl Cutter”