Quickly Mute And Unmute Yourself Using The Physical Mute Button

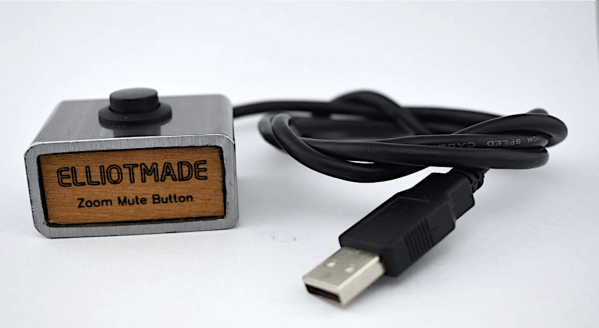
With many conferences moving to fully virtual this year, video conferencing will continue to be a mainstay in our lives for the foreseeable future. [Elliot] wanted to spice up his video conferencing experience just a bit and make his experience a bit more ergonomic. We’ve all had the problem of looking for our Zoom window buried behind any number of other applications, desperately searching for the mute button. Furthermore, when we get called on, we’re desperately trying to give the impression that we’ve been paying attention the entire time, even when we haven’t been.

To solve all these problems, he built a physical mute button to easily toggle the mute option on and off during Zoom calls. The device takes advantage of the native USB feature of his Digispark board, and a few built-in keyboard shortcuts in Zoom. With native USB, the Digispark board can act like a keyboard, making it really simple to emulate keyboard presses using the microcontroller. Throw in an arcade-style button and do a bit of handcrafting and you have yourself your own physical mute button.

We were really impressed by the simplicity of the design as well as the elegance of the mechanical assembly. [Elliot] even made a revamped version with a second button allowing him to control his video as well. Cool button(s) [Elliot]!

What’s your favorite work-from-home hack? Check out some of our favorites here on Hackaday.

Continue reading “Quickly Mute And Unmute Yourself Using The Physical Mute Button”

The rust language logo being branded onto a microcontroller housing

Will 2020 Be The Year Of Rust In The Linux Kernel?

One problem with modern programming languages is the reach their overly enthusiastic early adopters have nowadays thanks to the internet. As a result, everyone else’s first encounter with them are oftentimes some crude, fanboyish endeavors to rewrite every single established software project in that shiny new language — just because — which may leave an off-putting taste behind. However, Rust certainly seems to have outgrown this state by now, and with its rising popularity within the general developer population, it’s safe to say it will stick around. Will it fully replace C one day? Probably not, but there’s a big chance for coexistence, and [Nick Desaulniers] got the ball rolling for that within the Linux kernel.

Now, before you storm off pledging your allegiance to C by finding a new operating system: nothing is happening yet. [Nick] simply tested the waters for a possible future of Rust within the Linux kernel code base, which is something he’s planning to bring up for discussion in this year’s Linux Plumbers Conference — the annual kernel developer gathering. The interesting part is [Linus Torvalds]’s respone on the LKML thread, which leaves everyone hoping for a hearty signature Rust rant akin to his C++ one disappointed. Instead, his main concern is that a soft and optional introduction of the support in the build system would leave possible bugs hidden, and therefore should be automatically enabled if a Rust compiler is present — essentially implying that he seems otherwise on board.

We’ll see what comes of it, but with Rust language team lead [Josh Triplett] stating that enhancements benefiting and advancing a kernel integration are certainly imaginable for Rust itself, we might see interesting collaborations coming up in the near future. If you don’t want to wait for that and use Rust already today in a user-land driver, check out this 35c3 talk. And if that doesn’t go far enough for you, here’s a whole (non-Linux) kernel written in Rust.

A Shrine For All The 555 Lovers

For many of our readers, the classic 555 timer holds a special place in their heart, and cursed be the fool who dares to use an Arduino in its place. For the seriously devoted ones, or those who simply like a novelty decorative item, [acerlaguinto7] built just the right thing: a giant, actually functional, cardboard 555 timer IC.

Taking all the measurements of the original IC, [acerlaguinto7] scaled it up by factor 22 and started cutting out pieces of cardboard — also considering the orientation notch — and added the markings to emulate TI’s NE555P. Next he took a bunch of aluminum cans apart and shaped them into the pins, again staying as close as possible to the original. To top it all off, he put an actual NE555 inside the giant counterpart, and hooked it up to the soda can pins, turning it into a fully operational, oversized timer IC.

Obviously, giant conductive pins like that scream for some dead bug blinky light that even the shakiest of hands could manage to solder, and [acerlaguinto7] certainly delivers, as you can see in the video after the break. One nifty way we could see this taken further would be integrating this breadboard implementation as replacement for the 555 inside — or then just connect it to the giant Raspberry Pi.

Continue reading “A Shrine For All The 555 Lovers”

Today’s Twitter Hack Is New Take On “Nigerian Prince” Scam

Don’t send bitcoin to celebrities… or to random people for that matter. This afternoon a number of high profile Twitter accounts were taken over, including Joe Biden, Bill Gates, Elon Musk, Apple, Jeff Bezos, and Kanye West, and the event appears to be ongoing. Each displayed a message saying they wanted to “give back” by doubling the bitcoin that they are sent. The messages all appear to have the same bitcoin wallet address.

This is reminiscent of the “Nigerian prince” scams, a form of advance-fee scam where an email asks for help with a small sum of money in order to obtain a larger sum. Those usually come in as spam emails which most people are wise to at this point. However, blindly following celebrities on Twitter may still deliver a good dose of naïveté when those platforms are misused.

Bitcoin transactions can be viewed publicly and this wallet is showing 11.8 BTC in and 5.8 BTC out in a total of 288 transactions. The net is roughly 6 bitcoin or $55k USD at the time of writing. Twitter’s response appears to have locked down all verified accounts from publishing new tweets. They retain the ability to retweet and delete existing tweets.


Main image screenshot sources:

No Assembly Required For This Compliant Mechanism Dial Indicator

If you’ve ever had the good fortune — or, after a shop mishap, the misfortune — to see the insides of a dial indicator, you’ll know the workings of these shop essentials resemble nothing so much as those of a fine Swiss watch. The pinions, gears, and springs within transmit the slightest movement of the instrument’s plunger to a series of dials, making even the tiniest of differences easy to spot.

Not every useful dial indicator needs to have those mechanical guts, nor even a dial for that matter. This compliant mechanism 3D-printed dial-free indicator is perfect for a lot of simple tasks, including the bed leveling chores that [SunShine] designed it for. Rather than print a bunch of gears and assemble them, [SunShine] chose to print the plunger, a fine set of flexible linkage arms, and a long lever arm to act as a needle. The needle is attached to a flexible fulcrum, which is part of the barrel that houses the plunger. Slight movements of the plunger within the barrel push or pull on the needle, amplifying them into an easily read deflection. When attached to the head of a 3D-printer and scanned over the bed, it’s easy to see even the slightest variation in height and make the corresponding adjustments. Check it out in the video below.

We’re big fans of compliant mechanisms, seeing them in everything from robot arms and legs to thrust vectoring for an RC plane. This might look like something from a cereal box, and it certainly doesn’t have the lasting power of a Starrett or Mitutoyo, but then again it costs essentially nothing, and we like that too.

Continue reading “No Assembly Required For This Compliant Mechanism Dial Indicator”

Exposing Computer Monitor Side-Channel Vulnerabilities With TempestSDR

Having been endlessly regaled with tales of side-channel attacks and remote exploits, most of us by now realize that almost every piece of gear leaks data like a sieve. Everything from routers to TVs to the power supplies and cooling fans of computers can be made to give up their secrets. It’s scary stuff, but it also sounds like a heck of a lot of fun, and with an SDR and a little software, you too can get in on the side-channel action.

Coming to us via software-defined radio buff [Tech Minds], the video below gives a quick tour of how to snoop in on what’s being displayed on a monitor for almost no effort or expense. The software that makes it possible is TempestSDR, which was designed specifically for the job. With nothing but an AirSpy Mini and a rubber duck antenna, [Tech Minds] was able to reconstruct a readable black and white image of his screen at a range of a few inches; a better antenna and some fiddling might improve that range to several meters. He also shares a trick for getting TempestSDR set up for all the popular SDRs, including SPRplay, HackRF, and RTL-SDR.

Learning what’s possible with side-channel attacks is the key to avoiding them, so hats off to [Tech Minds] for putting together this simple, easy-to-replicate demo. To learn even more, listen to what [Samy Kamkar] has to say about the subject, or check out where power supplies, cryptocurrency wallets, and mixed-signal microcontrollers are all vulnerable.

Continue reading “Exposing Computer Monitor Side-Channel Vulnerabilities With TempestSDR”

Printed It: Print-in-Place PCB Gripper

The goal of Printed It is to showcase creations that truly embrace the possibilities offered by desktop 3D printing. The most obvious examples are designs that can be printed quickly and cheaply enough that they’re a valid alternative to commercially available products. But as previous entries into the series have shown, there are also technical considerations. Is it simply a duplicate of something that could be produced via traditional means, or does the design really benefit from the unique nature of 3D printing?

A perfect example is the Print-in-Place PCB Holder/Gripper created by SunShine. This design is able to hold onto PCBs (or really, whatever you wish) without any additional components. Just pull it off the bed, and put it to work. While having to add a rubber band or generic spring would hardly be an inconvenience, there’s always something to be said for a design that’s truly 100% printable.

The secret is the dual flat spiral springs integrated into the device’s jaws. While most of the common thermoplastics used in desktop 3D printing are relatively stiff, the springs have been designed in such a way that they can be printed in standard PLA. The backside of the jaws have teeth that mesh together, so the energy of the springs is combined to provide a clamping force. Serrations have been added to the jaws to catch the edge of the PCB and help stabilize it.

Visually, it’s certainly striking. The design largely eschews right angles, giving it an almost biological appearance. Many have compared it to the head of a mantis, or perhaps some piece of alien technology.

There’s no question that the design leverages the strengths of 3D printing either; there’s no other way to produce its intricate interlocking components, especially without the use of any sort of fasteners. In short, this design is an ideal candidate for Printed It. But there’s still one question to answer: does it actually work?

Continue reading “Printed It: Print-in-Place PCB Gripper”