Digital Hourglass Counts Down The Seconds

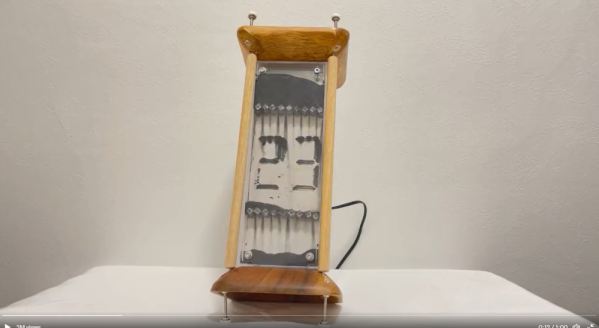
If someone asked you to build a digital hourglass, what would your design look like? [BitBlt_Korry] took on that challenge, creating a functional art piece that hits it right on the nose: an hourglass with a digital display

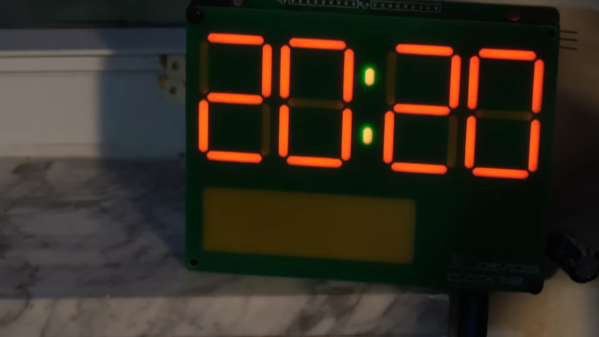
Iron filings fall between two pieces of plexiglass while ghostly numbers appear, counting down 30 seconds. Just as quickly as they appear, the numbers disappear – dropping down to the bottom of the enclosure. Each second is punctuated by what might be the loudest clock tick we’ve ever heard.

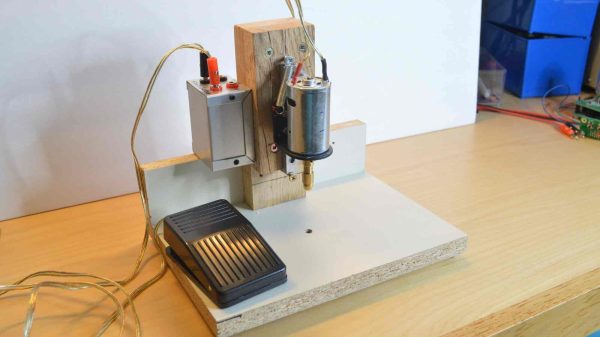
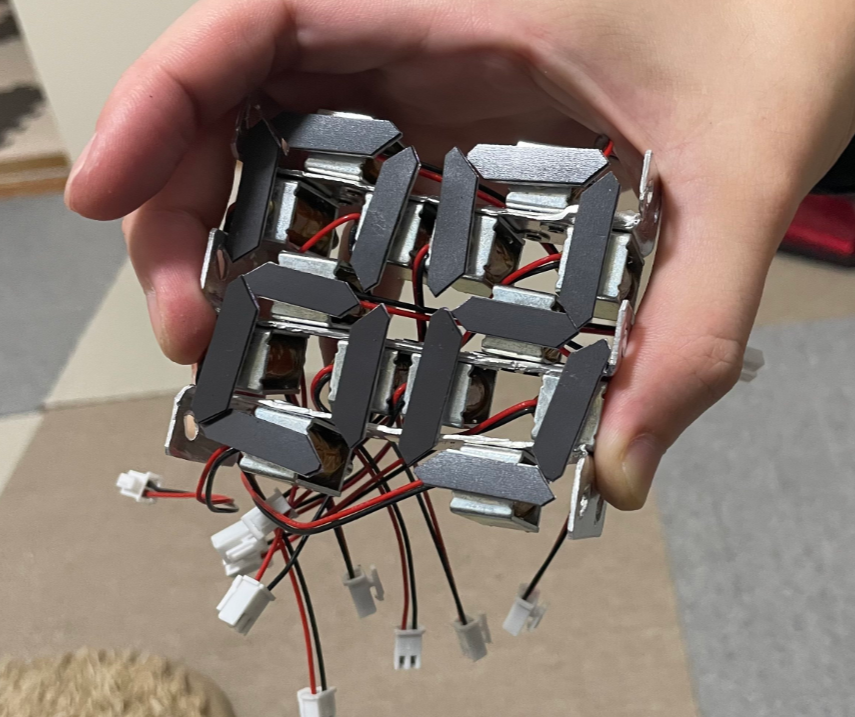
Of course, it’s not all magic. The hourglass is controlled by a Raspberry Pi Pico running code in MicroPython. The pico drives a series of transistors, which in turn are used to control 14 solenoids.  The solenoids serve double duty — first, they move pieces of flat “fridge magnet” material close enough to attract iron filings. Their second duty is of course provide a clock tick that will definitely get your attention.

Tilt sensors are the user input to the hourglass, letting the Pi Pico know which end is up when it’s time to start a new 30-second countdown.

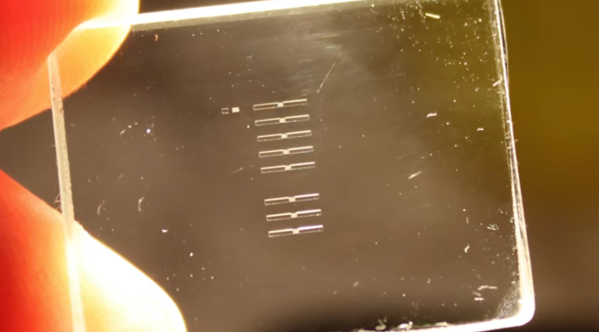
[BitBlt_Korry] mentions that the hardest part of the project was setting the screws at the top and bottom of the hourglass to get the perfect uniform flow of iron filings. 

[BitBlt_Korry] calls his creation “「時場(じば)」”.  Google translates this to “Jiba”, which means “magnetic field”.  We’re not native speakers, but we’re guessing there is a double meaning there.

This isn’t the first time we’ve seen humble iron filings stand up and dance at our command. If iron dust is too dry a topic, we’ve got plenty of ferrofluid projects as well!

Continue reading “Digital Hourglass Counts Down The Seconds”

Circuit-less PCB Featured As Faceplate For A Digital Clock

If there’s no circuitry on a printed circuit board, does it cease being a “PCB” and perhaps instead become just a “PB”?

Call them what you will, the fact that PCBs have become so cheap and easy to design and fabricate lends them to more creative uses than just acting as the wiring for a project. In this case, [Jeremy Cook] put one to work as the faceplate for his “742 Clock,” a name that plays on the fact that his seven-segment display is 42 mm tall, plus it’s “24/7” backward.

In addition to the actual circuit board that holds the Wemos ESP32 module and the LEDs, a circuit-less board was designed with gaps in the solder mask to act as light pipes. Sandwiched between the boards is a 3D printed mask, to control the light and direct it only through the light pipes. [Jeremy] went through a couple of iterations of diffuser and mask designs, finally coming up with a combination that works well and looks good. He mentions a possible redesign of the faceplate board to include a copper backplane for better opacity, which we think is a good idea. We’d also like to see how different substrates work; would boards of different thickness or using FR-4 with different glass transition temperatures work better? Check out the video below and see what you think.

We’re seeing more and more PCBs turn up as structural elements, from enclosures to control panels and even tools, and we approve of this trend. But what we really approve of is what [Jeremy] did here by making this clock just a dumb display that gets network time over NTP. Would that all three digital clocks in our kitchen did the same thing — maybe then they wouldn’t each be an infuriating minute out of sync with the others.

Continue reading “Circuit-less PCB Featured As Faceplate For A Digital Clock”

A Nicely Accurate PCB Drill Press You Can Build Yourself

Making PCBs isn’t always just about getting nice copper traces on a lovely fiberglass board. There’s often lots of drilling to be done! This PCB drill press from [w_k_fay] should help you do just that with the finesse and accuracy of a pro.

The design isn’t particularly fancy or pretty, but just simply focuses on doing a simple job well. There’s a basic DC motor, sitting on a linear rail so that it has minimal deflection in the X and Y axes as it moves up and down. Special care was taken to ensure the linear rail was mounted perfectly perpendicular to the base to ensure the drill doesn’t wander or splay off target.

A collet chuck is used to center the bit as well as possible for a good price. The build also includes a bright LED in order to give you the best possible view of your work. Power is via a variable bench supply which allows for variable speed as necessary. There’s a foot pedal to activate the drill which allows both hands to be used for positioning the work for added ease of use.

The total build came in at under $50 spend by the time [w_k_fay] was done. Alternatively, you could use this 3D printed design to build your own as well. If you’ve been whipping up your own useful tools for the home shop, though, don’t hesitate to drop us a line!

Hackaday Podcast 149: Ballerina Bot Balances, Flexures Track Cat Food, PCB Goes Under The Knife, And An ATtiny Does The 555

Newly ordained Hackaday editor-in-chief Elliot Williams and staff writer Dan Maloney jump behind the podcast mic to catch you up on all this week’s essential hacks. We’ll have a Bob Ross moment with an iPad, go to ridiculous lengths to avoid ordering a 555, and cook up a Wii in toaster. Need to make a VGA adapter from logic chips? Or perhaps you want to quantify the inner depths of human consciousness? Either way, we’ve got you covered.

Take a look at the links below if you want to follow along, and as always, tell us what you think about this episode in the comments!

Direct download (55 MB)

Continue reading “Hackaday Podcast 149: Ballerina Bot Balances, Flexures Track Cat Food, PCB Goes Under The Knife, And An ATtiny Does The 555”

LED Matrix Hourglass Knows Which Way Is Up

[Fearless Night]’s slick dual hourglass doesn’t just simulate sand with LEDs, it also emulates the effects of gravity on those simulated particles and offers a few different mode options.

The unit uses an Arduino (with ATMEGA328P) and an MPU-6050 accelerometer breakout board to sense orientation and movement, and the rest is just a matter of software. Both the Arduino and the MPU-6050 board are readily available and not particularly expensive, and the LED matrix displays are just 8×8 arrays of red/green LEDs, each driven by a HT16K33 LED controller IC.

The enclosure and stand are both 3D-printed, and a PCB not only mounts the components but also serves as a top cover, with the silkscreen layer of the PCB making for some handy labels. It’s a clever way to make the PCB pull double-duty, which is a technique [Fearless Night] also used on their earlier optical theremin design.

Those looking to make one of their own will find all the design files and source code handily available from the project page. It might not be able to tell time in the classical sense, but seeing the hourglass displays react to the device’s orientation is a really neat effect.

Hackaday Podcast 132: Laser Disco Ball, Moore’s Law In Your Garage, Cheap Cyborg Glasses, And A Mouse That Detects Elephants

Hackaday editors Elliot Williams and Mike Szczys debate the great mysteries of the hacking universe. On tap this week is news that Sam Zeloof has refined his home lab chip fabrication process and it’s incredible! We see a clever seismometer built from plastic pipe, a laser, and a computer mouse. There’s a 3D printed fabric that turns into a hard shell using the same principles as jamming grippers. And we love the idea of high-powered lasers being able to safely direct lighting to where you want it.

Take a look at the links below if you want to follow along, and as always, tell us what you think about this episode in the comments!

Direct download (60 MB or so.)

Continue reading “Hackaday Podcast 132: Laser Disco Ball, Moore’s Law In Your Garage, Cheap Cyborg Glasses, And A Mouse That Detects Elephants”

Tiny Tesla Valves Etched In Glass

While it’s in vogue right now to name fancy new technology after Tesla, the actual inventor had plenty of his own creations that would come to bear his namesake, including Tesla coils, Tesla oscillators, Tesla turbines and even the infamous Tesla tower. One of the lesser known inventions of his is the Tesla valve, a check valve that allows flow in one direction without any moving parts, and [Huygens Optics] shows us a method of etching tiny versions of these valves into glass.

The build starts out with a fairly lengthy warning, which is standard practice when working with hydroflouric acid. The acid is needed to actually perform the etching, but it’s much more complicated than a typical etch due to the small size of the Tesla valves. He starts by mixing a buffered oxide etch, a mix of the hydroflouric acid, ammonia, and hydrochloric acid, which gives a much more even etching than any single acid alone. Similar to etching PCBs, a protective mask is needed to ensure that the etch only occurs where it’s needed. For that there are several options, each with their own benefits and downsides, but in the end [Huygens Optics] ends up with one of the smallest Tesla valves ever produced.

In fact, the valves are so small that they can only be seen with the aid of a microscope. While viewing them under the microscope he was able to test with a small drop of water to confirm that they do work as intended. And, while the valves that he is creating in this build are designed to work on liquids, [Huygens Optics] notes that the reason for making them this small was to make tiny optical components which they are known for.

Continue reading “Tiny Tesla Valves Etched In Glass”