Hot Camera Contest: Build A Battery Powered Thermal Camera

Here’s a challenge for all you hardware hackers out there. Peter Jansen has opened up the Hot Camera Contest on Hackaday.io to use a thermal imaging camera in a battery-powered project.

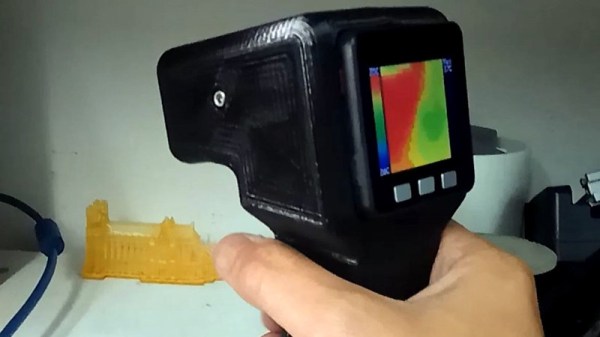
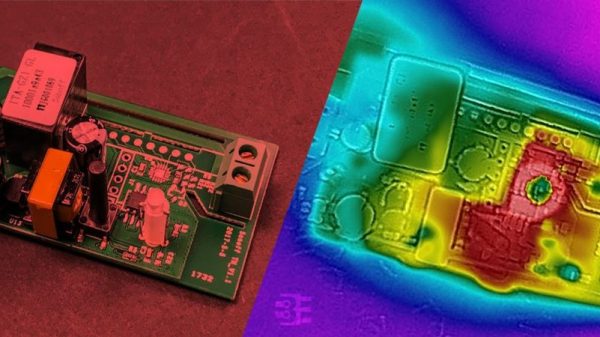
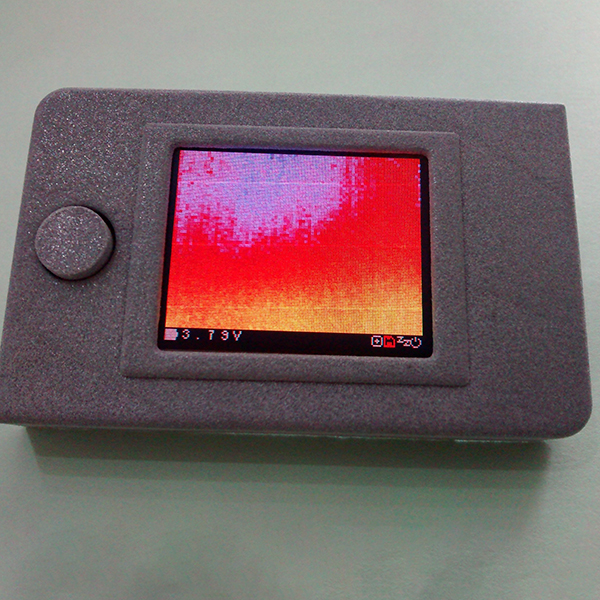
The challenge here is simple. Use a Flir Lepton thermal imaging camera module in a battery-powered configuration. There’s a catch, though: this is a project to use the Lepton in radiometric mode, where the camera spits out an actual temperature value for each pixel. Yes, this is a documented feature in the Flir Lepton module, but so far very few people are using it, and no one has done it with a small, battery-powered device.

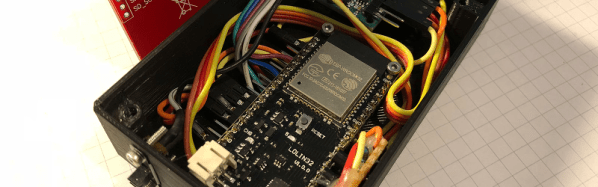
The rules for this challenge are to use the Flir Lepton 2.5 in radiometric mode using either the Raspberry Pi Zero W or ESP32. Any software in this challenge must spit out absolute temperature values in a text format, and there must be a demonstration of putting the Flir Lepton into low-power mode. There are two challenges here, one for the Raspi and one for the ESP32; and winner will be named for each.

Getting More from a Fascinating Sensor

The Flir Lepton is a tiny little thermal camera that’s been available to the Maker community for some time now, first through GroupGets and now through Sparkfun. For a pair of Benjamins, the specs are very impressive: the Lepton has a resolution of 60×80 pixels and everything is can be read over an SPI port. The Lepton gives any project thermal imaging, and the PureThermal board turns the Lepton into a USB device.

Peter Jansen is the creator of the Open Source Science Tricorder (yes, it’s a tricorder) which took Fourth Prize in the 2014 Hackaday Prize. You can understand how he became interested in portable, and we’re sure whatever project he has in mind for this battery-powered Flir will be awesome.

This really is a great example of what the Hackaday.io community is capable of. The goal here is to create useful Open Source drivers for some very interesting hardware, and there’s some prizes to sweeten the pot. Peter has a $125 Sparkfun gift card on offer for each of the two winners. And the challenge of solving a tricky problem and making designs easier for others is a powerful motivator. Who doesn’t like a challenge?

Who Said Thermal Cameras Weren’t Accessible To The Masses?

Thermal cameras hold an enduring fascination as well as being a useful tool for the engineer. After all, who wouldn’t want to point one at random things around the bench, laughing with glee at finding things warmer or colder than expected? But they’ve always been so expensive, and a lot of the efforts that have sought to provide one for little outlay have been rather disappointing.

This has not deterred [Offer] though, who has made an extremely professional-looking thermal camera using an M5Stack ESP32-based computer module and an AMG8833 thermal sensor array module in a 3D-printed case that copies those you’d find on a commercial unit. The modular approach makes it a simple prospect for the constructor, the software can be found on GitHub, and the case files are hosted on Thingiverse. You’ll be finding warm and cold things on your bench in no time, as the video below shows.

Most of the thermal cameras we’ve seen have centred upon the FLIR Lepton module, but that’s a component that remains expensive. This project shows us that thermal cameras are a technology that is slowly becoming affordable, and that greater things are to come.

Continue reading “Who Said Thermal Cameras Weren’t Accessible To The Masses?”

Adding Optics To A Consumer Thermal Camera

[David Prutchi] writes in to tell us about his recent experiments with building lenses for thermal imaging cameras, which to his knowledge is a first (at least as far as DIY hardware is concerned). With his custom designed and built optics, he’s demonstrated the ability to not only zoom in on distant targets, but get up close and personal with small objects. He’s working with the Seek RevealPro, but the concept should work on hardware from other manufacturers as well.

In his detailed whitepaper, [David] starts by describing the types of lenses that are appropriate for thermal imaging. Glass doesn’t transmit the wavelengths that thermal camera is looking for, so the lenses need to be made of either germanium or zinc selenide. These aren’t exactly the kind of thing you can pick up at the local camera shop, and even small lenses made of these materials can cost hundreds of dollars. He suggests keeping an eye out on eBay for surplus optics you could pull them out of to keep costs down.

Creating the macro adapter is easy enough, you simply put a convex lens in front of the thermal camera. But telephoto is a bit more involved, and the rest of the whitepaper details the math and construction techniques used to assemble it the optics. [David] gives a complete bill of materials and cost breakdown for his telephoto converter, but prepare for a bout of sticker shock: the total cost with all new hardware is nearly $500 USD. The majority of that is for the special lenses though, so if you can score some on the second-hand market it can drop the cost significantly.

We’ve seen an impressive array of thermal camera hacks and projects recently, no doubt due to the falling prices of consumer-level imaging hardware. Given their utility as a diagnostic tool, a thermal camera might be something worth adding to your bag of tricks.

Thermal Camera Diagnoses Thermal Issue On A Sonoff Switch

No matter what your experience level with troubleshooting, there’s always at least a little apprehension when you have to start poking through a mains powered device. A little fear is a good thing; it keeps you focused. For some, though, the aversion to playing with high voltage is too much, which can cause problems when something fails. So what do you do when you’re reluctant to even open the case? Easy — diagnose the problem with an infrared camera.

[Bald Engineer]’s electrophobia started early, with some ill-advised experiments in transcutaneous conduction. So when his new Sonoff WiFi switch failed soon after deploying it to control a lamp in his studio, popping the top while it was powered up was out of the question. The piquant aroma of hot plastic was his first clue to the problem, so he whipped out his Flir One Thermal Camera and watched the device as it powered up. The GIF nearby shows that there was clearly a problem, with a bloom of heat quickly spreading out from the center of the unit. A few IR images of the top and bottom gave him some clues as to the culprits, but probing the board in those areas once power was removed revealed no obviously damaged components.

[Bald Engineer] hasn’t yet gotten to the bottom of this, but his current thinking is that the NCP1117 regulator might be bad, since it rapidly spikes to 115°C. Still, we think this is a nifty diagnostic technique to add to our toolkit, and a great excuse to buy an IR camera. Or, we could go with an open-source thermal camera instead.

[via Dangerous Prototypes]

Dead EBay Thermal Camera Is An Organ Donor

[Damien] wanted to build a thermal camera. He was dismayed about how much a microbolometer costs so he salvaged one from a dead FLIR he picked up on eBay for 75 pounds. That’s about $100, and less than half what a new sensor costs. He selected one that didn’t turn on, which he hoped meant the Lepton 3 160×120 pixel microbolometer would not be the reason the camera failed.

Once it arrived, he pulled the pricey module, connected it to a breakout board and a Raspberry Pi. His gamble paid off; it worked fine. That wasn’t the end of the project, though. He went on to make a portable, self-contained camera with a rechargeable battery and an LCD screen.

Continue reading “Dead EBay Thermal Camera Is An Organ Donor”

Using A Thermal Camera To Spot A Broken Wrist

Chemist and Biochemist [Thunderf00t] has shown us a really interesting video in which you can spot the wrist he broke 10 years ago using a thermal camera.

He was on an exercise bike while filming himself on a high-resolution thermal camera, As his body started to heat up he noticed that one hand was not dumping as much heat as the other. In fact one was dumping very little heat. Being a man of science he knew there must be some explanation for this. He eventually came to the conclusion that during a nasty wrist breaking incident about 10 years ago it must have affected the blood-flow to that hand, Which would go on to produce these type of results on a thermal camera while exercising.

Using thermal camera’s to spot fractures in the extremities is nothing new as it has the benefit of eliminating radiation exposure for patients, But it’s not as detailed as an X-ray or as cool as fluoroscopy and is only useful for bones near the surface of the skin.  It’s still great that you can visualize this for yourself and even after 10 years still notice a significant difference.

Continue reading “Using A Thermal Camera To Spot A Broken Wrist”

Best Product Entry: Pocket Thermal Camera

One of the entries in the Hackaday Prize Best Product competition is [x-labz]’s pocket thermal imager. It’s more than a prototype, it’s a design conceived to get out into the world and be used by many. Best Product entries are open until July 24th, and with a $30,000 cash prize on the line let’s take a look at some of the things that elevate a project to product status.

Thanks to recent advances in the state of thermal image sensors, a tool that gives you Predator vision is almost a necessity on the modern workbench. The pocket thermal imager will find drafts in your house during winter, will tell you how to cook a steak, figure out what part is shorting out in your latest electronics project, and will tell you how terrible the heated bed is on your 3D printer.

[x-labz]’s thermal camera is based around the FLIR Lepton image sensor, an 80×60 pixel thermal imaging sensor that’s good enough for most uses. This camera is soldered onto a PCB sandwich containing an Atmel SAMD21 microcontroller, full-color OLED display, SD card, and a battery management system.

What we’ve mentioned so far isn’t out of the ordinary for any other entry in the Hackaday Prize. Building something for the Best Product competition is different, though: a lot of thought has to go into the manufacturability and the fit and finish of this device. So far, everything’s looking great for [x-labz]’s camera. There’s a 3D printed case that looks like it could be easily translated into an injection-moldable shell and at least some of the parts of the user interface are unbelievably satisfying. We’re looking forward to seeing the full Bill of Materials and a business plan (a new requirement this year). That’s an area where many hardware designers lack experience; being able to study the examples from Best Product entries will be a welcomed resource.

There’s a world of difference between building a project and building a product, and the entire goal of the Best Product portion of the Hackaday Prize is to reward those people who go the extra mile as aspiring entrepreneurs and show us how that’s done. $50k in cash prizes are set aside for Best Product; $30,000 for the winner as we mentioned before, but there is also $1000 for each of the twenty entries that make it to the finals in this category in addition to some much deserved notoriety from Hackaday’s community of hardware aficionados and early adopters.