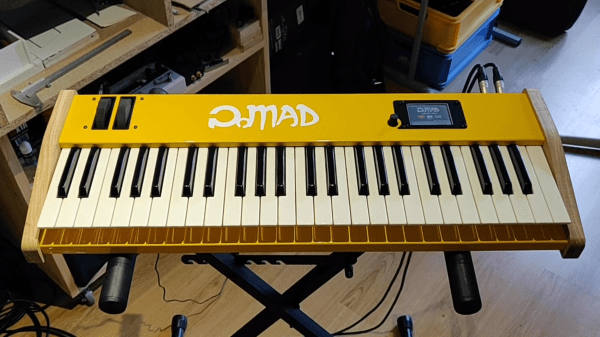
Forty Four Hackers And A Hatch: Progress Egress Takes Off

The 50th anniversary of the first Moon landing is rapidly approaching, and uber space-nerd Adam Savage is in the thick of the celebration of all the amazing feats of engineering that made humanity’s first steps out of the cradle possible. And in a grand and very hacker-friendly style, we might add, as his Project Egress aims to build a full-scale replica of the Apollo 11 Command Module Columbia’s hatch.

Continue reading “Forty Four Hackers And A Hatch: Progress Egress Takes Off”

Amiga In The MiST Gets Online With An ESP8266

While he couldn’t quite come up with the cash to buy one in their hayday, [Bruno Antunes] has always been fascinated with the Amiga. When PCs got fast enough he used emulators like UAE to get a taste of the experience, but it was never quite the same thing. Not until he found the MiST anyway, which uses an FPGA to implement several retro computers such as the Apple II, Atari, and of course his beloved Amiga.

The only downside for [Bruno] was that the MiST has no network interfaces. To get onto the Internet, he had to install an ESP8266 inside the device and spend some quality time tweaking various software settings to get everything talking to each other. The end result is a BBS hosted on an Amiga 1200, that’s running on an FPGA, that’s connected to WiFi via an ESP8266. What a time to be alive.

Adding the ESP8266 to the MiST was actually quite straightforward, as there’s an unpopulated serial port header right on the board. Though [Bruno] cautions this header has been removed as of version 1.4 of the device, so if you’re in the market for an FPGA retro box and might want to get it online at some point, that may be a detail to keep in mind. The ESP is running a firmware which implements Serial Line IP (SLIP); which allows you to use TCP/IP over a serial port, albeit very slowly.

The hardware implant went well enough, but unfortunately [Bruno] found the ESP8266 was unable to communicate through the thick metal case of the MiST. He enlisted his girlfriend to make a new papercraft enclosure for the MiST that the ESP could talk though, and it even has the added benefit of glowing thanks to the internal LEDs. We probably would have just got one of the ESP modules that includes an external antenna, but to each their own.

With the hardware taken care of, the rest of the considerable write-up details how he got the Amiga operating system to talk to the Internet through the SLIP connection. He goes over everything from setting the system time with NTP to getting a Telnet daemon installed. As you might expect, this involves installing a number of additional software packages, but [Bruno] is kind enough to provide links for everything you’ll need.

We’ve seen the ESP8266 used to get other retro computers onto the modern Internet before, but it’s usually through the use of an external device. This internal modification is very clean, and seems like a no-brainer for anyone who owns a MiST and a soldering iron.

Continue reading “Amiga In The MiST Gets Online With An ESP8266”

This MDF Sound Bar Sounds Great

Everyone should build a speaker cabinet at least once in their life, if only so they can realize how much thought goes into building a simple box. [John] of ibuildit.ca wanted a sound bar for his home theater setup, and that means building a sound bar. The result is beautiful, and a demonstration of how much you can do with just a router and a table saw.

[John] built this sound bar almost entirely out of MDF, which isn’t the best material but it works well enough for a speaker cab that’s meant to be mounted to a wall. The sides were constructed first, with a rabbet holding the front and back on. Both the woofer and tweeter are inset into the front, and a standard piece of plumbing pipe serves as the bass port. Slap a round over bit into the router and do some light sanding, and everything looks great with a coat of black paint.

As with any speaker enclosure, the design is effectively parametric, designed entirely around the drivers being used. In this case, [John] is using a spreadsheet named ‘Unibox’ that gives you all the formulas and graphs for designing a speaker enclosure.

With the box built and the speakers installed, the only matter left were a few aesthetic choices. [John] went with a standard black finish with a very nice wooden grille held onto the front with magnets. It’s a design that pops, but the true test of a speaker is how it sounds. That’s a bit hard to convey over the Internet, but [John] included a few sound samples at the end of the build video, available below.

Continue reading “This MDF Sound Bar Sounds Great”

PiTop, Makers Of Raspberry Pi Laptops, Release Something That’s Not A Laptop

The Raspberry Pi the closest thing to a modular laptop. That’s the idea behind the Pi-Top, a laptop with a Raspberry Pi as a brain. Need an upgrade? No problem, just get the latest Pi, they’re up to four now.

Now the people behind the Pi-Top are releasing what can best be described as a brick of computing. The Pi-Top 4 is a designed as ‘The Sony Walkman for Making’, in which the form factor becomes a building block of anything you can imagine and probably a lot of things you can’t. Inside is a Raspberry Pi 4, a small OLED display, and a few buttons. On the bottom is a detachable ‘foundation plate’ that allows the Pi-Top 4 to connect to sensors, LEDs, and switches. The idea of all this building is that the brick-shaped Pi-Top 4 becomes a building block in anything you can imagine, be that a drone, a humanoid robot, or a portable photo booth. All of this is powered by the Raspberry Pi 4, no slouch when it comes to computational power.

The Pi-Top 4 doesn’t have a release date or a price just yet, but the company says it will be offered on Kickstarter.

Continue reading “PiTop, Makers Of Raspberry Pi Laptops, Release Something That’s Not A Laptop”

Emulating A 6502 In ROM

The Gigatron TTL microcomputer is an exercise in alternative history. What if, by some bizarre anomaly of invention and technology, the 1970s was not the age of the microprocessor? What if we could have had fast, high density ROM and RAM in the late ’70s, but the ability to put a microprocessor in silicon was beyond our comprehension? Obviously we would figure out a way to compute with this, and the Gigatron is the answer. It’s a computer from that era that’s designed with a CPU that’s entirely made of microcode.

While the Gigatron is a popular product in the world of weird electronics kits, the creator, [Marcel van Kervinck], is going beyond what anyone thought possible. Now the Gigatron is emulating a 6502 processor, the same CPU found in the Apple II and almost every other retrocomputer that isn’t running a Z80.

There’s a thread over on the Gigatron forums for this. Although it’s still very early in development, the Gigatron can now run 6502 machine code,  and in doing so the Gigatron is now the only dual-core computer without a CPU. All of the addressing modes have been implemented, along with half of the instructions and most of the status flags. All of this interacts with the Gigatron’s existing video subsystem, and all code can switch in between the Gigatron’s virtual CPU and 6502 code with just a few instructions.

This opens the door to a wide variety of software that’s already written. MicroChess is possible, as is MS Basic. This is great; the biggest downside of the Gigatron is that there was no existing code for the machine when it was first designed. That changed when the Gigatron got a C compiler, but now somehow we’ve got a logic chip implementation of a 6502 in far fewer chips than are found in an Apple II. It’s not fast ( about 1/8th the speed of a 1 MHz 6502), but in the video below you can see a munching squares demo.

Continue reading “Emulating A 6502 In ROM”

RC Trike Handles Great With Rear Steering

Small robotics builds with three wheels are plentiful. The most typical configuration is to have the two front wheels drive and turn the vehicle in a skid-steer configuration. The third wheel is often a simple caster. However, this isn’t the only way to go, and [markus.purtz] has put together a build that does things differently.

The build is a small, radio-controlled FPV trike. Instead of the usual skid-steer setup, the rear wheel is mounted on a pair of horizontal bearings which allows it to pivot left and right. A servo is used to control the rear wheel position, with a pair of tie rod ends used to connect the horn to the rear steering assembly. It’s not the only unconventional design choice, either – magnets are used to affix the top plate to the vehicle chassis, rather than screws or clips. For video, the user can mount either a small dedicated FPV camera, or a GoPro with the included mount.

Without any code or control details posted, we can’t be 100% sure how it all works. However, from the video, it appears that both front wheels are being driven at the same speed, with steering handled solely by the rear wheel. This is apparent when driving on a smooth surface, where the vehicle can be seen to slide when turning. While it’s unlikely this setup has many advantages over a simpler differential steering build with a caster, it does show that rear steering can be effective on its own.

It’s a build that shows off the benefits of using proper bearings and mechanical parts in a design. With today’s online marketplaces, it’s never been easier to find what you need. Parts are on Thingiverse for those interested in replicating the design. Meanwhile little FPV bots remain popular, and we’re sure we’ll continue to see them coming in. Video after the break.

Continue reading “RC Trike Handles Great With Rear Steering”

This Arduino Is Feeding The Fishes

Fish are easy to keep as pets, requiring little more than regular feeding to keep them happy in the short-to-medium term. If you’re going on holiday, it can be nice to know that your pets are being taken care of, but finding someone to take on the chore can be hard. [Trevor_DIY] doesn’t need to worry about that, however – he’s built an automatic feeder to handle the job.

The build uses an Arduino Uno as the brains, with the only additional hardware required being a stepper motor and driver. The stepper motor drives a 3D printed wheel, with 14 slots – each one holding one meal for the fish. This allows the feeder to deliver two meals a day for a full week before requiring attention.

The feeder is configured to feed a breakfast meal, then a dinner meal 8 hours later, and then wait 16 hours before breakfast comes around again. Rather than use a real-time clock, this is simply handled with the Arduino’s built in delay function. While it isn’t super accurate, this should be close enough over a week to keep the fish alive. We’d be interested as to just how far it drifts over time.

Overall, it’s a quick and tidy way to keep the pets going without a lot of fuss. Pet feeders are a popular project, as they solve a common problem faced by owners the world over; this one can even handle wet cat food. Video after the break.

Continue reading “This Arduino Is Feeding The Fishes”