Building A Wind Power Generator In Your Backyard

For many environmental enthusiasts, horizontal-axis wind turbines (HAWTs) — the kind that look like windmills slowly spinning in the distance — are a pretty familiar sight. Unfortunately, there are quite a few caveats that make them harder to adopt despite the fact that harvesting renewable energy sources is more sustainable than relying on natural gas and fuels that can be depleted. Since they face in one axis, they need to be able to track the wind, or else trade off the ability to maximize energy output. In turbulent and gusty conditions, as well, HAWTs face accelerated fatigue when harvesting.

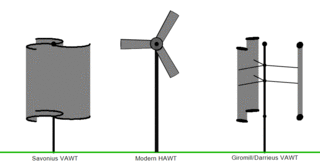
The development of the vertical-axis wind turbine (VAWT) solves several of these issues. In addition, the turbines are typically closer to the ground and the gearbox replacement is simpler and more efficient. Maintenance is more accessible due to the size of the turbines, so no heavy machinery is typically necessary to access crucial components on-site. In addition, the gearbox by nature of its operation takes on less fatigue and is able to function in turbulent winds, which reduces the rate of failure.

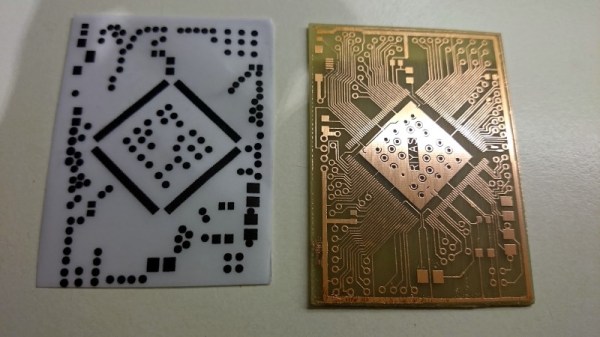
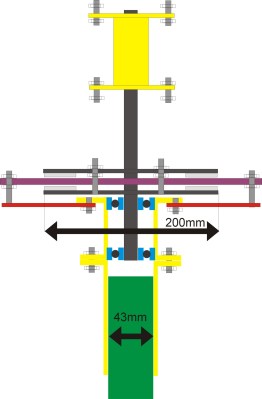
For a simple version of a VAWT that you can build yourself, [BlueFlower] has published several mechanical drawings that detail the layout of the design. The wind power generator uses 24 magnets, copper wire fashioned into coils, and a metal plate for the main generator. The coils are arranged in a circular formation on a static plate, while the magnets are equally spaced on a moving circular plate. As the magnets pass over coils, the flux induces a current, which increases as the plates spin faster.

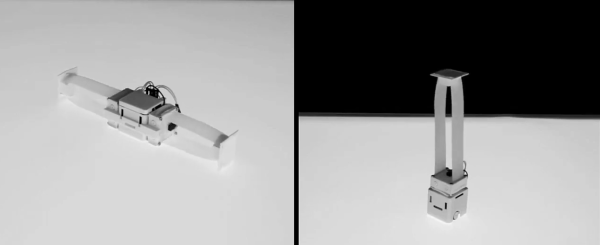
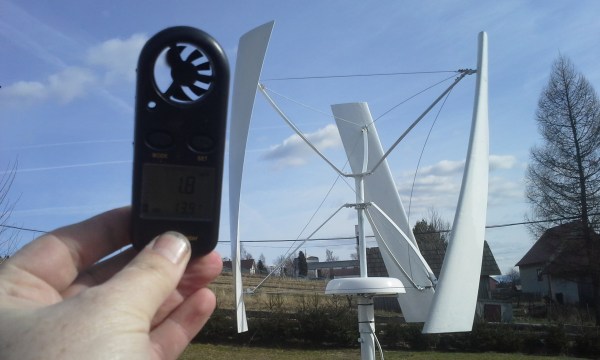
The blades of the generator are made from blue foam with a metal bar running through it for structure. Three of the blades are attached with triangular bars to a central rod, which also holds the spinning magnetic plate.

In [BlueFlower]’s initial trials using the VAWT for charging a battery they were able to generate a max power of 15W on boost mode and 30-70W when charging in PWM mode. Not bad for a home-made wind power generator!

There aren’t only pros to the design, however. While VAWTs may be cheaper, more mobile, and more resistant to wear and tear, there are some design features that prevent the generators from functioning as well as HAWTs at harvesting energy. The blades don’t produce torque at the same time, with some blades simply being pushed along. This produces more drag on the blades when they rotate, limiting the efficiency of the entire system. In addition, higher wind speeds are typically found at higher altitudes, so the VAWTs will perform better if installed on a towering structure. Vibration forces close to the ground can also wear out the bearings, resulting in more maintenance and costs.


Continue reading “Building A Wind Power Generator In Your Backyard”

This Home-Etched ARM Dev Board Is A Work Of Art

One of the step changes in electronic construction at our level over the last ten or fifteen years has been the availability of cheap high-quality printed circuit boards. What used to cost hundreds of dollars is now essentially an impulse buy, allowing the most intricate of devices to be easily worked with. Many of us have put away our etching baths for good, often with a sigh of relief.

We’re pleased that [Riyas] hasn’t though, because they’ve etched an STM32 dev board that if we didn’t know otherwise we’d swear had been produced professionally. It sports a 176-pin variant of an STM32F4 on a single-sided board, seemingly without the annoying extra copper or lack-of-copper that we remember from home etching. We applaud the etching skill that went into it, and we’ll ignore the one or two boards that didn’t go entirely to plan. A coat of green solder mask and some tinning, and it looks for all the world as though it might have emerged from a commercial plant. All the board files are available to download along with firmware samples should you wish to try making one yourself, though we won’t blame you for ordering it from a board house instead.

It’s always nice to see that single board computers are not the sole preserve of manufacturers. If the RC2014 Micro doesn’t isn’t quite your style, there’s always the Blueberry Pi which features a considerably higher penguin quotient.

How To Get Started With Fadecandy And LEDs

The internet is awash with millions of stunning LED projects, and for that, we are all very thankful. For those outside the hacker/maker matrix, it can be difficult to know how to approach such a build. Never fear, for [Amy Goodchild] has put together a beginner’s guide to building pretty glowables, using Fadecandy and Processing.

Fadecandy is a platform specifically designed to drive WS2812B LEDs for artistic purposes. This allows users to focus on the visual side of things without getting bogged down with the hassle of selecting the right microcontroller and choosing the applicable libraries. It works great in combination with Processing, a piece of software designed for coders experimenting with visual arts. Through a USB link, any graphics drawn by processing can be mapped to the LEDs attached to the Fadecandy controller.

[Amy] does a great job of explaining how to do everything required, from purchasing the right equipment, through wiring everything up, and then getting it all humming along with the correct software. If you’ve ever wanted to build a big flashy project with a ton of LEDs, this would be a great place to start.

We’ve seen Fadecandy put to good use before, too. Video after the break.

Continue reading “How To Get Started With Fadecandy And LEDs”

The Monotron, A Rusty Retrocomputer

For many people, a retrocomputer is a classic machine from the past lovingly brought back to working order. But for some, the idea of a retrocomputer is wider than that, encompassing modern hardware that delivers to feel like a device from the past.

The Monotron from [Jonathan Pallant] is one such computer. It’s definitely a retrocomputer such as you might have found in the 1980s, but it’s running on a much more modern Tiva-C TI Launchpad dev board sporting an ARM Cortex M4.

The platform has been created entirely in Rust, and emulates what would have been a rather desirable machine in the early 1980s. With an 800×600 pixel 8-colour VGA display interface, 32k of RAM, and mono 8-bit audio, it already has a few simple demos and games running upon it. [Jonathan Pallant] has given more than one talk on its design and capabilities, we’ve placed one of them as a video below the break. There is even a PCB available which adds all the ports as well as a micro SD card slot for program storage.

We like the Monotron, and we look forward to seeing it develop. It’s an exciting time for retrocomputig with projects such as the RC2014 Z80 machine and the Gigatron TTL RISC processor, but is there space for an emulated one such as this? We hope so.

Continue reading “The Monotron, A Rusty Retrocomputer”

Mt Everest Lamp Recreates The Famous Peak

Anyone who has travelled to distant mountain peaks has marvelled at the beauty of the natural, rugged terrain. [apoorvas15] is no different, and created a lamp that celebrated the awe of the largest mountain on earth.

When it comes to reproducing an accurate geometrical representation of the landscape, the easiest approach is to reach for some variety of CNC machinery. Here, a 3D printer is used to create a translucent shell replicating the mountain. A reverse shell is then laced on the bottom to create an effect akin to that of a reflection in a lake. The assembly was fitted with WS2812 LEDs run by an Arduino Nano, and suspended from a stainless steel frame for an attractive floating look.

It’s a great piece, one that would look suitably impressive on any desk or coffee table. The 3D printer has served many makers well when it comes to producing attractive home lighting. We’ve seen many great builds — from the 8-bit to the floral-inspired. Video after the break.

Continue reading “Mt Everest Lamp Recreates The Famous Peak”

Tiny Robots That Grow Taller (And Wider)

Sometimes one just needs an extra hand or six  around the workbench. Since you’re a hacker that should take the form of a tiny robot swarm that can physically display your sensor data, protect you against a dangerously hot caffeine fix and clean up once you’re done. [Ryo Suzuki] and [Clement Zheng] from the University of Colorado Boulder’s ATLAS Institute developed ShapeBots, small shape-shifting swarm robots that aim to do exactly that and more.

The robots each consist of a cube shaped body with 2 small drive wheels, onto which 1-4 linear actuator modules can attach in various positions. For control the robots’ relative positions are tracked using an overhead camera and is shown performing the tasks mentioned above and more.

To us the actuators are the interesting part, consisting of two spools of tape that can extend and retract like a tape measure. This does does lead us to wonder: why we haven’t seen any hacks using an old tape measure as a linear actuator? While you likely won’t be using it for high force applications, it’s possible to get some impressive long reach from a small from factor. This is exactly what the engineers behind the Lightsail 2 satellite used to deploy it’s massive space sail. Space the two coils some distance apart and you can even achieve full 2-axis motion.

You can also control your swarm using your favourite wifi chip or have them skitter around using vibration or 3D print some linear actuators.

Thanks for the tip [Qes]!

E3D Tool Changer Partially Reviewed

[Design Prototype Test] got a box in the mail. Inside? An E3D “tool changer and motion system.” Superficially, it looks like a 3D printer, but it is touted as a machine that can mount several different kinds of tools, including a 3D print head. In the video below, you can see the assembly of the heavy-looking machine.

In a world in which a cheap 3D printer costs way under $200, this machine is much sturdier and costs about $3,000 with all the pieces. [Design Prototype Test] is a bit put out by the price, but you have to wonder if they aren’t trying to allow for an eventual CNC head for which the extra-sturdy build could be an advantage. However, the use of motion belts makes that seem like a long shot.

Continue reading “E3D Tool Changer Partially Reviewed”