Next Week Is KiCon: Come For The Talks, Stay For The Parties

KiCad is the electronic design automation software that lives at the intersection of electronic design and open source software. It’s seen a huge push in development over the last few years which has grown the suite into a mountain of powerful tools. To help better navigate that mountain, the first ever KiCad conference, KiCon, is happening next week in Chicago and Hackaday is hosting one of the afterparties.

The two days of talks take place on April 26th and 27th covering a multitude of topics. KiCad’s project leader, Wayne Stambaugh, will discuss the state of the development effort. You’ll find talks on best practices for using the software as an individual and as a team, how to avoid common mistakes, and when you should actually try to use the auto-router. You can learn about automating your design process with programs that generate footprints, by connecting it through git, and through alternate user interfaces. KiCad has 3D modeling to make sure your boards will fit their intended enclosures and talks will cover generating models in FreeCAD and rendering designs in both Fusion360 and Blender. Dust off your dark arts with RF and microwave design tips as well as simulating KiCad circuits in SPICE. If you can do it in KiCad, you’ll learn about it at KiCon.

Of course there’s a ton of fun to be had as interesting hackers from all over the world come together in the Windy City. Hackaday’s own Anool Mahidharia and Kerry Scharfglass will be presenting talks, and Mike Szczys will be in the audience. We anticipate an excellent “lobby con” where the conversations away from the stages are as interesting as the formal talks. And of course there are afterparties!

  • Friday 4/26 Pumping Station: One, the popular Chicago hackerspace now celebrating its 10 year anniversary, is hosting an afterparty (details TBA)
  • Saturday 4/27: Hackaday is hosting an after party at Jefferson Tap from 6-8:30. We’re providing beverages and light food for all who attended the conference.

If you still don’t have a ticket to KiCon, you better get one right now. We’re told that you can count what’s left on two hands. Supplyframe (Hackaday’s parent company) is a sponsor of KiCon, and we have two extra tickets that came with that sponsorship. We like seeing a diverse community at these events and have saved these tickets for people from under-represented groups (such as for example women, LGBT+, and people of color) in the hardware world. Email us directly for the tickets, your information will remain confidential.

We’re looking forward to seeing everyone next week!

FabGL Has Everything You Need To Write Games For The ESP32

Typically, when one considers writing a video game, the platform is among the first decisions to be made. The PC can be an easy one to start with, and mobile development is fairly accessible too. Of course, you could always develop for a microcontroller platform instead. [Fabrizio Di Vittorio] has built the perfect set of tools to do just that with the ESP32, by the name of FabGL.

The library contains a laundry list of features that are perfect for developing games. There’s VGA output with up to 64 colors, PS/2 mouse and keyboard inputs, as well as a capable graphics library and game engine. It can even act as an ANSI/VT terminal if necessary.

[Fabrizio] has put the hardware through its paces, with a variety of benchmarks displaying impressive performance with simple balls, polygons and sprites. You could easily produce a 2D game in an early 90s style without running into any hardware limitations — though given the ESP32 clocks in at up to 240MHz, that’s somewhat to be expected.

It’s an impressive project (video after the break), and we’d love to see more games developed on the platform. Once you have a VGA connector wired in you should try out some ESP32 VGA hacks. And for those ESP8266 die hards there’s a game engine for that chip too!

Continue reading “FabGL Has Everything You Need To Write Games For The ESP32”

The Drones And Robots That Helped Save Notre Dame

In the era of social media, events such as the fire at Notre Dame cathedral are experienced by a global audience in real-time. From New York to Tokyo, millions of people were glued to their smartphones and computers, waiting for the latest update from media outlets and even individuals who were on the ground documenting the fearsome blaze. For twelve grueling hours, the fate of the 850 year old Parisian icon hung in the balance, and for a time it looked like the worst was inevitable.

The fires have been fully extinguished, the smoke has cleared, and in the light of day we now know that the heroic acts of the emergency response teams managed to avert complete disaster. While the damage to the cathedral is severe, the structure itself and much of the priceless art inside still remain. It’s far too early to know for sure how much the cleanup and repair of the cathedral will cost, but even the most optimistic of estimates are already in the hundreds of millions of dollars. With a structure this old, it’s likely that reconstruction will be slowed by the fact that construction techniques which have become antiquated in the intervening centuries will need to be revisited by conservators. But the people of France will not be deterred, and President Emmanuel Macron has already vowed his country will rebuild the cathedral within five years.

It’s impossible to overstate the importance of the men and women who risked their lives to save one of France’s most beloved monuments. They deserve all the praise from a grateful nation, and indeed, world. But fighting side by side with them were cutting-edge pieces of technology, some of which were pushed into service at a moments notice. These machines helped guide the firefighters in their battle with the inferno, and stood in when the risk to human life was too great. At the end of the day, it was man and not machine that triumphed over nature’s fury; but without the help of modern technology the toll could have been far higher.

Continue reading “The Drones And Robots That Helped Save Notre Dame”

A Mostly 3D Printed Speaker

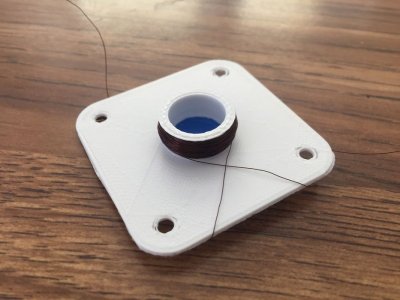
The common magnetic loudspeaker is, fundamentally, a fairly simple machine. A static magnetic field is generated by a permanent magnet, and a membrane is mechanically connected to a coil. When a varying electrical current is passed through the coil, this causes the coil to move due to the magnetic field, vibrating the membrane and producing sound. [Mattosx] put this theory into practice with a simple 3D-printed speaker.

It’s not the first 3D-printed speaker we’ve ever seen, but it’s one of the cutest. The main body of the speaker is rectangular, and has a cavity in which three neodymium magnets are placed. The vibrating membrane is then printed separately, including an integrated spindle upon which the coil is wound. The assembly is held together with some socket-head cap screws which complement the pleasantly modern look.

The device does a good job delivering the bleeps when hooked up to an Arduino, and we could see this basic design serving well in all manner of charming 3D-printed builds. Video after the break.

Continue reading “A Mostly 3D Printed Speaker”

Making Crampons Out Of Scrap

If you’re living somewhere that gets icy in the wintertime, you know the sidewalk can be perilous. Slipping on ice hurts like hell if you’re lucky, and can cause serious injuries if you’re not. Naturally, if you’re trying to get down to the hackerspace when it’s cold out, you’ll look for solutions. [masterbuilder] wanted to be surefooted in the coming season, and decided to build a set of crampons.

Scrap inner tubes are the key here, providing a source of hardy rubber for the build. The tubes are cut into a series of bands which are woven together in a hexagonal pattern. Steel nuts are included at various points to help grip the ice in inclement conditions. A larger strip of rubber is then used to form a band which secures the entire assembly to the wearer’s shoes.

It’s a design that’s intended for ease of use over outright performance. The crampons can be quickly attached and removed, and using nuts instead of spikes reduces the chance of damaging the floor if you forget to take them off immediately when returning home. If you’ve got any handy winter hacks of your own, you know where to send ’em.

The Pocket Emulator That Will Fit In Your Pocket

If there’s one thing tiny Linux Systems on a Chip are good for, it’s emulation. There’s nothing like pulling out an emulation console on the bus for a quick game of old-school NES Tetris, or beating the next level in Super Mario World. This is the smallest emulation console ever. It’ll fit in your pocket, and it has a bright, vibrant screen. It doesn’t get better than this.

This project is an improvement on two projects, both of which are some of the top projects on hackaday.io, the best place on the Internet for hacks and builds. The Keymu is (or was, at the time) the smallest emulation console ever, built as a miniaturized version of the Game Boy Advance SP in a 3D printed case and powered by the Intel Edison. The Edison doesn’t exist anymore, so after that development moved over to the Funkey Zero, a tiny console built around the AllWinner V3s chip and a 240×240 display. Both of these are tiny, tiny consoles, but as silicon gets better there’s always better options, so it’s back to the drawing board.

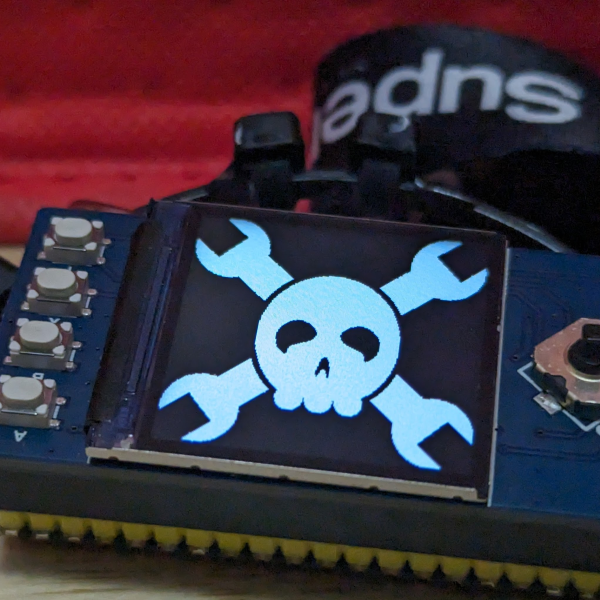
The design of the Funkey Project is again built on the AllWinner V3S SoC with 64MB of DDR2 DRAM. There’s a 1.5″ display with 240×240 resolution, and of course this retro emulation console retains the classic and very useful clamshell form factor of the famous Game Boy Advance SP.

Already, this project is in the works and it’s shaping up to be one of the most popular projects on hackaday.io ever. Everyone wants an emulation console, and this is the smallest and tiniest one yet. Whether or not this project can carry through to production is another matter entirely, but we’re eager to find out.

This Air Compressor Sucks

Vacuum is something most people learn about as children, when they’re first tasked with chores around the home. The humble vacuum cleaner is a useful home appliance and a great way to lose an eye as an inquisitive child. When it comes to common workshop tasks though, they can be a bit of a let down. When you need to pull some serious vacuum, you might wanna turn to something a little more serious – like this converted air compressor.

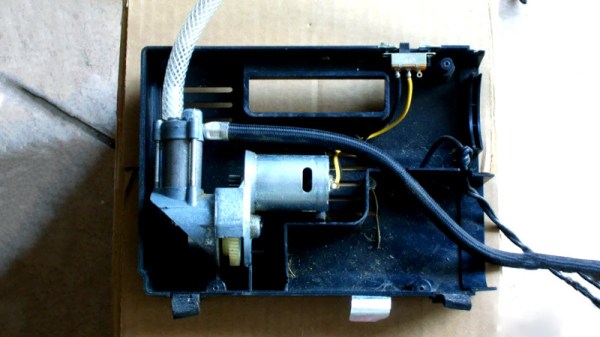
The build starts with a cheap off-the-shelf tyre inflator. These can be had for under $20 from the right places. They’re prone to overheating if used at too high a duty cycle, but with care they can last just long enough to be useful. The hack consists of fitting a hose barb connection over the intake of the pump, to allow air to be sucked out of whatever you’re trying to pull vacuum on. This is achieved with some hardware store parts and a healthy dose of JB-Weld. It’s then a simple matter of removing the valve adapter on the tyre inflator’s outlet so it can flow freely.

You might also consider adding a check valve, but overall this remains a cheap and easy way to get an electric vacuum pump for your workshop up and running. If that’s not quite your jam, you can always go down the handpump route instead.