Imagine for a moment that you are back in 2015. Radio Shack are going to the wall, Heathkit returning from the dead, and Arduino spliting into two warring Arduinos. And someone has announced a tiny Linux-capable microprocessor board called the C.H.I.P. that will cost only $9. We all thought that last one was pretty cool at the time, didn’t we. Then Heathkit’s new products turned out to be pretty lacklustre, the warring Arduinos merged, and the C.H.I.P? The consensus was that $9 was a tall order for that BoM at the time, and then the Raspberry Pi people gave away a free Pi Zero on the front of a magazine before selling it for £5 ($6.30). It didn’t matter that the C.H.I.P. had a nifty all-in-one screen and keyboard combo called the Pocket C.H.I.P. which was a significant object of desire, the venture lasted for three years before finally hitting the rocks last year.
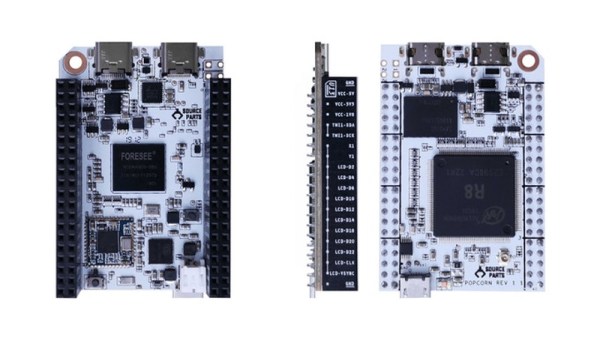
Now the C.H.I.P. is back, in a crowdfunding campaign fronted by one of its original engineers. It’s been renamed the Popcorn, and it comes in three variants. The Original Popcorn is a compatible C.H.I.P. by any other name, while the Super Popcorn is a much higher-spec machine that comes in quad and octacore variants with AmiLogic SoCs. All three have 32 GB eMMC on board, and the specs are suitably impressive but not out of the ordinary for a 2019 single board computer. Prices are $49, $69, and $89, which takes away that optimistic $9 price tag that made the original so attractive. There is no Pocket C.H.I.P. which is a shame because for us that was the only reason to buy a C.H.I.P, but there is a companion board called the Stovetop that provides Raspberry Pi-style desktop and display interfaces.
We wish them well, but it’s difficult to escape the conclusion that the hardware world has moved on and the window of opportunity has closed. It’s not that these boards are not good ones, more that they now join a plethora of others which come a lot closer to the low price of the original. Still, there remains a C.H.I.P. community still out there, so perhaps that will save the day for them.
We interviewed the C.H.I.P.’s creators back in 2015, and marked its passing last year.
Thanks [Rose] for the tip.