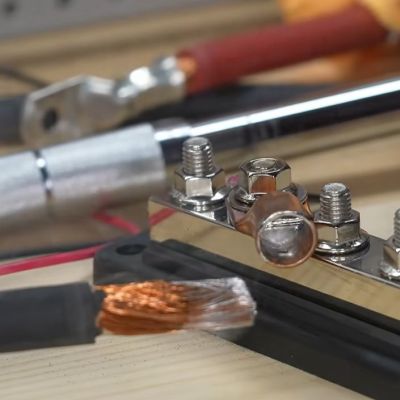
[Electronic Wizard] explains that understanding how to apply the 74HC595 can increase the quality of your projects and also help keep the demands on the number of pins from your microcontroller to manageable levels. If you’re interested in the gory details you can find a PDF datasheet for the 74HC595 such as this one from Texas Instruments.
[Electronic Wizard] explains further that a shift register is like a small one byte memory where its data is directly available on its eight output pins, no input address required. When you pulse the clock pin (CLK) each bit in the eight bit memory shifts right one bit, making room for a new bit on the left. The bits that fall off the right hand side can daisy chain into another 74HC595 going out on pin 9 and coming in on pin 14.
To connect the miniature world of integrated circuits like a CPU with the outside world, a number of physical connections have to be made. Although this may seem straightforward, these I/O pads form a major risk to the chip’s functioning and integrity, in the form of electrostatic discharge (ESD), a type of short-circuit called a latch-up and metastability through factors like noise. Shielding the delicate ASIC from the cruel outside world is the task of the I/O circuitry, with [Ken Shirriff] recently taking an in-depth look at this circuity in Intel’s 386 CPU.
The 386 die, zooming in on some of the bond pad circuits. (Credit: Ken Shirriff)
The 386 has a total of 141 of these I/O pads, each connected to a pin on the packaging with a delicate golden bond wire. ESD is on the top of the list of potential risks, as a surge of high voltage can literally blow a hole in the circuitry. The protective circuit for this can be seen in the above die shot, with its clamping diodes, current-limiting resistor and a third diode.
Latch-up is the second major issue, caused by the inadvertent creation of parasitic structures underneath the P- and NMOS transistors. These parasitic transistors are normally inactive, but if activated they can cause latch-up which best case causes a momentary failure, but worst case melts a part of the chip due to high currents.
To prevent I/O pads from triggering latch-up, the 386 implements ‘guard rings’ that should block unwanted current flow. Finally there is metastability, which as the name suggests isn’t necessarily harmful, but can seriously mess with the operation of the chip which expects clean binary signals. On the 386 two flip-flops per I/O pad are used to mostly resolve this.
Although the 386’s 1985-era circuitry was very chonky by today’s standards, it was still no match for these external influences, making it clear just how important these protective measures are for today’s ASICs with much smaller feature sizes.
As much as I love Linux, there are always one or two apps that I simply have to run under Windows for whatever reason. Sure, you can use wine, Crossover Office, or run Windows in a virtual machine, but it’s clunky, and I’m always fiddling with it to get it working right. But I recently came across something that — when used improperly — makes life pretty easy. Instead of virtualizing Windows or emulating it, I threw hardware at it, and it works surprisingly well.
Once Upon a Time
First, a story. Someone gave me a Surface Laptop 2 that was apparently dead. It wouldn’t charge, and you can’t remove the keyboard without power. Actually, you can with a paper clip, and I suggested pulling it to see if the screen would charge by itself. They said they had already bought a new computer, so they didn’t care.
Unsurprisingly, once I popped the keyboard off, the computer charged and was fine. You just have to replace the keyboard or use another one. Or use it as a tablet, which it is set up for anyway. But I have plenty of laptops and computers of every description. What was I going to do with this nice but keyboardless computer? Continue reading “Linux Fu: Windows Virtualization The Hard(ware) Way”→
Back in the day, an FM bug was a handy way to make someone’s annoying radio go away, particularly if it could be induced to feedback. But these days you’re far more likely to hear somebody’s Bluetooth device blasting than you are an unruly FM radio.
To combat this aural menace, [Tixlegeek] is here with a jammer for the 2.4 GHz spectrum to make annoying Bluetooth devices go silent. While it’s not entirely effective, it’s still of interest for its unashamed jankiness. Besides, you really shouldn’t be using one of these anyway, so it doesn’t really matter how well it works.
Raiding the AliExpress 2.4 GHz parts bin, there’s a set of NRF24L01+ modules that jump around all over the band, a couple of extremely sketchy-looking power amplifiers, and a pair of Yagi antennas. It’s not even remotely legal, and we particularly like the sentence “After running the numbers, I realized it would be cheaper and far more effective to just throw a rock at [the Bluetooth speaker]“. If there’s a lesson here, perhaps it is that effective jamming comes in disrupting the information flow rather than drowning it out.
This project may be illegal, but unlike some others we think it (probably) won’t kill you.
Given all the incredible technology developed or improved during the Apollo program, it’s impossible to pick out just one piece of hardware that made humanity’s first crewed landing on another celestial body possible. But if you had to make a list of the top ten most important pieces of gear stacked on top of the Saturn V back in 1969, the fuel cell would have to place pretty high up there.
Apollo fuel cell. Credit: James Humphreys
Smaller and lighter than batteries of the era, each of the three alkaline fuel cells (AFCs) used in the Apollo Service Module could produce up to 2,300 watts of power when fed liquid hydrogen and liquid oxygen, the latter of which the spacecraft needed to bring along anyway for its life support system. The best part was, as a byproduct of the reaction, the fuel cells produced drinkable water.
The AFC was about as perfectly suited to human spaceflight as you could get, so when NASA was designing the Space Shuttle a few years later, it’s no surprise that they decided to make them the vehicle’s primary electrical power source. While each Orbiter did have backup batteries for emergency purposes, the fuel cells were responsible for powering the vehicle from a few minutes before launch all the way to landing. There was no Plan B. If an issue came up with the fuel cells, the mission would be cut short and the crew would head back home — an event that actually did happen a few times during the Shuttle’s 30 year career.
This might seem like an incredible amount of faith for NASA to put into such a new technology, but in reality, fuel cells weren’t really all that new even then. The space agency first tested their suitability for crewed spacecraft during the later Gemini missions in 1965, and Francis Thomas Bacon developed the core technology all the way back in 1932.
So one has to ask…if fuel cell technology is nearly 100 years old, and was reliable and capable enough to send astronauts to the Moon back in 1960s, why don’t we see them used more today?
The basic principle works like this: an extra-viscous photopolymer resin sits inside a rotating, transparent cylinder. As the cylinder rotates, UV light is projected into the resin in patterns carefully calculated to reproduce the object being printed. There are no layers, no FEP, and no stop-and-start; it’s just one long exposure from what is effectively an object-generating video, and it does not take long at all. You can probably guess that the photo above shows a Benchy being created, though unfortunately, we’re not told how long it took to produce.
Don’t expect to grab a bottle of SLA resin to get started: not only do you need higher viscosity, but also higher UV transmission than you get from an SLA resin to make this trick work. Like regular resin prints, the resolution can be astounding, and this technique even allows you to embed objects into the print.
This handle was printed directly onto the shaft of the screwdriver.
It’s not a new idea. Not only have we covered CAL before, we even covered it being tested in zero-G. Floating in viscous resin means the part couldn’t care less about the local gravity field. What’s interesting here is that this hardware is at tabletop scale, and looks very much like something an enterprising hacker might put together.
Indeed, the team at Berkeley have announced their intention to open-source this machine, and are seeking to collaborate with the community on their Discord server. Hopefully we’ll see something more formally “open” in the future, as it’s something we’d love to dig deeper into — and maybe even build for ourselves.
At this point the question is no longer whether a new device runs DOOM, but rather how well. In the case of Anker’s Prime Charging Station it turns out that it’s actually not too terrible at controlling the game, as [Aaron Christophel] demonstrates. Unlike the similar Anker power bank product with BLE and a big display that we previously covered, this device has quite the capable hardware inside.
Playing a quick game of DOOM while waiting for charging to finish. (Credit: Aaron Christophel, YouTube)
According to [Aaron], inside this charging station you’ll not only find an ESP32-C3 for Bluetooth Low Energy (BLE) duty, but also a 150 MHz Synwit SWM341RET7 (Chinese datasheet) ARM-based MCU along with 16 MB of external flash and 8 MB of external RAM. Both of these are directly mapped into the MCU’s memory space. The front display has a 200×480 pixel resolution.
This Synwit MCU is a bit of a curiosity, as it uses ARM China’s Star-MC1 architecture for which most of the information is in Chinese, though it’s clear that it implements the ARMv8-M profile. It can also be programmed the typical way, which is what [Aaron] did to get DOOM on it, with the clicky encoder on the side of the charging station being the sole control input.
As can be seen in the video it makes for a somewhat awkward playing experience, but far more usable than one might expect, even if running full-screen proved to be a bit too much for the hardware.