One of my first jobs as a freshly minted graduate engineer involved the maintenance of a set of analogue chart recorders. They were museum pieces by the early 1990s: a motorized roll of graph paper across which a pen would traverse in proportion to the voltage on the input terminals. Inside was a simple servo, with a differential amplifier comparing the feedback via a potentiometer from the mechanism with the amplified input.
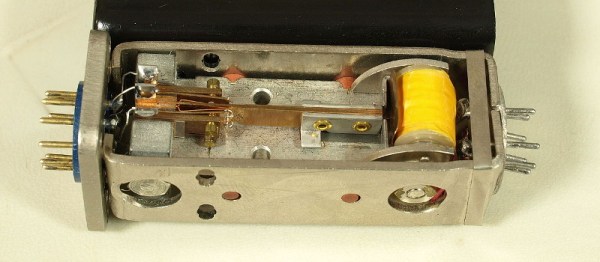
The recorders dated from the early 1960s, and internally their electronics were from the germanium transistor era: many Mullard OC-series devices, black-painted glass tubes with a red dot, and, unexpectedly, a large electromagnet connected to the 50 Hz AC supply with a reed switch through its middle, something completely new to an overconfident youngster who thought she knew everything.
What I’d stumbled upon was a chopper amplifier, a slightly ungainly and long superseded solution to the problem of DC amplification from the days before ubiquitous integrated circuit op-amps. We have become so used to DC amplifiers that just work, that we have forgotten that there was a time when such devices were an impossibility. The close matching of properties between devices on the same wafer allowed integrated circuit op-amps to achieve stable DC amplification in a way that the best attempts at the same circuits with discrete transistors had failed, but before they happened some desperate measures were called for. Continue reading “Chopper And Chopper-Stabilised Amplifiers, What Are They All About Then?”