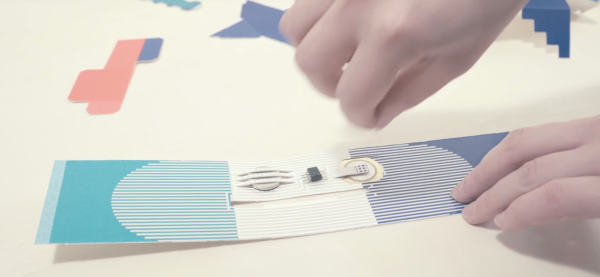
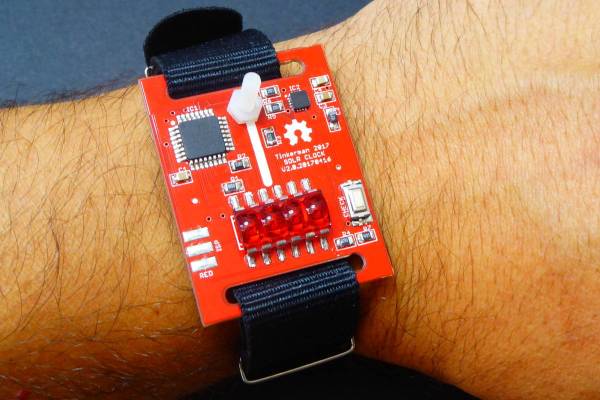
Upgrading RAM On A Nexus 5X

A screenshot of the status screen indicating the phone has detected the extended RAM.

A denizen of the venerable XDA forums reports that it is possible to upgrade the RAM of the Nexus 5X from 2GB to 4GB.  Having suffered the dreaded bootloop, [Cathair2906] decided to send their phone off to China for repair. The technician advised that since reflow of the CPU was necessary anyway, it makes sense to upgrade the RAM as well. This is due to the RAM actually being fitted directly on top of the CPU, a method amusingly known as Package on Package (SFW).

Upgrading RAM in the average computer is a relatively trivial task. Pop the case open, and you slide the new sticks into the extra slots. It’s not the same case for smartphones and tablets — in the endless quest for the slimmest form factor, all parts are permanently soldered. In addition, every device is essentially bespoke hardware; there’s no single overarching hardware standard for RAM in portable devices. You could find yourself searching high and low for the right chips, and if you do track them down, the minimum order quantity may very well be in the thousands.

Unless, of course, you had access to the Shenzhen markets where it’s possible to buy sample quantities of almost anything. Given access to the right parts, and the ability to solder BGA packages, it’s a simple enough job to swap a bigger RAM chip on top of the CPU during the repair.

It’s the sort of thing that’s trivial in Shenzhen, and almost mind-bogglingly impossible in the West. The price of the repair? About $60 USD. [Cathair2906] was even nice enough to share the address of the shop that did the work.

We’ve seen similar antics before – like this Nexus 5 storage upgrade to 64GB.

[via XDA Developers, thanks to Jack for the tip!]

Enabling Ethernet On The ESP32

The ESP32 is the latest and greatest wonderchip from Espressif. It’s a 32-bit, dual-core chip with WiFi, Bluetooth, and tons of peripherals such as CAN and Ethernet. For most of these peripherals, Espressif already has a few bits of example code, but [Frank Sautter] didn’t like the Ethernet implementation. The ‘stock’ code calls for a TLK110 Ethernet PHY, but that’s an expensive chip when bought in quantity one. A better chip would be the LAN8720, so [Frank] built a board to enable Ethernet on the ESP32 with this chip.

The ESP32 only needs a few components to wire it into an Ethernet network. Just a few resistors, capacitors, and an RJ45 jack will take care of most of the work, but because he’s taking the Ethernet ‘shield’ route, he needs to add his own Ethernet PHY. The Waveshare LAN8720 is the chip for this, but there’s an issue with the pin configuration of the ESP32. GPIO0 on the ESP32 has two functions — the first is pulling it low during startup for serial programming, and the second is the clock input for the EMAC function block. Some bit of circuitry must be devised to allow for both conditions to enable Ethernet on the ESP32.

[Frank]’s solution is to add a few pull-up and pull-down resistors to a breakout board, and use an unused GPIO pin to switch GPIO0 high during startup, but allows a crystal to grab it a bit later. It’s a hack, certainly, but it does allow for some much cheaper chips to be used to give the ESP32 Ethernet.

Photochromic Eggs: Not For Breakfast

Photochromic paint is pretty nifty – under exposure to light of the right wavelength, it’ll change colour. This gives it all kinds of applications for temporary displays.  [Jiri Zemanek] decided to apply photochromic paint to an egg, utilising it to create stroboscopic patterns with the help of a laser.

Patterns for the egg are generated in MATLAB. A Discovery STM32 board acts as a controller, looking after the laser scanner and a stepper motor which rotates the egg. A phototransistor is used to sync the position of the laser and the egg as it rotates.

The photochromic paint used in this project is activated by UV light. To energize the paint, [Jiri] harvested a violet laser from a Blu-ray player, fitting it to a scanning assembly from a laser printer. Instead of scanning the laser across an imaging drum, it is instead scanned vertically on a rotating egg. Patterns can then be drawn on the egg, which fade over time as the paint gives up its stored energy.

[Jiri] exploits this by writing a variety of patterns onto the egg, which then animate in a manner similar to a zoetrope – when visualised under strobing light, the patterns appear to move. There are also a few holiday messages shown for Easter, making the egg all the more appropriate as a billboard.

If you like the idea of drawing on eggs but are put off by their non-uniform geometry, check out the Egg-bot. Video below the break.

Continue reading “Photochromic Eggs: Not For Breakfast”

Hackaday Prize Entry: GoKart Tank

There is probably something in all of us that yearns to drive a tank, just once. Most of us will probably never fulfill it, in fact, unless we work in farming or construction we’re unlikely to even drive a skid-steer vehicle of any type. But that doesn’t mean we can’t have a go at building one ourselves, as [samern] is doing with his Hackaday Prize entry.

The GoKart Tank has a chequered history, as a build that started as an internal combustion go-kart, became a half-track, and eventually the fully tracked electric vehicle we see today. It has a wooden frame, two 1KW electric scooter motors, and tracks made from IntraLox modular plastic industrial conveyor belt parts. This last choice is particularly interesting because even though it isn’t designed for use as a track it is designed for heavy-duty service and could offer a component source for other tracked vehicle projects.

What you see is a working tracked vehicle, but it is not without problems. The electric motors are only powerful enough to move a child, so there are plans to return it to internal combustion power. We can, however, see it working, as you can watch the video of it we’ve put below the break.

Continue reading “Hackaday Prize Entry: GoKart Tank”

Networking: Pin The Tail On The Headless Raspberry Pi

Eager to get deeper into robotics after dipping my toe in the water with my BB-8 droid, I purchased a Raspberry Pi 3 Model B. The first step was to connect to it. But while it has built-in 802.11n wireless, I at first didn’t have a wireless access point, though I eventually did get one. That meant I went through different ways of finding it and connecting to it with my desktop computer. Surely there are others seeking to do the same so let’s take a look at the secret incantations used to connect a Pi to a computer directly, and indirectly.

Continue reading “Networking: Pin The Tail On The Headless Raspberry Pi”

Up, Up, Up: $2k More Seed Funding For Projects That Matter

Getting a project off the ground often means an up-front investment in parts. Hackaday is upping our efforts to smooth out that obstacle for those who want to Build Something That Matters. Seed funding for the 2017 Hackaday Prize is simple, enter your design plans, share it far and wide so that a lot of people will show their admiration with a ‘like’ on the project page. You get a dollar for each like to help jump-start the build phase.

This year has started off like a rocket. Last week we passed the $4000 seed funding limit even though there’s still two weeks left in the Design Your Concept round. We’re raising the pot to a total of $6000. That means there’s more up for grabs. Enter your project now. If you’ve already done that, polish up your presentation and show it around to your friends and on social media. You’ll get a dollar for every like up to $200 max, or until we undoubtedly reach the new limit once again. Don’t delay, it’s time to Build Something that Matters!

Electronifying A Horror Fraught Hydraulic Press

[Josh] is replacing the springs in his car’s suspension. He wanted to know the travel rates of these springs, but apparently, this is a closely guarded trade secret in the industry. One company did manage to publish the spring rates, but they weren’t believable. Instead of taking this company’s word, [Josh] built a spring tester.

The theory behind a spring tester is pretty simple: apply a force to a spring, measure it, then measure how much the spring has traveled. Or compress a spring an inch or so, measure the force, and compress it some more. Either gets you the same data.

This spring tester is built around a Harbor Freight hydraulic press. Yes, the spring is completely captured and won’t fly out of the jig if you look at it wrong. The bottom of the press contains a few load cells, fed into an ATmega8, which displays a value on an LCD. For the displacement measurement, a ruler taped to the side of the press will suffice, but [Josh] used a Mitutoyo linear scale.

What were the results of these tests? You shouldn’t buy coils from Bilstein if these results are correct. The rates for these springs were off by 70%. Other springs fared better and won’t bind when going over bigger bumps. That’s great work, and an excellent application of Horror Fraught gear.