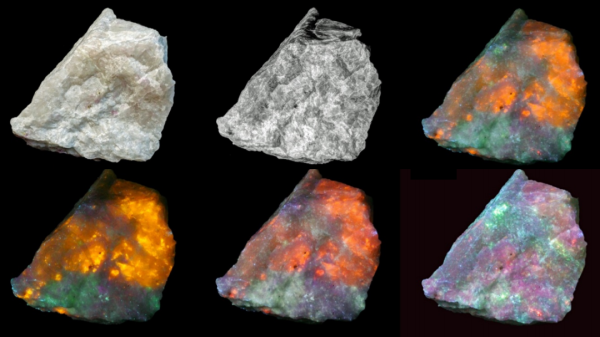
Materials To Know: Tooling And Modeling Board

I was in a fit of nerd glee the first time I used tooling board. I’d used MDF for similar purposes before, and I doubt I ever will again. Called Renshape, Precision Board Plus, or that green stuff people on another continent buy; it’s all the same extremely useful, unfortunately expensive, stuff. It’s hard to pin down exactly what tooling board is. Most of the blends are proprietary. It is usually a very dense polyurethane foam, sometimes by itself, sometimes with a fine fiber filler.

What makes tooling board so good is its absolute dimensional stability and its general apathy to normal temperature swings. (It even comes in versions that can go through curing ovens.) It is impervious to humidity. It has good surface finish, and it machines perfectly without wearing down tools.

The CNC set-up I coaxed precision molds out of.

This stuff is really tops as far as machining goes. I got super precise molds out of a very basic CNC machine at the LVL1 hackerspace. Renshape cut easily at a high spindle speed, and put practically no load on the machine. Climb and conventional milling were equal load wise with no immediately perceivable difference in finish. In the end I hit the precision range of my cheap digital calipers: +-.005mm, when the temperature is right, the battery is a charged, and the planets align.

I like to do resin casting when I get serious about a part. If you are making a master mold, there’s nothing better than tooling board. I’ve used both Renshape 460 and Precision Board Plus. Both impart a very light matte pattern, equivalent to a light bead blast on an injection mold. There’s no finishing required, though I mistakenly bought Renshape 440 at first and had to sand it a little to get the finish I wanted.

Tooling board is great for masters in metal casting, and is often used in the industry for just that, especially if quick and accurate prototypes are needed. It’s also tough enough to last through a few rounds of metal stamping in the home shop.

If you are doing lay-up for carbon fiber, fiberglass, or leather, this is also a very good choice. It will be unaffected by the chemicals, heat, and vacuum you may use in the process. It is tough enough hold alignment pins for proper set-up without premature ovaling. It is also a very good choice for vacuum forming.

Tooling board is, unsurprisingly, really good for tooling. It’s a great material for soft-jaws, alignment fixtures, and assembly fixtures, especially if you are doing delicate precision assemblies.

If you’re made of money, tooling board can be used for models, signs and props. It sands, shapes, and files extremely well. It bonds well to a lot of substances. It also takes paint very well with none of the absorption properties of wood or MDF. Most professional model shops will use it.
2015-11-05-10.34.01The one big flaw of tooling board is its price — this stuff is expensive. There’s no good DIY version that I’ve scrounged up so far. If you’re making a mold master, a fixture, or anything where you need tooling board’s properties and you are likely to get a few uses out of the board, then it’s probably worth it. Also, be careful of sellers selling plain “Renshape” it is probably going to be the lower grade Renshape 440 and not the more expensive Renshape 460 (or equivalent), where you start to really see the surface finish advantage of the material.

Tooling board is an industrial material. Typically you can call up a supplier and tell them what you’d like to do with it and they will be able to help. If you are making tools for carbon fiber quadcopter frame lay-up, let them know and they’ll have a formulation for that. If you are resin casting, there’s a formulation that gives superior surface finish.

It’s a pretty common material in the industrial scene, but I don’t see it a lot on the hobby scene. This is almost certainly due to its cost, as well as a shortage of small quantity re-sellers. (If someone starts selling assorted sizes on eBay for a reasonable price you have at least one buyer in me.) However, after using it in the niches it is designed for, I really don’t use anything else. I used to hack MDF to fit, but MDF is awful to paint, has no dimensional stability, and dulls tools really fast.

Are you a fan of tooling board? Have a good source? If you have anything to add, let us know in the comments.

Tindie Opens A Flea Market For Tools, Components, And Other Gear

We like to pop into electronics flea markets and swap meets at every chance we get. Last month [Brian] made it to the ham swap meet at Northrup Grumman held in Redondo Beach. I had a great time a couple of years back at the Electronics Flea Market held at De Anza College. Physical proximity to one of these nearly-mythical events is, unfortunately, required. If only the Internet offered a solution to this problem…

The fact that you’re reading Hackaday puts you into one of three categories: you wish you had a lot more tools, you’re on the way to a well-stocked workshop, or you’re trying to pass on your shop surplus to someone who will love it like you do. There’s now a perfect solution for the buy-upgrade-horde cycle we all inevitably fall into: the Tindie Flea Market. If you use something to make hardware, this is going to be the place to buy or sell it.

tindie-flea-market-thumbHas that starter scope been collecting dust since you picked up not one, but two better models? We know you can’t part with it unless you know it’s not going to be thrown out, and this is the chance to find not just a good home, but an owner that will use and cherish it. This goes for all kinds of great tools. After all, how do you find someone to take that pick and place off of your hands?

At launch, the Tindie Flea Market categories will include Adapters and Cables, Audio and Video, Batteries and Power, Bulk Components, Equipment, Fasteners, RC, and Small Tools. Maybe I’ll finally be able to find a home for that tube of power transistors I ordered years ago in the wrong package — and maybe even that long tape of EEPROM that I ordered in 1.8v instead of 3.3v. Time to start my listings and keep good stuff out of the landfill. Yet another great reason we were so happy to welcome Tindie to the Hackaday family.

The Dark Arts: SQL Injection And Secure Passwords

As the year of 2005 was drawing to a close, a website known as Myspace was basking in popularity. With millions of users, the site was the most popular social networking site in the world. It was unique in that it let users use HTML code to customize their Myspace page. Most of us, c’mon…admit it….had a Myspace page. The coding part was fun! But not everything was changeable with code. You could only upload up to 12 images and the Relationship Status drop-down menu only had a few options to choose from. These limitations did not sit well with [Samy Kamkar], a 19 year old hacker out of Los Angeles.

sql_03
Source

It didn’t take [Samy] long to figure out how to trick the site to let him upload more images and change his relationship status to a customized “in a hot relationship”. After hoodwinking the Myspace site with some simple hacks, he realized he could do just about anything he wanted to with it. And this is where things get interesting. It took just over a week to develop a script that would force people who visited his page to add him as a friend. But that wasn’t enough. He then programmed the script to copy itself onto the visitor’s page. [Samy] had developed a self-propagating worm.

The script went live as [Samy] went to bed. He woke up the next morning with 200 friends requests. An hour later the number had doubled. [Samy] got worried and sent an anonymous email to the webmaster warning of the worm. It was ignored. By 1:30PM that day, he had over 6,000 friends request. And like any good hacker worth his weight in floppy drives, his sense of humor had him program the script to also add his name to each visitor’s Heroes List. This angered many people, who deleted him from their page, only to get reinfected moments later when they visited another (infected) page.

[Samy’s] script was raging out of control.  As the evening closed in, his friends count had reached 919,664. It would top the 1 million mark just before Myspace took their servers offline to figure out what was going on. Two hours later, the site was back up. [Samy’s] profile page had been deleted.

[Samy] had used a technique known as cross-site scripting (XSS) to pull off his hack. We’ll touch on XSS in a later article. For now, we’re going to stick to the basics – proper passwords and SQL Injection.

Continue reading “The Dark Arts: SQL Injection And Secure Passwords”

Mein Enigma

The World War II German Enigma encoding machine is something of an icon in engineering circles not just for its mechanical ingenuity but for the work of the wartime staff at Bletchley Park in decoding its messages. Without it we would not have had Colossus, the first programmable digital electronic computer, and subsequent technological developments might have taken a slower pace towards what we take for granted today.

Sadly for the Enigma enthusiast though, real machines are now few and far between. Our grandparents’ generation saw to that through the chaos and bombing of the fight across Europe. If you want to handle one you will have to either have an outrageous amount of money, work for a museum, or maybe for the GCHQ archivist.

This has not stopped our community building Enigma replicas, and the latest one to come to our attention here at Hackaday shows some promise. [lpaseen]’s meinEnigma is an electronic Enigma driven by an Arduino Nano, with rotary encoders to represent the Enigma rotors and multi-segment alphanumeric displays standing in for the lighted letters in the original. It supports all the different variations of rotors from the original in software, has a physical plugboard, and a serial port over USB through which all machine functions can be controlled. The machine as it stands is a fully working prototype, the plan is that a final machine will resemble the original as closely as possible.

All the code used in the project can be found on GitHub, along with [lpaseen]’s Arduino library for the Holtek HT16K33 keyboard/display chip used to handle those tasks.

We’ve featured a few Enigma machines on Hackaday over the years. One was built into a wristwatch, another into a hacked child’s toy, but the closest in aim to [lpaseen]’s offering is this rather attractive replica also driven by an Arduino. It is also worth mentioning that should your travels ever take you to Buckinghamshire you can visit the Bletchley Park Museum and neighboring  National Museum of Computing, to get the Enigma and Colossus story from the source.

Does The World Need An FPGA Arduino?

What would you get it you mashed up an FPGA and an Arduino? An FPGA development board with far too few output pins? Or a board in the form-factor of Arduino that’s impossible to program?

Fortunately, the ICEZUM Alhambra looks like it’s avoided these pitfalls, at least for the most part. It’s based on the Lattice iCE40 FPGA, which we’ve covered previously a number of times because of its cheap development boards and open-source development flow. Indeed, we were wondering what the BQ folks were up to when they were working on an easy-to-use GUI for the FPGA family. Now we know — it’s the support software for an FPGA “Arduino”.

Icezum-rev1-1607-img1-peq_thumbnail

The Alhambra board itself looks to be Arduino-compatible, with the horrible gap between the rows on the left-hand-side and all, so it will work with your existing shields. But they’ve also doubled them with pinheaders in a more hacker-friendly layout: SVG — signal, voltage, ground. This is great for attaching small, powered sensors using a three-wire cable like the one that you use for servos. (Hackaday.io has two Arduino clones using SVG pinouts: in SMT and DIP formats.)

The iCE40 FPGA has 144 pins, so you’re probably asking yourself where they all end up, and frankly, so are we. There are eight user LEDs on the board, plus the 28 I/O pins that end in pinheaders. That leaves around a hundred potential I/Os unaccounted-for. One of the main attractions of FPGAs in our book is the tremendous availability of fast I/Os. Still, it’s more I/O than you get on a plain-vanilla Arduino, so we’re not complaining too loudly. Sometimes simplicity is a virtue. Everything’s up on GitHub, but not yet ported to KiCad, so you can tweak the hardware if you’ve got a copy of Altium.

We’ve been seeing FPGA projects popping up all over, and with the open-source toolchains making them more accessible, we wonder if they will get mainstreamed; the lure of reconfigurable hardware is just so strong. Putting an FPGA into an Arduino-compatible form-factor and backing it with an open GUI is an interesting idea. This project is clearly in its very early stages, but we can’t wait to see how it shakes out. If anyone gets their hands on these boards, let us know, OK?

Thanks [RS] for the tip!

Retrotechtacular: 100 Watts 120 Volts

If you read our recent feature about the Tal-y-Llyn Railway, the world’s first preserved line, you may have taken a while to watch the short film about the railway in the early 1950s. It was the work of an American film maker, [Carson “Kit” Davidson].

His other work includes some films that might be of interest to Hackaday readers, including one filmed in 1977: “100 Watts 120 Volts”. In it, he follows the manufacture of Duro-Test 100-watt light bulbs through all the stages of their assembly as neck, filament and envelope are brought together in strangely beautiful twentieth century production machinery.

Continue reading “Retrotechtacular: 100 Watts 120 Volts”

Turn A Free Flashlight Into LED Strips

Harbor Freight is always trying to sweeten the deal by throwing in a free flashlight, or a multimeter with a CAT III rating so poorly-met it might as well be a hand grenade. We usually donate the meters to our local hackerspace, but the flashlights tend to accumulate around the shop. Aside from borrowing the occasional magnet, we’ve not found a good use for them till now.

[Ben Brandt] realized that a ultra-low cost board such as the one likely to be in a free flashlight is probably going to contain a very easily hackable single-sided board. Which is exactly the case here. Once the plastic casing is removed it’s only a quick trip to the saw until you have four fresh mini LED strips.

[Ben] uses his hacked loot to build a neat little, “Thanks For Watching,” sign. We can picture lots of places these could fit in the occasional project, and the work to break these up into parts is less than making equivalent boards with any proto technique. We love his wooden battery compartment. Video after the break.

Continue reading “Turn A Free Flashlight Into LED Strips”