Make A Super Cute LiDAR Measurement Module

This ultra-cute tiny LiDAR rangefinder project by [gokux] can be thought of as a love letter to the incredible resources and components hobbyists and hackers of all types have access to nowadays. In fact, it all stemmed from coming across a miniscule half-inch 64×32 OLED display module that was simply too slick to pass up.
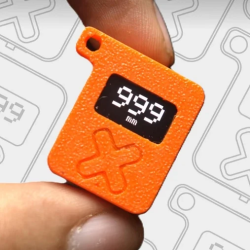
USB connector for charging on the bottom, hole for distance sensor out the top.

To use it, one simply powers it on and the display will read out the distance in millimeters. The VL53L0X time-of-flight sensor inside works by sending out a laser pulse and measuring how long it takes for the pulse to bounce back. We hope you’re curious about what such a sensor looks like on the inside, because here’s a nifty teardown of these fantastic devices. The device can technically measure distances of up to 2 m, but [gokux] says accuracy drops off after 1 m.

The main components besides the OLED display and VL53L0X sensor are an ESP32-C3 board (which handily integrates battery charging circuitry), 3D-printed enclosure, tiny rechargeable battery, and power switch. The whole thing is under one cubic inch. Not bad, and it even makes a passable keychain. Parts list, code, and 3D model files, including STEP format, are all available if you’d like to spend an afternoon making your own.

A stack of PCB business cards that can play Snake on an 8x8 LED matrix.

2024 Business Card Challenge: Snakes On A Business Card

Once [Lambert the Maker] saw the Arduboy, he knew the thing was ripe for remixing into a business card with an 8×8 LED matrix instead of an OLED screen. [Lambert] already has a PCB business card for work, but it looks like it doesn’t do anything. So this Snake-playing card is for their personal information.

The brains of this operation is an STM32F0, which required a bit of finesse when it came to programming the LEDs. According to the datasheet, the max current through a given GPIO pin is 30 mA. The LEDs are running at 20 mA through the limiting resistor, so the code only turns on one LED at a time and makes sure the previous one is off first. The whole screen is updated every 125 ms, and persistence of vision takes care of making the animation look right.

In the short videos after the break, you’ll see a preview followed by brief videos on versions one and two. The prototype was built in 2020, when the board house only offered green PCBs with their assembly service. Fast forward to 2024, when the board house is now offering colors other than green.

Version two is actually thinner than a credit card, and features tiny buttons instead of cap-sense pads for input. [Lambert] also added a floating ADC pin that acts as a random number generator, placing the apple in a new location every time the game is powered on.

Continue reading “2024 Business Card Challenge: Snakes On A Business Card”

A screenshot of the release page, showing the headline and a crop of the release notes

MicroPython 1.23 Brings Custom USB Devices, OpenAMP, Much More

MicroPython is a wonderful Python interpreter that runs on many higher-end microcontrollers, from ESP8266 to STM32 to the RP2040. MicroPython lets you build devices quickly, and its latest release, 1.23, brings a number of improvements you should be aware of.

The first one is custom USB device support, and it’s a big one. Do you want to build HID devices, or play with MIDI, or do multiple serial streams with help of PIO? Now MicroPython lets you easily create USB devices on a variety of levels, from friendly wrappers for creating HID or MIDI devices, to low-level hooks to let you define your own USB descriptors, with user-friendly libraries to help all the way through. Currently, SAMD and RP2040 ports are supported in this part of code, but you can expect more in the future.

Hooray to 10 years of MicroPython!

There’s more – support for OpenAMP, an inter-core communication protocol, has received a ton of improvements for systems where MicroPython reigns supreme on some of the CPU cores but also communicates with different systems on other cores. A number of improvements have made their way through the codebase, highlighting things we didn’t know MicroPython could do – for instance, did you know that there’s a WebAssembly port in the interpreter, letting you run MicroPython in your browser?

Well, it’s got a significant overhaul in this release, so there’s no better time to check it out than now! Library structure has been refactored to improve CPython compatibility, the RP2040 port receives a 10% performance boost thanks to core improvements, and touches upon areas like PIO and SPI interfaces.

We applaud all contributors involved on this release. MicroPython is now a decade old as of May 3rd, and it keeps trucking on, having firmly earned its place in the hacker ecosystem. If you’ve been playing with MicroPython, remember that there are multiple IDEs, graphics libraries, and you can bring your C code with you!

Assembled FPC PCB panels of the project

Give Your Thinkpad X1 Nano An Internal USB Port

How hard could it be to add an extra USB port inside your laptop? As [Joshua Stein] shows, it can be decently hard, but you will have fun along the way. His journey involves a Thinkpad X1 Nano, and his tech setup means it’d be most comfortable for him to have a USB port inside its case, for a Logitech mouse’s USB receiver. It wasn’t smooth sailing all throughout, but the end result is no doubt beautifully executed.

M.2 B-key, A-key and E-key slots have USB 2.0 available on them – you’d think that’s perfect for such a receiver, and there’s even plug and play adapters for this on places like eBay. Unfortunately, none of these, as Lenovo implements wireless card whitelists to this day. Tinkering with the whitelist on [Joshua]’s laptop resulted in BIOS digital signature check failures, and the USB-connected fingerprint reader was ultimately chosen as the most viable path.

Initially, he’s tested the fingerprint reader with an FPC breakout, having the USB connection work – many a hacker would stop here, pulling a few bodge wires from the breakout. [Joshua], however, raised the bar, creating a flexible PCB that would pull the fingerprint connector signals to a spot in the case where the USB receiver could fit neatly, with a 5 V step-up on the board, too.

[Joshua] tops it off by showing a 3D-printed spacer that goes into now-vacant spot where the fingerprint reader used to be. This mod is not open-source as far as we can see, but it’s definitely an inspiration. Want to put even more USB devices inside your laptop? Perhaps a tiny USB hub would help, in line with the EEE PC mods that aimed to stuff the tiny laptop with the largest amount of USB devices possible.

Why Your Old Phone Sounded The Way It Did

The mobile phone may be sweeping away the traditional wired phone, but that doesn’t change the fascinating history and technology of the older device. At [This Museum Is Not Obsolete] they have a fully functional mechanical telephone exchange as one of their exhibits, and they’ve published a video examining the various sounds it’s capable of making.

When a voice synthesiser was the stuff of science fiction, exchange status couldn’t be communicated by anything but a set of different tones. If you’ve ever encountered a mechanical exchange you’ll recognise the harsh-sounding low-frequency dial tone, and the various sets of beeps denoting different call status. These were produced with a set of oscillators being switched in and out by shaped cams, and the bank of these on their exchange is most of the subject of this video. The common ones such as the engaged tone and the dial tone are explained, but also some we’d never heard such as the one signifying the exchange as out of capacity.

We may never own a mechanical exchange of our own, but we’re glad that someone does and is sharing it with us. You can see the video below the break.

Continue reading “Why Your Old Phone Sounded The Way It Did”

Hands-On With The Electromagnetic Field 2024 Badge

With every large event in our circles comes a badge, and Electromagnetic Field 2024 is no exception. We’ve told you about the Tildagon when it was announced, it’s a hexagonal badge designed with provision for user-created “Hexpansions”, which can be picked up at future camps. The idea of this badge is to make something with a lifetime beyond the one camp, and we’re interested to have received our badge. It’s unusual for a hacker camp badge in that it costs a little extra rather than just coming with the ticket. Continue reading “Hands-On With The Electromagnetic Field 2024 Badge”

Use That One Port For High-Speed FPGA Data Export

There’s a good few options for exporting data out of FPGAs, like Ethernet, USB2, or USB3. Many FPGAs have a HDMI (or rather, sparkling DVI) port as well, and [Steve Markgraf] brings us the hsdaoh project — High-Speed Data Acquisition Over HDMI, using USB3 capture cards based on the Macrosilicon MS2130 chipset to get the data from the FPGA right to your PC.

Current FPGA-side implementation is designed for Sipeed Tang chips and the GOWIN toolchain, but it should be portable to an open-source toolchain in the future. Make sure you’re using a USB3 capture card with a MS2130 chipset, load the test code into your FPGA, run the userspace capture side, and you’re ready to add this interface to your FPGA project! It’s well worth it, too – during testing, [Steve] has got data transfer speeds up to 180 MB/s, without the USB3 complexity.

As a test, [Steve] shows us an RX-only SDR project using this interface, with respectable amounts of bandwidth. The presentation goes a fair bit into the low-level details of the protocol, from HDMI fundamentals, to manipulating the MS2130 registers in a way that disables all video conversion; do watch the recording, or at least skim the slides! Oh, and if you don’t own a capture card yet, you really should, as it makes for a wonderful Raspberry Pi hacking companion in times of need.