Tiny Orrery Keeps The Planets In Their Places

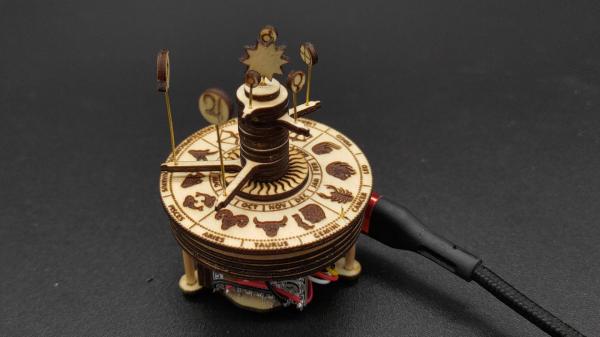
[Frans] claims to have made the world’s smallest wooden orrery. We won’t take a position on that — such things are best left up to the good folks at Guinness. But given that the whole thing is seriously in danger of being dwarfed by a USB-C connector, we’d say he’s got a pretty good shot at that record.

The key to keeping this planetarium so petite while making it largely out of wood is to eschew the complex gear trains that usually bring the Music of the Spheres to life in such devices. The layered base of the orrery, with pieces cut from a sheet of basswood using a laser cutter, contains a single tiny stepper motor and just two gears. A zodiac disc sits atop the base and is the only driven element in the orrery; every other celestial body moves thanks to a pin set into the zodiac disc. An ESP32 C3 contacts a NASA feed once a day to get the relative positions of the planets and uses the zodiac disk to arrange everything nicely for the day. The video below shows the “Planet Spinner” in action.

We love the look of this project; the burnt edges and lightly smoked surface of the laser-cut wooden parts look fantastic, and the contrast with the brass wires is striking. We’ve seen an orrery or two around here, executed in everything from solid brass to Lego, but this one really tickled our fancy. Continue reading “Tiny Orrery Keeps The Planets In Their Places”

Miniature Concrete Hoover Dam Is Tiny Engineering Done Right

Growing up, we got to play with all kinds of things in miniature. Cars, horses, little LEGO houses, the lot. What we didn’t get is a serious education with miniature-sized dams. This recreation of the glorious Hoover Dam from the [Creative Construction Channel] could change all that for the next generation.

The build starts with the excavation of a two-foot long curve in a replica riverbed. A cardboard base is installed in the ditch, and used as a base for vertical steel wires. Next, the arch of the dam is roughed out with more steel wires installed horizontally to create a basic structure. The cardboard is then be removed from the riverbed, with the steel structure remaining. It’s finally time to pour real concrete, with a foundation followed by the main pour into foam formwork. The dam is also given 3D printed outlets that can be opened to allow water to pass through — complete with small gear motors to control them. The structure even gets a little roadway on top for good measure.

The finished product is quite impressive, and even more so when the outlets open up to spill water through. Such a project would be great fun for high school science students, or even engineering undergrads. Who doesn’t want to play with a miniature scale dam, after all? Bonus points if you build an entire LEGO city downstream, only to see it destroyed in a flood.

Continue reading “Miniature Concrete Hoover Dam Is Tiny Engineering Done Right”

Tinkercad Gets A Move On

Going to the movies is an experience. But how popular do you think they’d be if you went in, bought your popcorn, picked your seat, and the curtain would rise on a large still photograph? Probably not a great business model. If a picture is worth 1,000 words, then a video is worth at least a million, and that’s why we thought it was awesome that Tinkercad now has a physics simulator built right in.

Look for this icon on the top right toolbar.

It all starts with your 3D model or models, of course. Then there’s an apple icon. (Like Newton, not like Steve Jobs.) Once you click it, you are in simulation mode. You can select objects and make them fixed or movable. You can change the material of each part, too, which varies its friction, density, and mass. There is a play button at the bottom. Press it, and you’ll see what happens. You can also share and you have the option of making an MP4 video like the ones below.

We, of course, couldn’t resist. We started with a half-sphere and made it larger. We also rotated it so the flat side was up. We then made a copy that would become the inside of our bowl. Using the ruler tool, we shaved about 2 mm off the length and width (X and Y) of the inner sphere. We also moved it 2 mm up without changing the size.

Using the alignment tools, you can then center the inner piece in the X and Y axis. Change the inner color to a hole and group the objects. This forms a simple bowl shape. Then we moved the workplane to a random part of the inner surface of our bowl and dropped a sphere. Nothing complicated.

Continue reading “Tinkercad Gets A Move On”

Hackaday Podcast 211: Pocket Sundial, Origami Llama, PCB Spacemouse

This week, Editor-in-Chief Elliot Williams and Contributor Emeritus Kristina Panos chewed the fat about the coolest hacks of the previous week. But first, a bit of news — our Low Power Challenge fizzled out this week, and boy did we have a lot of entries at the last minute. We love to see it though, and we’re going to get judging ASAP.

Don’t forget, this weekend is Hackaday Berlin! Livestreaming for this one may be iffy, but we’ll have the talks up for you eventually, so don’t fret too much if you can’t make it in the flesh this time.

Kristina definitely got What’s That Sound this week, but her answer will of course be bleeped out. Then it’s on to the hacks, beginning with a 6-DoF controller that does everything in interesting ways and a printed shredder that eats like a goat. From there we cover bolt dispensers, coffee grinders with Bluetooth weighing, camera calibration, and a $50 pen plotter that’s definitely a hack. Finally, we discuss the virtues of physicality when it comes to SIM cards and recorded music.

Check out the links below if you want to follow along, and as always, tell us what you think about this episode in  the comments!

And/or download it and listen offline.

Continue reading “Hackaday Podcast 211: Pocket Sundial, Origami Llama, PCB Spacemouse”

PCB Makes 7 Segment Displays

Of course, there’s nothing unusual about using 7-segment displays, especially in a clock. However, [Edison Science Corner] didn’t buy displays. Instead, he fabricated them from a PCB using 0805 LEDs for the segments. You can see the resulting clock project in the video below.

While the idea is good, we might have been tempted to use a pair of LEDs for each segment or used a diffuser to blur the LEDs. The bare look is nice, but it can make reading some numerals slightly confusing.

Continue reading “PCB Makes 7 Segment Displays”

An electromechanical clock based on sliding frames

Watch Time Slide By With This Electromechanical Clock

Back in the 18th century, clockmakers were held in high esteem, as turning pieces of metal and wire into working timepieces must have seemed like magic at the time. The advent of mass production made their profession largely obsolete, but today there are several hardware hackers whom you could consider modern heirs of the craft. [Hans Andersson] is one of them, and has made a name for himself with an impressive portfolio of electromechanical clocks. His latest work, called the Time Slider, is every bit as captivating as his previous work.

The insides of the TIme Slider clockThe mechanical display is almost entirely made of 3D printed components. Four flat pieces of red PLA form a basic 88:88 indicator, onto which the correct time is displayed by sliding frames that black out certain pixels. Those frames are moved up and down by a rack-and-pinion system driven by stepper motors. Evertyhing is controlled by an Arduino Mega, acoompanied by a DS3231 RTC and eight ULN2003-based stepper motor drivers.

[Hans] wrote a detailed assembly guide to go along with the STL files and Arduino code, so it should be easy make your own Time Slider if you have a decent supply of PLA filament. The display takes about ten seconds to update, but the process has certain hypnotic quality to it, helped by the mechanical whirring of the stepper motors in the background. Especially the hourly change of three or four digits at once is mesmerizing, as you can see in the video embedded below.

Time Slider is the latest in [Hans]’s long line of mechanical clocks, which includes the Time Twister series that evolved from a clever Lego-based design to a neat 3D-printed model. The rack-and-pinion system can also be used to make a compact linear clock.

Continue reading “Watch Time Slide By With This Electromechanical Clock”

The Last Meccano Factory Is To Close. Will We Miss It?

If we were to talk to engineers about the childhood toys which most inspired them, it’s likely that the older among them would mention either Meccano or Erector Set. These similar construction toys using metal components originated independently around the turn of the 20th century in both Britain and America, and eventually became part of the same company.

They were a staple of toy shops through the middle of the century, but have steadily declined in popularity over the past few decades. Now news has emerged that the last dedicated Meccano factory, in Calais, France, is to close. The products will still be made, but in other factories alongside other toys. It’s not the end for Meccano or Erector Set, but it’s clear that they are both toys whose time may have passed.

It’s fair to say that the possibilities of those perforated metal sheets and myriad nuts and bolts might seem a little limited for the 2020s child, but it opens the age-old question of what remains to interest young minds in engineering or technology. The obvious answer to that question comes in the form of Lego, evidently so much more fun can be had with plastic bricks.

Did you have Meccano or Erector Set when you were a kid? If so what did you do with it? We’ve seen a few projects using it here over the years.

Header: Alf van Beem, CC0.