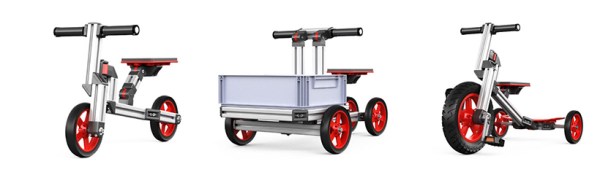
Commodore 64 Mods Make A Mobile Computer

Some Commodore C64 owners and enthusiasts keep tinkering with their precious units, adding upgrades all the time. [wpqrek]’s latest upgrade to his C64 makes it totally portable – he added DC-DC converters to allow it to run off external battery sources.

He installed two separate DC-DC converters – one for 5V and another for 9V inside the enclosure. He opted for these high-efficiency converters because he planned to use batteries to power the device and wanted to maximize the juice he was extracting. He wired up a barrel jack socket to accept a 12V input, and another XT60 socket where he could attach a LiPo battery. A common 2200mAh RC battery is enough to power his C64 for 1.5 hours. To ensure the LiPo battery doesn’t get fully discharged, he’s added a simple buzzer circuit that starts beeping at around 3.3V.

How does just adding an external battery help make it portable? Well, he’s already added a small LCD display and a couple of other mods, that we featured in an earlier post. These earlier mod’s didn’t make the unit truly portable. Adding the latest hack does. Check out the video after the break.

Continue reading “Commodore 64 Mods Make A Mobile Computer”

Forbidden Fruit Machine

Here’s another example of how today’s rapid-prototyping technologies are allowing Artists and Craftsmen to create interactive works of art rapidly and easily. [Kati Hyypa] and [Niklas Roy] teamed up to transform a classic painting in to an interactive exhibit. It’s a painting of Adam, Eve and the apple with a joystick attached. Spectators can control the destiny of the apple with the joystick and thus explore the painting.

The “Forbidden Fruit Machine” is based on a painting called “The Fall of Man” created by [Cornelis Cornelisz van Haarlem] in 1592. The painting depicts Eve and Adam in the Garden of Eden, being tempted by the serpent to eat the forbidden fruit. A public domain, high-resolution scan of the painting is available for download from the Rijksmuseum Amsterdam. Starting with that, the arms were edited out, and replaced with articulated versions (mounted on acrylic) driven by servos. The apple was mounted on a X-Y gantry driven by two stepper motors. These are driven by a motor shield, which is controlled by an Arduino Uno. The Uno also controls a Music Maker shield to play the various audio tracks and sound effects. Finally, an additional Arduino Pro-Mini is used to control the LED lighting effects via a Darlington driver and also connect to the end stops for the X-Y gantry. The joystick is connected to the analog ports of the Uno.

The LED’s give clues on where to move the apple using the joystick, and pressing the red button plays an appropriate audio or sound effect. For example, pressing the button over the cat at Eve and Adam’s feet elicits a heart-breaking meow, while letting Eve eat the apple results in an even more dramatic effect including a thunder storm.

The machine is open source with code posted on Github and 3d files on Youmagine. Watch a video after the break. The artist’s names may be familiar to some some readers – that’s because both have had their earlier work featured on our blog, for example this awesome ball sucking machine and another one too.

Continue reading “Forbidden Fruit Machine”

Arduino Vs Arduino: These Are Not The Droids…

We’ve been trying to not pick favorites in the Arduino controversy, or at least remain open-minded to both sides of the story. Some businesses, on the other hand, are clearly aligning themselves.  (Full text of e-mail below.)

Reader [Francisco Zabala], from cool robot-supplies store Acrobotic, got this e-mail from an Amazon distributor where he purchased some Arduinos “ages ago” and was angered enough at the brazen tone to drop us a line.


Thank you for our Arduino purchase from our Amazon.com store. We truly appreciate your business.

We are writing to let you know about an important change in Arduino products. The new website for Arduino is now officially Arduino.org. The old website (arduino.cc) should no longer be used.

All new Arduino hardware will be transitioned from the old Arduino.cc badging to the new Arduino.org badging. Please be aware that during this transition, you may receive Arduino hardware with either Arduino.cc or Arduino.org. Both are authentic Arduino-brand hardware.

If you use Arduino.org branded hardware on the old site, you may be presented with an error. Please use the new Arduino.org site.


We know for sure that Arduino SRL sent out a letter to distributors claiming that they were the real Arduino because they’ve been manufacturing the boards. Seeing a distributor recommend against the software at arduino.cc in such stark terms makes us wonder if there have been similar letters sent out concerning the IDE fork. Anyone have anything? Send us a tip if you do.

We find it a little ironic that when arduino.cc added the now-retracted popup that specifically targeted boards made by Smart Projects / Arduino SRL,  that they opened themselves up to this sort of counter-attack: if you see an error popup, just switch over to the “new official” IDE. Oops. Good that it’s gone now.

Finally, we’ve got to say that “the old website should no longer be used” is pretty rich: we’re hackers, we use whatever software / IDE we like, thank you very much! No matter how the legal battles end up, and no matter who tells you to use what codebase, the beauty of open source is that it’s up to you, and not them. Hack on, y’all!

Thanks, [Francisco] for the tip.

Tessel 2, A $35 Linux Computer That’s Truly Open Source

We’ve seen the first version of the Tessel a few years ago, and it’s still an interesting board: an ARM Cortex-M3 running at 180MHz, WiFi, 32 Megs of both Flash and RAM, and something that can be programmed entirely in JavaScript or Node.js. Since then, the company behind Tessel, Technical Machines, has started work on the Tessel 2, a board that’s continuing in the long tradition of taking chips from WiFi routers and making a dev board out of them. The Tessel 2 features a MediaTek MT7620 running Linux built on OpenWRT, Ethernet, 802.11bgn WiFi, an Atmel SAMD21 serving as a real-time I/O coprocessor, two USB ports, and everything can still be controlled through JavaScript, Node, with support for Rust and other languages in the works.

Instead of going the usual route and determining the future of Tessel through market research and the apparent pragmatism of whoever happens to be in charge, this week Technical Machines did something wonderful: the ownership and direction of the Tessel Project is now independent of Technical Machine. This makes Tessel a completely open source and community driven platform for I0T, robots, and whatever else would benefit from an open source community disconnected from hardware.

The Tessel project is completely disconnected from manufacturers, something the Arduino project has been struggling with for the last few years, unbeknownst to most of the founders for most of that time. It’s a boon for the open source community, and something that should see an incredible uptake in the next few months.

Making a Hackerspace Passport Stamp

How To Make A Hackerspace Passport Stamp

A few years ago, [Mitch Altman] from Noisebridge came up with the idea of a Hackerspace Passport. The idea behind it was not to hinder or monitor travels but to encourage visiting other hackerspaces. These passports can be purchased for just a few dollars or, in true open source fashion, be made with nothing more than a computer printer… the Hackerspace Passport design files are totally free and available here.

So next time you’re visiting a new hackerspace, bring your passport and get it stamped to document the trip…. and that brings us to the point of this post: The Stamp. At around $25, having a custom ink stamp made at an office supply store isn’t that much money, but buying a stamp is not as fun as making one! That is what we are going to do today; make a stamp… or more specifically, several stamps using different techniques. Then we’ll compare the performance of each method.

DESIGN

Since this is Hackaday, we will be making a Hackaday Logo stamp. Back a couple years ago we ran a contest asking folks to make unique things with the Hackaday logo. To make it easy for the entrants, the Hackaday logo was made available in SVG format. We’ll start with that, since it is available, and make a minor change by adding some lettering, as most soon-to-be stamp makers will probably want letters on their stamps too. This is easily done in the FOSS vector graphic editor software: Inkscape.

The stamp size is important. A Hackerspace Passport page has room for 4 stamps up to 41 x 47mm and we’ll try to keep our stamp within those limits.

Continue reading “How To Make A Hackerspace Passport Stamp”

See You At LayerOne This Weekend

LayerOne, the first level of security. [Brian Benchoff] and I are excited to take part in our first LayerOne conference this Saturday and Sunday in Monrovia California.

Anyone in the Los Angeles area this weekend needs to get out of whatever they have planned and try out this conference that has a soul. Get the idea of a mega-con out of your head and envision a concord of highly skilled and fascinating hackers gathering to talk all things computer security. Speakers will cover topics like researching 0day exploits, copying keys from pictures taken in public, ddos attacks, social engineering, and more.

It’s not just talks, there is a ton of hands-on at LayerOne as well. I plan to finally try my hand at lock picking. Yep, I’ve covered it multiple times and we’ve even had a session led by [Datagram] at the Hackaday 10th Anniversary but I’ve never found time to give it a roll. Of course electronics are my game and [Brian] and I will both be spending a fair amount of time in the hardware hacking village. We’ll have a bunch of dev boards along with us if you want to try out an architecture with which you’re unfamiliar. This year’s LayerOne badges are sponsored by Supplyframe; we’ll have something in store for the best badge hacks we see during the weekend.

See you there!

3D Printering: Maker Faire And Resin Printers

Of course Maker Faire was loaded up with 3D printers, but we’re no longer in the era of a 3D printer in every single booth. Filament-based printers are passé, but that doesn’t mean there’s no new technology to demonstrate. This year, it was stereolithography and other resin-based printers. Here’s the roundup of each and every one displayed at the faire, and the reason it’s still not prime time for resin-based printers.

predictaFormlabs

Of course the Formlabs Form 1+ was presented at the Bay Area Maker Faire. They were one of the first SLA printers on the market, and they’ve jumped through enough legal hoops to be able to call themselves the current kings of low-cost laser and resin printing. There were a few new companies and products at the Faire vying for the top spot, and this is where things get interesting.

The folks at Formlabs displayed the only functional print of all the resin-based 3D printing companies – a tiny, tiny Philco Predicta stuffed with an LCD displaying composite video. The display is covered by a 3D printed lens/window. That’s the closest you’re going to get to an optically clear 3D printed part at the Faire.

XYZPrinting Nobel

The Eiffel tower, an architectural model, and a Bratz doll, all printed on the XYZPrinting Nobel

XYZPrinting, the company famous for the $500 printer that follows the Gillette model: sell the printer cheap, sell expensive replacement filament cartridges, and laugh all the way to the bank. Resetting the DRM on the XYZPrinting Da Vinci printer is easy, the proprietary host software is done away with, and bricked devices are not. Time for a new market, huh?

Enter the XYZPrinting Nobel, a resin printer that uses lasers to solidify parts 25 microns at a time. The build volume is 125x125x200mm (5x5x7.9″), with an X and Y resolution of 300 microns. Everything prints out just as you would expect. As far as laser resin printers go, it’s incredibly cheap: $1500. It does, however, use XYZware, the proprietary toolchain forced upon Da Vinci users, although the Nobel is a stand-alone printer that can pull a .STL file from a USB drive and turn it into an object without a computer. There was no mention of how – or if – this printer is locked down.

DWS Lab XFAB

This Shrek is the highest resolution 3D printed object I've ever seen.
This Shrek is the highest resolution 3D printed object I’ve ever seen.

You’ve seen the cheapest, now check out the most expensive. It’s the DWS Lab XFAB, an enormous and impressive machine that has incredible resolution, a huge build area, and when you take into account other resin printers, a price approaching insanity.

First, the price: $5000 officially, although I heard rumors of $6500 around the 3D printing tent. No, it’s not for sale yet – they’re still in beta testing. Compare that to the Formlabs Form 1+ at $3300, or the XYZPrinting Nobel at $1500, and you would expect this printer to be incredible. You would be right.

The minimum feature size of the XFAB is 80 microns, and can slice down to 10 microns. Compare that to the 300 micron feature size of the Form 1+ and Nobel, and even on paper, you can tell they really have something here. Looking at the sample prints, they do. These are simply the highest resolution 3D printed objects I’ve ever seen. The quality of the prints compares to the finest resin cast objects, machined plastic, or any other manufacturing process. If you’re looking for a printer for very, very high quality work, this is what you need.

Sharebot Voyager

SharebotAlso on display – but not in the 3D printing booth, for some reason – was the Sharebot Voyager. Unlike all the printers described above, this is a DLP printer; instead of lasers and galvos, the Voyager uses an off-the-shelf 3D DLP projector to harden layers of resin.

Strangely, the Sharebot Voyager was stuck in either the Atmel or the Arduino.cc (the [Massimo] one) booth. The printing area is a bit small – 56x96x100mm, but the resolution – on paper, mind you – goes beyond what the most expensive laser and galvo printers can manage: 50 microns in the X and Y axes, 20 to 100 microns in the Z. Compare that figure to the XFAB’s 80 micron minimum feature size, and you begin to see the genius of using a DLP projector.

The Sharebot Voyager is fully controllable over the web thanks to a 1.5GHz quad core, 1GB RAM computer that I believe is running 32 bit Windows. Yes, the spec sheet said OS: 32 bit Windows.

There were no sample prints, no price, and no expected release date. It is, for all intents and purposes, vaporware. I’ve seen it, I’ve taken pictures of it, but I’ve done that for a lot of products that never made it to market.

The Problem With Resin Printers

Taking a gander over all the resin-based 3D printers, you start to pick up on a few common themes. All the software is proprietary, and there is no open source solution for either moving galvos, lasers, or displaying images on a DLP projector correctly to run a resin-based machine. Yes, you heard it here first: it’s the first time in history Open Source hardware folk are ahead of the Open Source software folk. Honestly, open source resin printer hosts is something that should have been done years ago.

This will change in just a few months. A scary, tattooed little bird told me there will soon be an open source solution to printing in resin by the Detroit Maker Faire. Then, finally, the deluge of resin.